Appspresso를 사용하여 하이브리드앱 개발하기 - 9.iOS 푸시 적용하기
서론
Appspresso (앱스프레소)를 현재 구현되어져 있는 네이티브 앱을 하이브리드 앱으로 구현하기에 있어서 가장 심각하게 고려되는 부분이 바로 푸시지원이였다. 기존에 푸시 서비스를 제공하지 않았더라면 그렇게 큰 문제가 되지 않겠지만 이미 기존에 앱이 푸시 지원을 하고 있기 때문에 하이브리드로 마이그레이션한다고 푸시 서비스를 중단할 수 없기 때문이다. 그런 의미에서 이번 포스팅이 나와 같이 고민하는 개발자에게 좋은 글이 되지 않을까 생각한다. 이 포스팅은 두가지 포스팅으로 연재될 것인 바로 iOS 용 푸시랑 c2dm 용 푸시에 대한 적용 방법이다. 첫번째로 iOS 개발을 하기위한 APN (Apple Push Notification)에 대한 예제이다.
이 포스팅을 참고하는 개발자나 연구원들은 이미 APNS 구축과 Certificates의 개념을 알고 있다고 생각하기에 Push Notification을 하기 위해서 생성해야하는 과정은 생략하려고 한다.
우선 Appspresso에서 푸시 기능을 구현하기 위해서는 PDK(Plugin Development Kit)을 이용해서 Plugin으로 개발을 해야한다. Appspresso를 사용하여 하이브리드앱 개발하기 - 5.PDK(Plugin Development Kit)를 이용하여 네이티브 코드 사용 글을 참조해서 Plugin을 개발하는 방법을 먼저 숙지하면 도움이 될 것 같다.
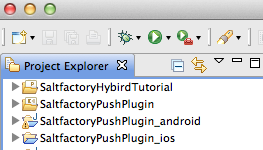
플러그인은 SaltfactoryPushPlugin 이라는 이름으로 만들고 SaltfactoryPushPlugin_ios 모듈과 SaltfactoryPushPlugin_android 모듈 프로젝트를 만든다.
SaltfactoryPushPlugin_ios 모듈 프로젝트를 열어서 SaltfactoryPushPlugin_ios.xcodeprj 파일을 선택하고 오른쪽 마우스를 클릭하면 Xcode 로 프로젝트를 열수 있게 된다. 우리는 푸시 설정을하기 위해서 네이티브 코드를 수정할 것이기 때문이다.
여기서부터는 iOS의 동작을 이해하고 있어야 개발하는데 도움이 될 것인데, 우선 iOS가 처음 앱이 동작할 때 UIApplicationDelegate를 사용하게 된다. 다시 말하면 UIApplication에 관한 동작에 대한 프로토콜(정의)을 UIApplicationDelegate 에 미리 지정한 메소드들(delegate method)를 이용해서 설정을 지정할 수 있다.
그중에서 푸시 서비스를 하기 위해서 디바이스의 고유한 토큰이 필요한데 이 것을 사용하기 위해서 토큰 값을 가져오는 delegate method가
-application:didRegisterForRemoteNotificationsWithDeviceToken:이다. 앱이 실행될 때 이 delegate method로 디바이스 토큰을 가져올 수 있다. 하지만 이것은 UIApplicationDelegate의 delegate method 인데 Appspresso에서 PDK로 만든 plugin_ios 모듈은 우리가 흔히 보는 Xcode로 생성한 UIApplicationDelegate와 다른 형태를 하고 있다. 그래서 Appspresso에서 만들어서 실행되는 클래스에 UIApplicationDelegate 프로토콜을 추가한다.
//
//  net_saltfactory_hybirdtutorial_pushplugin_MyPlugin.h
//  net_saltfactory_hybirdtutorial_pushplugin_MyPlugin
//
//  Copyright 2011 none. All rights reserved.
//

#import <Foundation/Foundation.h>
#import "AxPlugin.h"

@protocol AxContext;
@protocol AxPluginContext;

@interface net_saltfactory_hybirdtutorial_pushplugin_MyPlugin : NSObject<AxPlugin, UIApplicationDelegate>{
@private
    NSObject<AxRuntimeContext> *_runtimeContext;
}

@property (nonatomic,readonly,retain) NSObject<AxRuntimeContext>* runtimeContext;

- (void)activate:(NSObject<AxRuntimeContext>*)runtimeContext;
- (void)deactivate:(NSObject<AxRuntimeContext>*)runtimeContext;
- (void)execute:(NSObject<AxPluginContext>*)context;

 @end
이제 UIApplcationDelegate의 delegate method들을 사용할 수 있게 되었다. 구현부에 가서 디바이스 토큰을 가져오는 delegate method를 구현하자. 다음과 같이 -application:didRegisterForRemoteNotificationsWithDeviceToken: 딜리게이트 메소드가 실행될 때 동작해야할 코드를 작성한다. 나중에 우리는 deviceToken을 UI로 전달할 것이다. 네이티브의 값을 UI로 전달하기 위해서 axplugin.js에서 call by name으로 불러온다는 것을
Appspresso를 사용하여 하이브리드앱 개발하기 - 5.PDK(Plugin Development Kit)를 이용하여 네이티브 코드 사용 에서 같이 테스트 했었다. 나중에 getDeviceToken이라는 이름으로 토큰 값을 가져오기 위해서 NSUserDefaults의 plist에 deviceToken이라는 키로 값을 저장한다. 그리고 NSLog를 사용해서 로깅을 해보자.
#pragma mark - UIApplicationDelegate delegate methods
-(void)application:(UIApplication *)application didRegisterForRemoteNotificationsWithDeviceToken:(NSData *)deviceToken {
    NSString *token = [[deviceToken description] stringByTrimmingCharactersInSet:[NSCharacterSet characterSetWithCharactersInString:@"<>"]];
    token = [token stringByReplacingOccurrencesOfString:@" " withString:@""];

    [[NSUserDefaults standardUserDefaults] setValue:token forKey:@"deviceToken"];

    NSLog(@"device token %@",token);
}
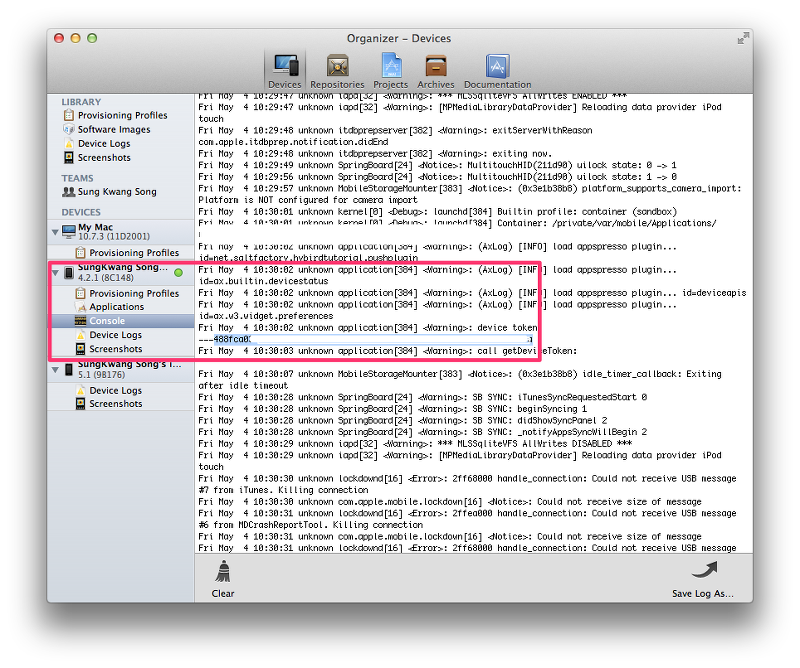
NSLog를 사용해도 Appspresso에서 로그 정보를 볼 수 없다. 물론 ADE (크롬 Appspresso Debug Extension)에서도 볼 수 없다. 하지만 Xcode의 Organizer에서 디바이스 콘솔로 NSLog의 정보를 확인할 수 가 있기 때문이다. 아래 그림은 나중에 앱이 실행될 때 Xcode의 Organizer를 이용해서 위에서 작성한 UIApplicationDelegate 메소드가 동작할 때 NSLog를 출력하게 만든 것을 확인하는 그림이다.
이제 우리가 만든 앱이 실행될 때 APN (Apple Push Notification)을 사용한다고 지정을 해야한다. Appspresso가 아닌 Xcode에서 푸시를 적용하기 위해서는 UIApplicationDelegate의 -application:didFinishLaunchingWithOptions: 딜리게이트 메소드에 푸시를 사용할 거라고 명시하지만, Appspresso가 생성하는 네이티브 코드의 시작은 -activate:runtimeContext: 를 실행시킨다. 그래서 이 메소드 안에 푸시를 사용할 거라고 지정을 한다. Appspresso에서는 AxRuntimeContext를 사용해서 javascript와 통신을 하는 Context이고 어플리케이션을 담당하고 있는데 이 객체에다 UIApplicationDelegete를 적용해서 위임시키고 만약 푸시로 앱이 실행하게 될 때는 getLaunchOptions를 사용해서 UIApplicationLaunchOptionsRemoteNotificationKey로 푸시로 전달된 값을 받아 온다.
- (void)activate:(NSObject<AxRuntimeContext>*)runtimeContext {
    _runtimeContext = [runtimeContext retain];

    [_runtimeContext addApplicationDelegate:self];

    [[UIApplication sharedApplication] setApplicationIconBadgeNumber:0];

    NSDictionary* launchOptions = [_runtimeContext getLaunchOptions];

    NSDictionary *userInfo = [launchOptions objectForKey:UIApplicationLaunchOptionsRemoteNotificationKey];
    if (userInfo != nil) {
        NSLog(@"%@", userInfo);
    }
    [[UIApplication sharedApplication] registerForRemoteNotificationTypes:(UIRemoteNotificationTypeBadge | UIRemoteNotificationTypeSound |UIRemoteNotificationTypeAlert)];
}
이제 UI에서 디바이스 토큰 값을 가져오기 위해서 axplugin.js에 불러올 call by name을 -execute: 메소드에 추가한다.
- (void)execute:(id<AxPluginContext>)context {
    NSString* method = [context getMethod];

    if ([method isEqualToString:@"echo"]) {
        NSString* message = [context getParamAsString:(0)];
        [context sendResult:(message)];
    } else if ([method isEqualToString:@"getDeviceToken"]){
        NSString *deviceToken = [[NSUserDefaults standardUserDefaults] valueForKey:@"deviceToken"];
        NSLog(@"call getDeviceToken: %@", deviceToken);
        [context sendResult:(deviceToken)];
    }
    else {
        [context sendError:(AX_NOT_AVAILABLE_ERR)];
    }
}
그리고 SaltfactoryPushPlugin 프로젝트의 axplugin.js를 열어서 네이티브 코드와 인터페이스에서 통신할 stub 메소드를 추가한다.
/*
 * JavaScript Stub Appspresso Plugin
 *
 * id: net.saltfactory.hybirdtutorial.pushplugin
 * version: 1.0.0
 * feature: <feature id="" category="Custom" />
 */

(function(){
	function echoSync(message) {
		if(!message) {
			throw ax.error(ax.INVALID_VALUES_ERR, 'invalid argument!');
		}
		return this.execSync('echo', [ message||'' ]);
	}

	function echoAsync(callback, errback, message) {
		if(!message) {
			throw ax.error(ax.INVALID_VALUES_ERR, 'invalid argument!');
		}
		return this.execAsync('echo', callback, errback, [ message||'' ]);
	}

	function getDeviceToken(callback, errback){
 		return this.execAsync('getDeviceToken', callback, errback);
 	}

	window.myplugin = ax.plugin('net.saltfactory.hybirdtutorial.pushplugin', {
		'echoSync': echoSync,
		'echoAsync': echoAsync,
		'getDeviceToken' : getDeviceToken
	});
})();
이제 마지막으로 SaltfactoryHybridTutorial 어플리케이션 프로젝트에서 앱이 실행될 때 getDeviceToken stub 메소드를 호출해서 가져오게 app.js를 구현보자.
<!DOCTYPE html>
<html>
<head>
<meta http-equiv="pragma" content="no-cache" />
<meta http-equiv="Content-Type" content="text/html; charset=UTF-8">
<script src="/appspresso/appspresso.js"></script>
<script>
	function errback(err) {
 		alert(err.code + " : " + err.message);
 	}
 	//
 	myplugin.getDeviceToken(function(result) {
 		ax.log(result);

 	}, errback);

	//activate ax.log(), comment out when you release app
	ax.runMode = ax.MODE_DEBUG;
	ax.log("Hello World");
</script>

</head>
<body>
	<h1 id="title">Hello</h1>
	<h3>net.saltfactory.tutorial</h3>
</body>
</html>
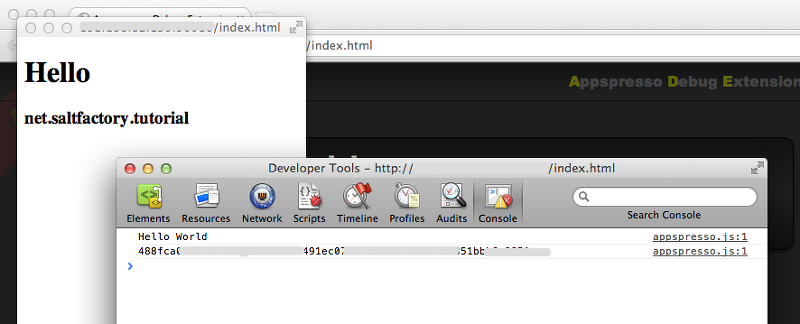
이제 모두 다 되었다. 앱을 빌드하고 디바이스로 설치를 한다. 그리고 앱이 실행될때 위에서 말한 Organizer로 NSLog 정보를 확인한다. 그리고 ADE를 열어서 디바이스토큰을 바로 가져오는지 확인하자.
Appspresso의 on the fly 화면
ADE (구글 크롬 Debugging Extension) 화면
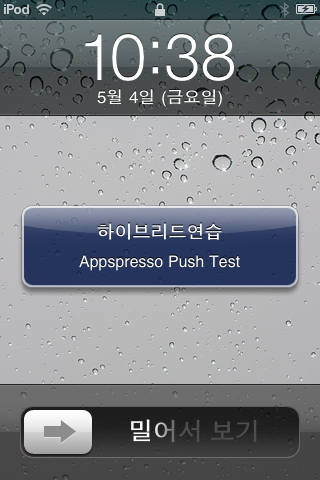
이제 PDK를 이용해서 네이티브코드로 디바이스 토큰을 가져오는 작업을 모두 맞쳤다. 이 디바이스 토큰을 서버에 전송해서 데이터베이스화 시켰다가 푸시를 보낼 때 사용하면 된다. 푸시가 전송이 바로 되는지 확인해보자. 간단하게 푸시를 보내기 위해서 Ruby로 푸시 전송하는 코드를 작성한다. 먼저 ruby gem을 이용해서 apns를 설치한다.
gem install apns
# encoding: UTF-8
require 'rubygems'
require 'apns'

APNS.host = 'gateway.sandbox.push.apple.com'
APNS.pem  = 'development_cert.pem'
APNS.port = 2195

device_token = '488fca...ea' #디바이스토큰
APNS.send_notification(device_token, :alert => 'Appspresso Push Test', :badge => 1, :sound => 'default')
이젠 Appspresso (앱스프레소)로 푸시 서비비스를 적용할 수 있게 되었다. Appspresso는 처음에 생각했던 것 보다 훨씬 더 하이브리드 앱을 만들기에 좋은 환경을 제공한다. 나중에 포스팅을 또 하겠지만 WAC를 사용할 수 있는 마술 같은 방법은 정말 멋진 기능이다. 다음 포스팅은 Android 앱에서 C2DM으로 푸시를 받을 수 있는 방법에 대해서 포스팅을 할 예정이다.
이 포스팅에서는 Certificates와 Apple Push Notification 인증서를 등록하는 내용은 제외 했다. 이 포스팅을 참조하는 개발자나 연구원은 이미 푸시 전송을 구현해본 경험이 있다고 생각해서 생략을 한 것인데, 그 과정이 필요한 댓글이나 피드백 요청이 많으면 그 과정까지 자세하게 첨부하도록 하겠다. (만약, 그 과정을 모르거나 알고 싶은 분은 소셜댓글을 남겨주시거나 @saltfactory 로 멘션을 보내시면 됩니다.)
참고
- https://groups.google.com/forum/#!searchin/appspresso-ko/UIApplicationDelegate/appspresso-ko/-g8-oSWEABg/XMxojB1icf4J
연구원 소개
- 작성자 : 송성광 개발 연구원
- 블로그 : http://blog.saltfactory.net
- 이메일 : saltfactory@gmail.com
- 트위터 : @saltfactory
- 페이스북 : https://facebook.com/salthub
- 연구소 : 하이브레인넷 부설연구소
- 연구실 : 창원대학교 데이터베이스 연구실


