Appspresso를 사용하여 하이브리드앱 개발하기 - 5.PDK(Plugin Development Kit)를 이용하여 네이티브 코드 사용
서론
이번 포스팅은 두가지 관점에서 포스팅을 한다. 하나는 앞에서 사용한 ax.ext.net 대신에 네이티브코드로 원격 데이터를 요청하는 것이고 다른 하나는 Appspresso에서 Native Code를 사용하는 것이다. Hybrid의 최고의 약점은 바로 브라우저에 내장되어 있는 javascript 엔진이다. 사실 그 성능에 대해서는 정확한 벤치마킹이 있어야하지만 보통 네이티브에서 처리하는 것이 webkit의 자바스크립트로 처리하는 것보다 성능이 좋다고 알려져 있다. 이러한 이유로 하이브리드 앱에서 성능이 요구되는 일은 네이티브 프로그램으로 처리하길 원하게 될 것이다. 그래서 Appspresso에서 네이티브 코드를 사용할 수 있게 하는 PDK (Plugin Development Kit)을 어떻게 사용할 수 있는냐는 것을 바탕으로 이전에 포스팅한 예제를 ax.ext.net 플러그인 대신에 네이티브 코드로 URL을 요청을 하는 방법에 대해서 포스팅 한다.
PDK(Plugin Development Kit)
모바일 브라우저가 아닌 네이티브 코드로 프로그램을 실행시키고 싶을 경우가 있다. 네이티브 코드가 가지는 빠른 퍼포먼스와 C 라이브러리를 사용할 수 있기 때문에 하이브리드 앱을 만들 때 네이티브 코드를 재사용하거나 무거운 처리를 Objective-C로 처리하는 경우가 좋을 때도 있기 때문이다. ajax의 cross domain 문제도 NSURLConnection을 이용해서 URL 요청을 할 수 있다. ax.ext.net을 사용할 때 보다 복잡한 과정이 필요하다. 하지만 꼭 URL 요청 문제가 아니라 네이티브 프로그램을 어떻게 사용할 수 있는지 경험할 수 있을거라 예상한다. Appsresso에서는 네이티브코드 iOS에서 사용하는 Objective-C나 Android에 사용하는 Java를 플러그인으로 사용하여 연결하도록 하는데 Appspresso Plugin Development Kit (PDK) 로 만들 수 있다.
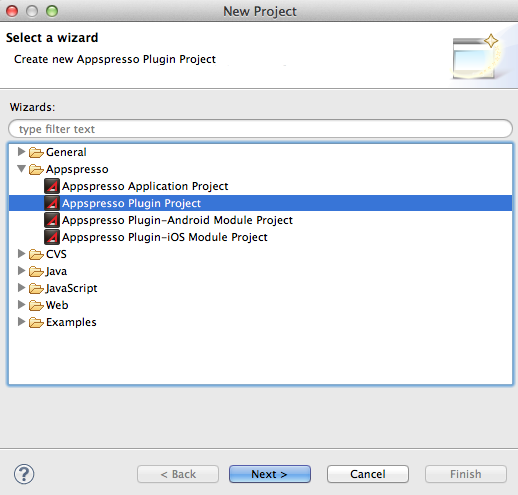
Appspresso의 workspace에 다른 Plugin Project를 생성한다.
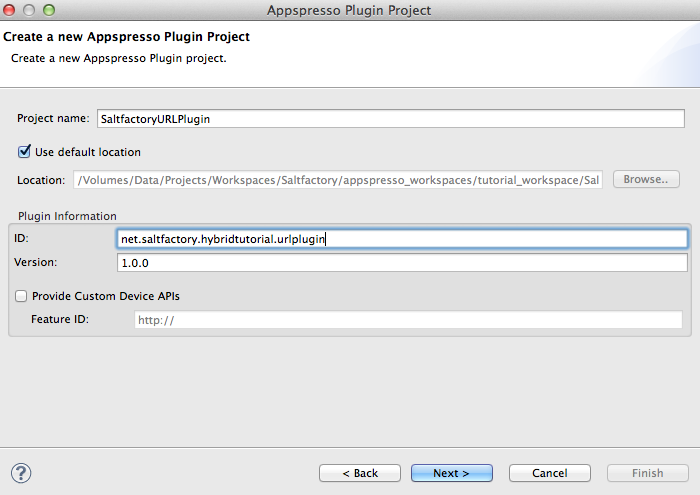
새로운 Plugin 프로젝트를 만들때 Project Name을 입력하고 나중에 plugin의 유일한 식별을 하기 위해서 ID를 지정하고 버전 정보를 입력한다.
다음은 iOS 버전의 네이티브 모듈 plugin을 만들 것인지, Android 네이티브 모듈 plugin을 만들 것인지 선택을 한다. 두가지 모두 선택하면 두가지 모듈 프로젝트가 workspace에 추가된다.
첫번재로 Android 모듈을 설정하는 화면이다. plugin project에서 새로운 module project를 사용하게 되는데 이때 안드로이드 버전의 모듈 프로젝트를 생성한다.
안드로이드 모듈에서 사용될 메인 클래스를 지정한다. 이름은 어떻게 주어지든 상관 없지만 인식의 편리를 위해서 plugin을 만들 때 사용한 ID를 기반으로 메인 클래스 이름을 만들었다. 그리고 Android SDK의 레벨을 지정한다.
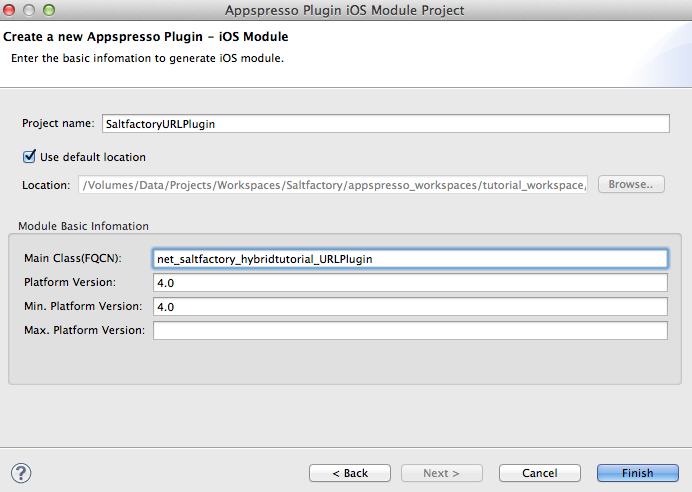
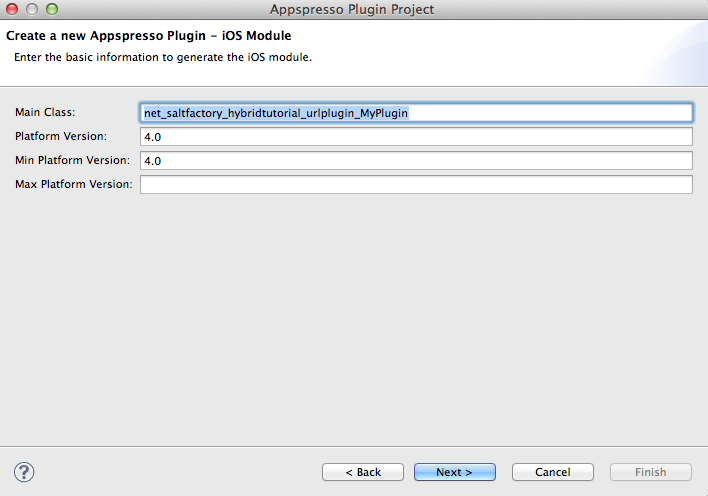
우리는 위에서 Android와 iOS 두가지 모듈 모두를 사용하는 plugin을 만든다고 체크하였기 때문에 이번에는 iOS 모듈을 설정하는 화면이 나타난다.
안드로이드 모듈의 메인클리스와 달리 iOS에서는 네이밍 규칙에 클래스 파일에 .을 사용하기 보다 다음과 같이 사용하기 때문에 다음과 같은 형태로 자동으로 만들어진다.
이렇게 plugin project를 생성하고 각가의 네이티브 서브 모듈들을 설정하면 다음과 같이 workspace에 plugin project와 Android Module Project, iOS Module Project를 생성할 거라는 요약정보를 알려준다.
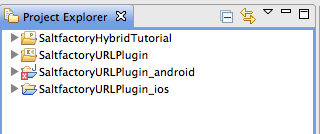
이렇게 plugin project를 생성하는 과정이 끝나면 현재 열려져 있는 workspaces에 다음과 같이 Application Project, Plugin Project, android Module Project, iOS Module Project 총 4가지 프로젝트가 존재하게 된다.
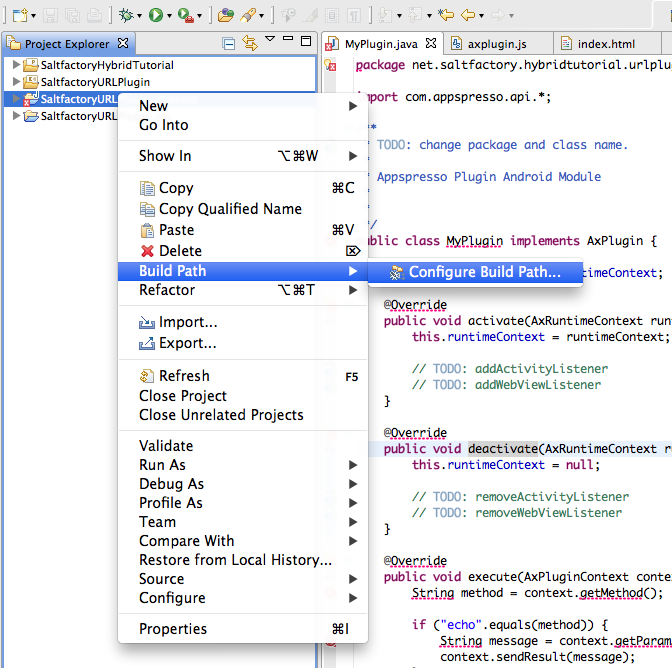
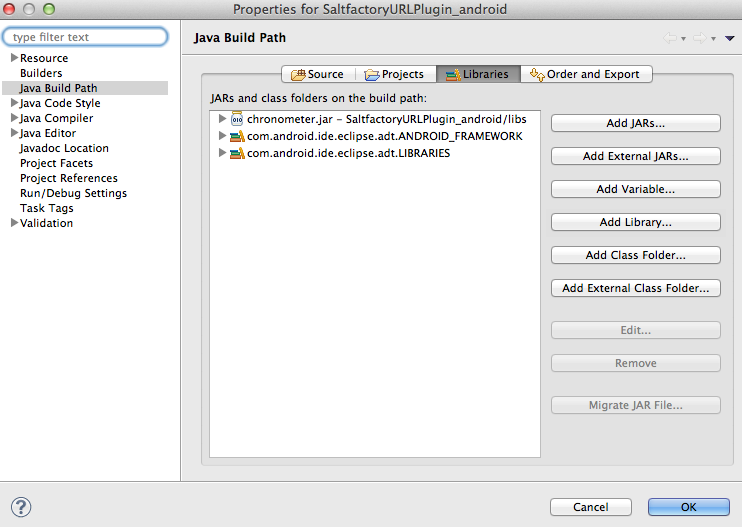
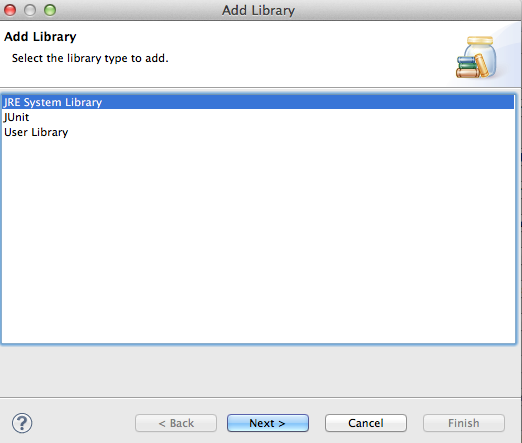
그런데 잘 살펴보면 Android Module Project 에 에러가 발생한 것을 볼 수 있다. 이유는 Java SDK나 JRE가 연결되지 못해서 그런것이기 때문에 Android Module Project를 선택하고 오른쪽 마우스를 클릭해서 build Path > Configure build path를 선택하여 JRE를 연결한다.
이렇게 JRE를 설정해주면 에러가 났던 문제는 해결이 된다.
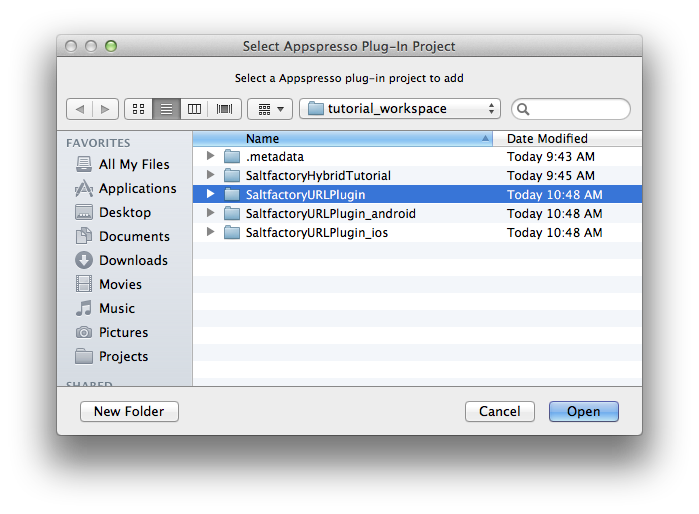
이젠 Application Project에서 어떻게하면 PDK로 만든 사용자가 새롭게 만든 plugin을 사용할 수 있느냐는 것이다. Application Project에서 project.xml 파일을 연다. 그리고 common 이라는 탭에서 plugin을 관리하는 패널이 나타나는데, 여기서 Add Plugin Project 버턴을 선택하여 방금 생성한 plugin project의 폴더를 지정한다.
이제 plugin project를 만들고 Application Project에서 사용자가 생성한 plugin을 사용할 모든 준비를 마쳤다. 이젠 코드를 실행시켜보자. 아마 샘플로 만들어진 코드는 message를 echo하는 소스코드가 샘플로 만들어질 것이다. 아래 코드는 plugin project에 들어있는 axplugin.js 의 파일이다. 여기서 feature id에 plugin을 만들었을 때 사용하던 id를 입력시킨다. Appspresso는 WAC 를 사용하여 디바이스의 API에 접근을 할 수 있는데 echoSync와 echoAsync에 사용하는 this.execSync와 this.execAsync를 네이티브 코드로 call by name 으로 context를 호출하고 데이터를 처리하는 과정을 거친다.
/*
 * JavaScript Stub Appspresso Plugin
 *
 * id: net.saltfactory.hybridtutorial.urlplugin
 * version: 1.0.0
 * feature: <feature id="net.saltfactory.hybridtutorial.urlplugin" category="Custom" />
 */

(function(){
	function echoSync(message) {
		if(!message) {
			throw ax.error(ax.INVALID_VALUES_ERR, 'invalid argument!');
		}
		return this.execSync('echo', [ message||'' ]);
	}

	function echoAsync(callback, errback, message) {
		if(!message) {
			throw ax.error(ax.INVALID_VALUES_ERR, 'invalid argument!');
		}
		return this.execAsync('echo', callback, errback, [ message||'' ]);
	}

	window.myplugin = ax.plugin('net.saltfactory.hybridtutorial.urlplugin', {
		'echoSync': echoSync,
		'echoAsync': echoAsync
	});
})();
아래 파일은 axplugin.js에서 execSync나 execAsync로 호출해서 실제 네이티브 코드인 Objective-C 안에서 처리하는 소스 코드인다. -execute: 메소드를 호출하게 되는데 이때 execSyc나 execAysnc에서 요청한 context에서 메소드 이름을 가지고 처리를 한 후에 다시 context의 -sendResult:나 -sendError:를 사용하여 axplugin.js에 정의된 callback 메소드에게 결과를 메세지로 보내게 된다.
//
//  net_saltfactory_hybridtutorial_urlplugin_MyPlugin.m
//
//  Copyright 2011 none. All rights reserved.
//

#import "AxRuntimeContext.h"
#import "AxPluginContext.h"
#import "AxError.h"
#import "net_saltfactory_hybridtutorial_urlplugin_MyPlugin.h"


@implementation net_saltfactory_hybridtutorial_urlplugin_MyPlugin

@synthesize runtimeContext = _runtimeContext;

- (void)activate:(NSObject<AxRuntimeContext>*)runtimeContext {
    _runtimeContext = [runtimeContext retain];
}

- (void)deactivate:(NSObject<AxRuntimeContext>*)runtimeContext {
    [_runtimeContext release];
    _runtimeContext = nil;
}


- (void)execute:(id<AxPluginContext>)context {
    NSString* method = [context getMethod];

    if ([method isEqualToString:@"echo"]) {
        NSString* message = [context getParamAsString:(0)];
        [context sendResult:(message)];
    }
    else {
        [context sendError:(AX_NOT_AVAILABLE_ERR)];
    }
}

@end
아래는 Android module project의 net.saltfactory.hybridtutorial.urlplugin.MyPlugin 클래스이고 동작 방법은 iOS의 동작 방법과 동일하거 call by name으로 처리하고 처리결과를 context에 다시 message를 보내는 방법이다.
package net.saltfactory.hybridtutorial.urlplugin;

import com.appspresso.api.*;

/**
 * TODO: change package and class name.
 *
 * Appspresso Plugin Android Module
 *
 *
 */
public class MyPlugin implements AxPlugin {

	private AxRuntimeContext runtimeContext;

	@Override
	public void activate(AxRuntimeContext runtimeContext) {
		this.runtimeContext = runtimeContext;

		// TODO: addActivityListener
		// TODO: addWebViewListener
	}

	@Override
	public void deactivate(AxRuntimeContext runtimeContext) {
		this.runtimeContext = null;

		// TODO: removeActivityListener
		// TODO: removeWebViewListener
	}

	@Override
	public void execute(AxPluginContext context) {
		String method = context.getMethod();

		if ("echo".equals(method)) {
			String message = context.getParamAsString(0, null);
			context.sendResult(message);
		}
		else {
			context.sendError(AxError.NOT_AVAILABLE_ERR);
		}
	}

}
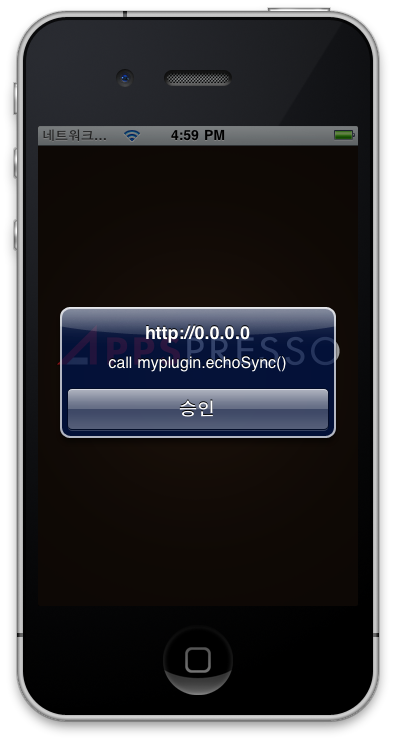
이렇게 네이티브 코드로 짜여진 코드는 Application Project에서 다음과 같이 코드로 실행할 수 있다. 기존의 내장 plugin을 사용했던 ax.ext.net.get 코드를 주석으로 처리하고 errorback과 echoAsync(), echoSync()를 정의하여 사용할 수 있다. 테스트를 위해서 echoSync()를 호출해보았다.
<!DOCTYPE html>
<html>
	<head>
		<meta http-equiv="pragma" content="no-cache" />
		<meta http-equiv="Content-Type" content="text/html; charset=UTF-8">

		<script src="/appspresso/appspresso.js"></script>
		<script src="locale-example.js"></script>
		<script>
			//activate ax.log(), comment out when you release app
			ax.runMode = ax.MODE_DEBUG;
			ax.log("Hello World");

/* 			ax.ext.net.get('http://search.twitter.com/search.json?q=saltfactory',
					function(response){
						var json = JSON.parse(response.data);
						var text = json.results[0].text;
						ax.log(text);
						document.getElementById("text").innerHTML = text;
					},
					function(erorr){
						ax.log(error);
					},
					'utf-8');  */
					var url = 'http://search.twitter.com/search.json?q=appspresso';

					function errback(err) {
				        alert(err.code + " : " + err.message);
				    }

				    function echoAsync() {
				        myplugin.echoAsync(
				            function(message) {
				                alert(message);
				            }, errback, "call myplugin.echoAsync()");
				    }

				    function echoSync() {

				        var message = myplugin.echoSync("call myplugin.echoSync()");
				        alert(message);
				    }

				    echoSync();

 </script>
		<style type="text/css">
			#text {
				color:blue;
			}
		</style>
	</head>
	<body>
		<h1 id="title"></h1>
		<h3>net.saltfactory.hybridtutorial</h3>
		<div id="text"></div>
		<!--
		/platforms			  ... Metafile, icon, application name FOR PLATFORM(Android, iOS, ...)
		/src
		   /appspresso
		      /appspresso.js  ... AUTO-GENERATED FILE.
		   /locales           ... Directory for Localized content.
		                          SEE ALSO, http://www.w3.org/TR/widgets/#folder-based-localization
		      /en
		         /locale.js
		      /ko
		      /...
		   /index.html        ... this page
		   /locale-example.js ... sample javascript
		   /widget-icon.png   ... icon for widget.
		                          IF YOU WANT TO CHANGE ICON FOR ANDROID or IOS,
		                          YOU CAN DO IT in 'platforms' DIRECTORY.
		/project.xml          ... application configuration file
		 -->
	</body>
</html>
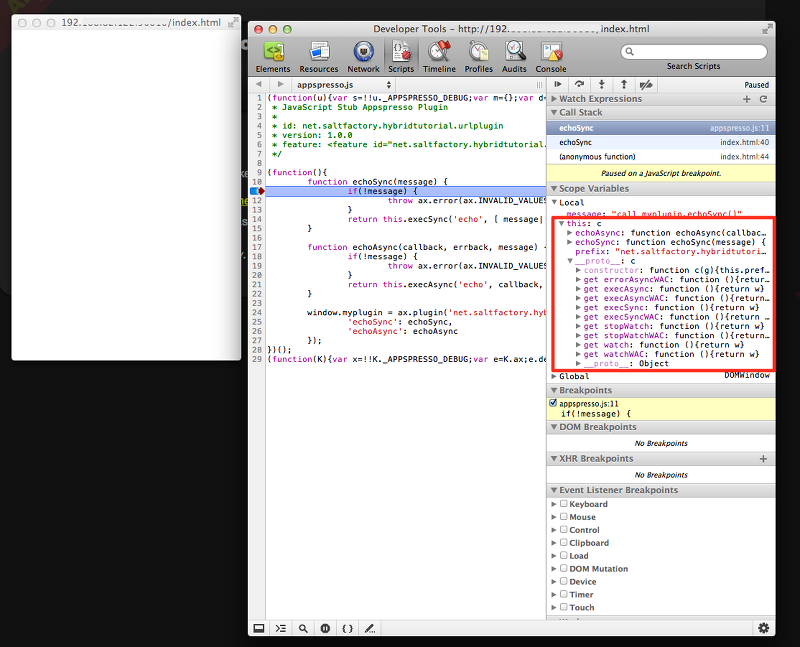
우리는 좀더 wac에 대한 접근 메소드가 궁금할 수 있는데 다행히도 Appspresso 1.1 버전부터는 ADE를 지원한다. ADE에 관한 내용은 이전 포스팅을 참조하면 된다. 여기서 우리는 echoSync 메소드에 breakpoint를 걸어서 확인할 것이다. 이렇게 breakpoint를 echoSync 내부의 this를 살펴보면 javascript 객체에 prototype으로 연결이 되어 있는데 보면 execAsync, execAsyncWAC, execSync, execSyncWAC, watch, … 등 내부 메소드를 확인할 수가 있다.
PDK를 이용하여 네이티브 코드로 원격 데이터 요청하기
이제 우리는 네이티브 코드를 수정해서 사용해보자. 이젠 포스트에서 ax.ext.net.get을 이용해서 원격 데이터를 가져왔는데, 이번에는 네이티브 코드로 원격데이터를 가져오도록 해보자. 우리는 이 작업을 위해서 axplugin.js에 메소드하나를 추가한다. Application Project와 Native Module 간에 연결할 수 있는 인터페이스 메소드이다. 메소드 이름은 requestURL이고 ax.plugin에 requestURL이란 key에 requestURL 메소드를 지정한다.
/*
 * JavaScript Stub Appspresso Plugin
 *
 * id: net.saltfactory.hybridtutorial.urlplugin
 * version: 1.0.0
 * feature: <feature id="net.saltfactory.hybridtutorial.urlplugin" category="Custom" />
 */

(function(){
	function echoSync(message) {
		if(!message) {
			throw ax.error(ax.INVALID_VALUES_ERR, 'invalid argument!');
		}
		return this.execSync('echo', [ message||'' ]);
	}

	function echoAsync(callback, errback, message) {
		if(!message) {
			throw ax.error(ax.INVALID_VALUES_ERR, 'invalid argument!');
		}
		return this.execAsync('echo', callback, errback, [ message||'' ]);
	}

	function requestURL(callback, errback, urlString){
 		if(!urlString) {
 			throw ax.error(ax.INVALID_VALUES_ERR, 'invalid argument!');
 		}
 		 return this.execAsync('requestURL', callback, errback, [urlString||'' ]);
 	}

	window.myplugin = ax.plugin('net.saltfactory.hybridtutorial.urlplugin', {
		'echoSync': echoSync,
		'echoAsync': echoAsync,
		'requestURL': requestURL

	});
})();
이제 iOS module project에서 execute 메소드에 다음 코드를 추가한다. 소스코드의 간결함을 위해서 github에서 NSURLConnection+Block 소스코드를 활용하였다. 이렇게 네이티브 코드에서 기존의 라이브러리를 추가하여 바로 사용을 할 수 있다. ( https://github.com/rickerbh/NSURLConnection-Blocks ) . axplugin.js에서 context로 네이티브로 요청이 들어올때 메소드 이름이 ‘requestURL’ 일경우 동작하게 하는 메소드이다. 그리고 원격 데이터를 요청하고 처리한 NSData를 다시 message로 만들어서 context에 결과로 메세지를 보낸다.
//
//  net_saltfactory_hybridtutorial_urlplugin_MyPlugin.m
//
//  Copyright 2011 none. All rights reserved.
//

#import "AxRuntimeContext.h"
#import "AxPluginContext.h"
#import "AxError.h"
#import "net_saltfactory_hybridtutorial_urlplugin_MyPlugin.h"
#import "NSURLConnection+Blocks.h"

@implementation net_saltfactory_hybridtutorial_urlplugin_MyPlugin

@synthesize runtimeContext = _runtimeContext;

- (void)activate:(NSObject<AxRuntimeContext>*)runtimeContext {
    _runtimeContext = [runtimeContext retain];
}

- (void)deactivate:(NSObject<AxRuntimeContext>*)runtimeContext {
    [_runtimeContext release];
    _runtimeContext = nil;
}

- (void)execute:(id<AxPluginContext>)context {
    NSString* method = [context getMethod];

    if ([method isEqualToString:@"echo"]) {
        NSString* message = [context getParamAsString:(0)];
        [context sendResult:(message)];
    } else if ([[context getMethod] isEqualToString:@"requestURL"]){
        NSString* urlString = [context getParamAsString:(0)];
        NSURL *url = [NSURL URLWithString:urlString];
        NSMutableURLRequest *request = [NSMutableURLRequest requestWithURL:url];
        [NSURLConnection asyncRequest:request
                              success:^(NSData *data, NSURLResponse *response){
                                  NSString *responseString = [[NSString alloc] initWithData:data encoding:NSUTF8StringEncoding];

                                  [context sendResult:responseString];
                              }
                              failure:^(NSData *data, NSError *error) {
                                  [context sendResult:[error localizedDescription]];
                              }];


    }
    else {
        [context sendError:(AX_NOT_AVAILABLE_ERR)];
    }
}

@end
마지막으로 이렇게 plugin project와 iOS module project에 수정된 코드를 application project에서 호출하여 사용해야한다. ajxplugin.js에서 myplugin이라는 객체로 plugin을 사용할 수 있는 ax.plugin을 설정하였고, 우리가 만든 requestURL을 호출하였다. 그리고 네티티브 코드가 실행되고 난 다음 callback으로 넘어온 결과를 json 파싱하여 text라는 div 엘리먼트 안에 text를 집어 넣게 된다.
<!DOCTYPE html>
<html>
	<head>
		<meta http-equiv="pragma" content="no-cache" />
		<meta http-equiv="Content-Type" content="text/html; charset=UTF-8">

		<script src="/appspresso/appspresso.js"></script>
		<script src="locale-example.js"></script>
		<script>
			//activate ax.log(), comment out when you release app
			ax.runMode = ax.MODE_DEBUG;
			ax.log("Hello World");

/* 			ax.ext.net.get('http://search.twitter.com/search.json?q=saltfactory',
					function(response){
						var json = JSON.parse(response.data);
						var text = json.results[0].text;
						ax.log(text);
						document.getElementById("text").innerHTML = text;
					},
					function(erorr){
						ax.log(error);
					},
					'utf-8');  */
					var url = 'http://search.twitter.com/search.json?q=appspresso';

					function errback(err) {
				        alert(err.code + " : " + err.message);
				    }

				    function echoAsync() {
				        myplugin.echoAsync(
				            function(message) {
				                alert(message);
				            }, errback, "call myplugin.echoAsync()");
				    }

				    function echoSync() {

				        var message = myplugin.echoSync("call myplugin.echoSync()");
				        alert(message);
				    }

				    myplugin.requestURL(function(result){
 							var json = JSON.parse(result);
 							var text = json.results[0].text;
 							ax.log(text);
 							document.getElementById("text").innerHTML = text;
 				    }, errback, url);
		</script>
		<style type="text/css">
			#text {
				color:blue;
			}
		</style>
	</head>
	<body>
		<h1 id="title"></h1>
		<h3>net.saltfactory.hybridtutorial</h3>
		<div id="text"></div>
		<!--
		/platforms			  ... Metafile, icon, application name FOR PLATFORM(Android, iOS, ...)
		/src
		   /appspresso
		      /appspresso.js  ... AUTO-GENERATED FILE.
		   /locales           ... Directory for Localized content.
		                          SEE ALSO, http://www.w3.org/TR/widgets/#folder-based-localization
		      /en
		         /locale.js
		      /ko
		      /...
		   /index.html        ... this page
		   /locale-example.js ... sample javascript
		   /widget-icon.png   ... icon for widget.
		                          IF YOU WANT TO CHANGE ICON FOR ANDROID or IOS,
		                          YOU CAN DO IT in 'platforms' DIRECTORY.
		/project.xml          ... application configuration file
		 -->
	</body>
</html>
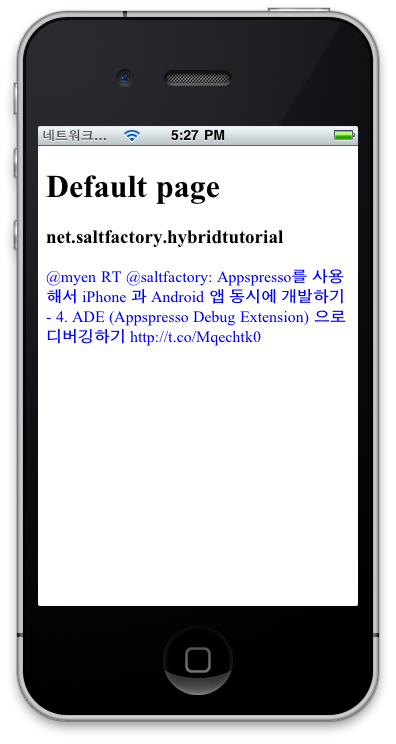
빌드해서 실행하면 다음과 같이 실행이 완료된다. ax.ext.net.get 내장 모듈과 사용할 때와 동일하게 네이티브 코드로 자신만의 plugin을 PDK로 만들어서 ax.plugin으로 연결하여 사용하여 얻은 결과이다.
결론
이 포스팅은 이해를 돕기 위해서 원격의 데이터를 요청하는 예제를 선택하였다. 그리고 네이티브 코드를 사요할 경우 기존의 외부 라이브러리를 사용할 수 있는것을 보여주기 위해서 NSURLConection+Block 을 사용하였다. 하지만 이렇게 간단한 URL요청은 ax.ext.net으로도 충분히 사용하는데 문제가 없다. 포스팅의 크기와 본문의 길이 때문에 예제는 iOS 버전만 남겼는데 Android 네이티브 코드를 사용하는 방법도 동일하다. (시간이 나는대로 다른 포스트로 추가하도록 하겠다.)성능상 네이티브가 꼭 필요한 경우에 이렇게 PDK를 이용하여 네이티브코드를 사용할 수 있다는 것을 설명하기 위해서 간단한 예제 코드를 만들었다. 이제 우리는 하이브리드 앱을 만들기 위해서 필요한 기술 중에서 cross domain으로부터 원격 데이터를 가져오는 방법에 대해서 웹 프로그램과 네이티브 프로그램을 처리하는 방법을 모두 살펴보았다. 그리고 ADE를 사용해서 javascript 코드와 HTML, CSS 코드를 디버깅하는 방법 또한 살펴보았다. 다음 포스팅은 UI Framework 를 적용하는 방법에 대해서 포스팅할 예정이다.
연구원 소개
- 작성자 : 송성광 개발 연구원
- 블로그 : http://blog.saltfactory.net
- 이메일 : saltfactory@gmail.com
- 트위터 : @saltfactory
- 페이스북 : https://facebook.com/salthub
- 연구소 : 하이브레인넷 부설연구소
- 연구실 : 창원대학교 데이터베이스 연구실
