PhoneGap Android 플러그인 개발
서론
우리는 저번 포스팅에서 PhoneGap iOS 플러그인 개발을 하는 방법을 살펴보았다. PhoneGap에서 웹 자원과 네이티브 자원의 상호 호출을 하기 위해서는 반드시 Plugins가 필요하기 때문에 PhoneGap Plugins 개발은 하이브리드 앱에서 필수로 알아야하는 항목이다. 저번 포스팅에 이어서 이번에는 PhoneGap으로 Android 프로젝트에서 사용할 수 있는 PhoneGap Android 플러그인을 개발하는 방법을 알아보기로 한다.
PhoneGap Plugins 프로젝트에 android 플랫폼 추가
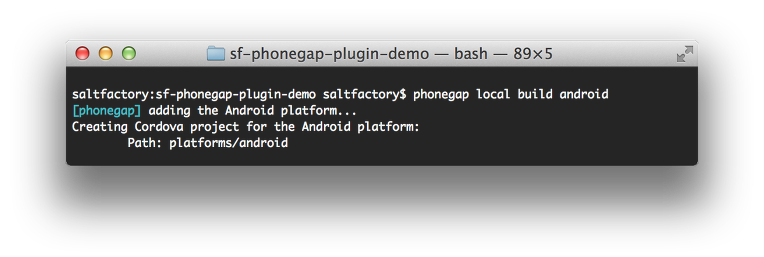
우리는 저번 포스팅(http://blog.saltfactory.net/235)에서 PhoneGap Plugins 프로젝트를 sf-phonegap-plugin-demo 라는 이름으로 생성을 했었다. ios 용 plugins을 만들 때 가장 먼저 PhoneGap 의 iOS 플랫폼을 추가한 것과 동일하게 android 플랫폼을 추가하기 위해서 build를 먼저 시행한다.
phonegap local build android
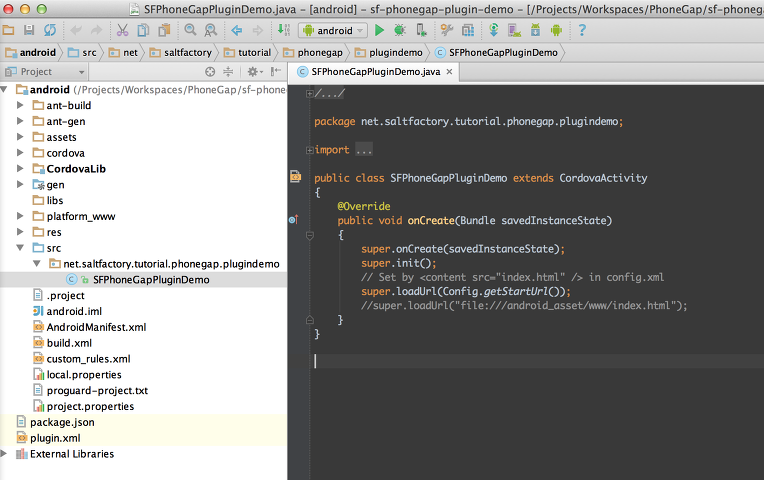
Android Studio 를 이용해서 Android 프로젝트를 만들고 PhoneGap Plugins 프로젝트를 import 한다.
PhoneGap Android 플러그인을 개발하기 위해서는 Android IDE가 필요하다. 우리는 Android Studio를 이용하기로 한다. eclipse 기반으로 import 진행해도 되지만 Android에서고 공식적으로 Android Studio를 배포하고 있기 때문에 Android Studio로 진행하기로 한다.
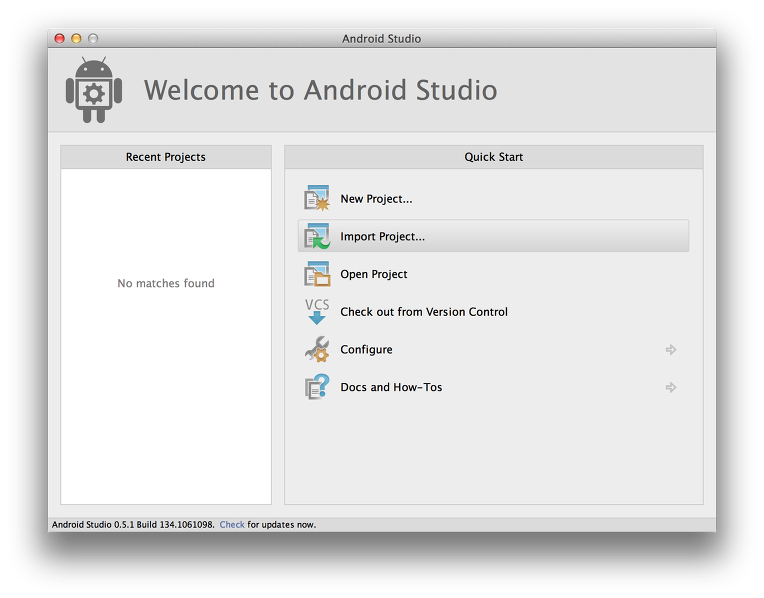
1) Android Studio를 실행
2) PhoneGap Plugins 프로젝트 디렉토리를 import
우리는 PhoneGap Plugins 프로젝트를 sf-phonegap-plugin-demo 라는 이름으로 디렉토리를 만들었는데 이 디렉토리를 import 한다.
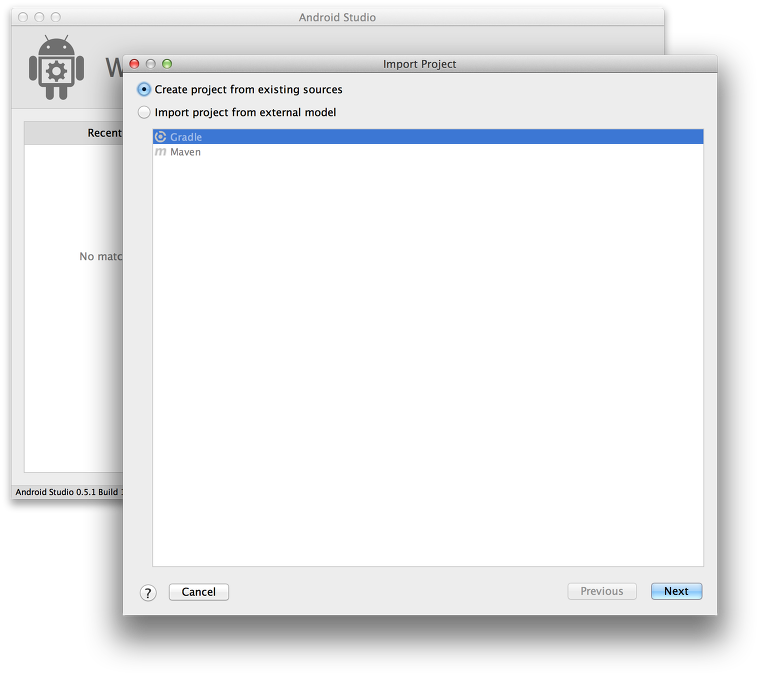
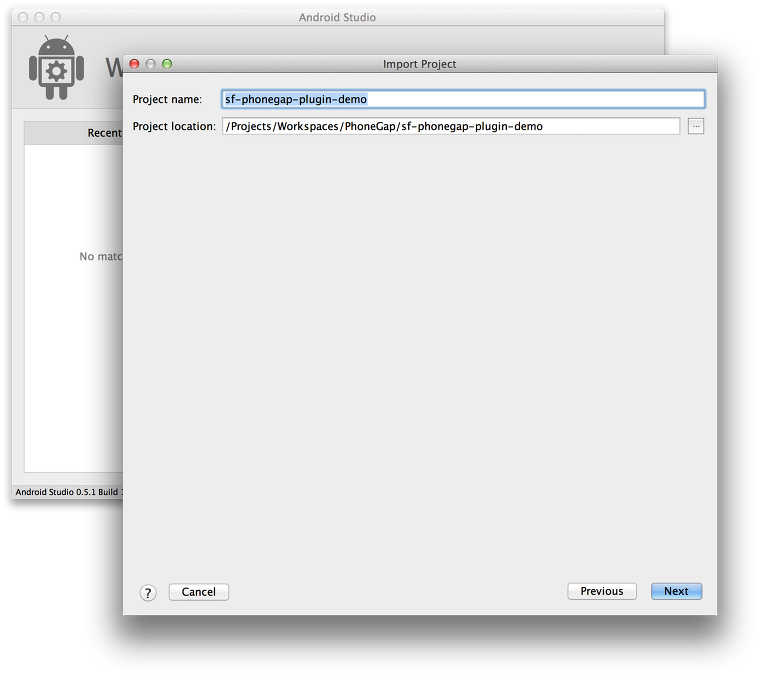
3) PhoneGap Plugins 프로젝트의 소스 import
PhoneGap Plugins 디렉토리를 import하면 Android Studio가 새로운 프로젝트를 만들고 존재하는 소스파일을 import 할것을 물어본다. 존재하는 소스를 import 한다. Android Studio 프로젝트 이름은 원하는 이름으로 만들어도 되지만 편의상 PhoneGap Plugins 디렉토리와 동일한 이름으로 만든다.
4) PhoneGap Plugins 안의 패키지 import
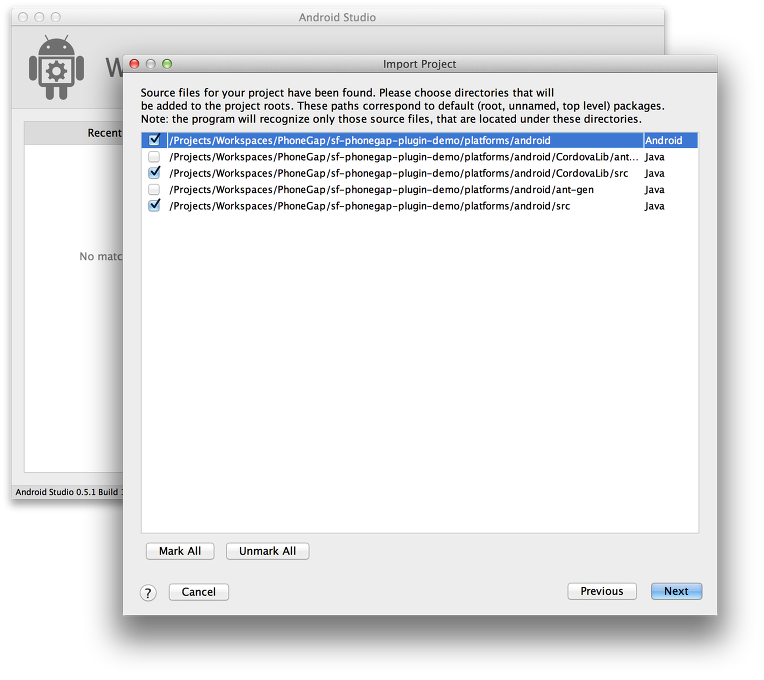
프로젝트를 생성하면 Android Studio는 하위 디렉토리를 검사해서 Android 프로젝트에 필요한 패키지들을 찾아낸다. 이 때 주의해야할 점은 ant 디렉토리 밑에 자원들은 import하지 않는다. 만약 모두 import하게 되면 Android Studio 프로젝트를 모두 만들고 나서 컴파일할 때 Class가 중복된다고 나오기 때문이다. 다음과 같이 src와 gen 디렉토리들만 import한다.
5) PhoneGap Plugins의 라이브러리 import
다음은 PhoneGap Plugins 프로젝트에서에 android 플랫폼을 추가하기 위해서 생성된 라이브러리를 추가하는데 역시 빌드가 완료된 라이브러리는 추가하지 않고 classes 만 추가한다.
6) PhoneGap Plugins 프로젝트의 모듈 import
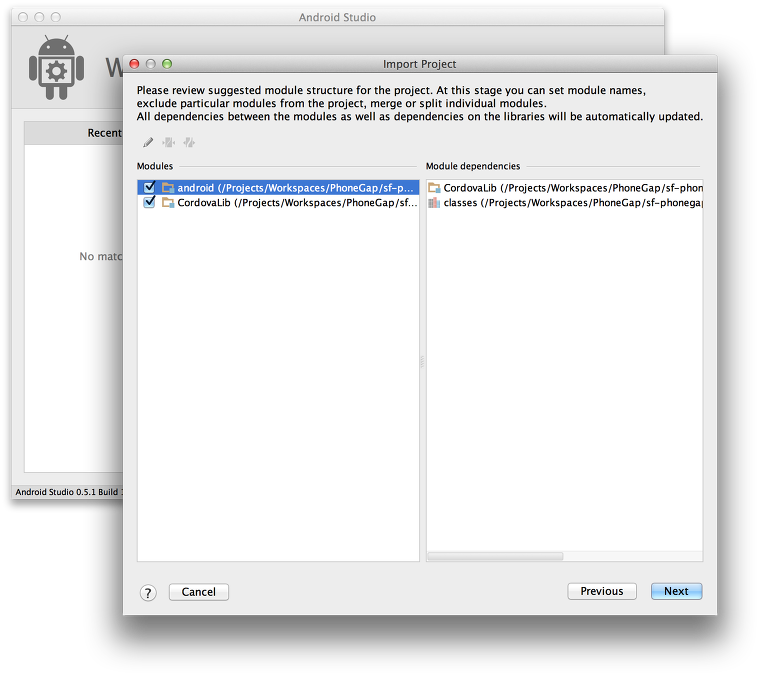
다음은 PhoneGap Plugins 프로젝트의 모듈을 추가하는 화면이 나타나는데 PhoneGap 프로젝트에서 Android 플랫폼 작업을 할 때는 PhoneGap 프로젝트의 모듈과 PhoneGap 코어 모듈인 CordovaLib 모듈을 추가한다.
7) Android SDK 추가
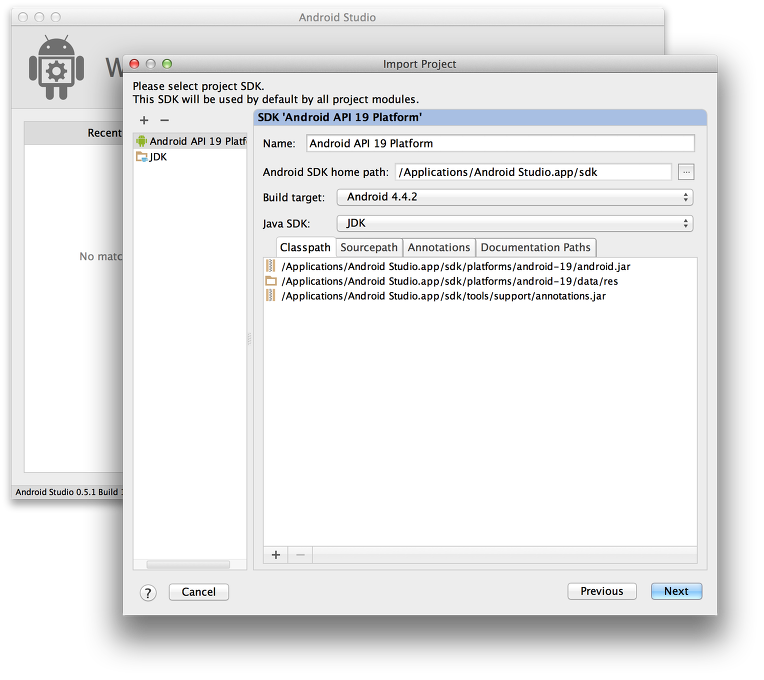
마지막으로 PhoneGap Android Plugins를 개발하기 위해서 Android SDK를 임포트하는데 PC에 설치되어 있거나 Android Studio에 built-in 되어 있는 Android SDK를 선택한다.
8) PhoneGap Plugins 프로젝트의 AndroidManifest.xml 설정
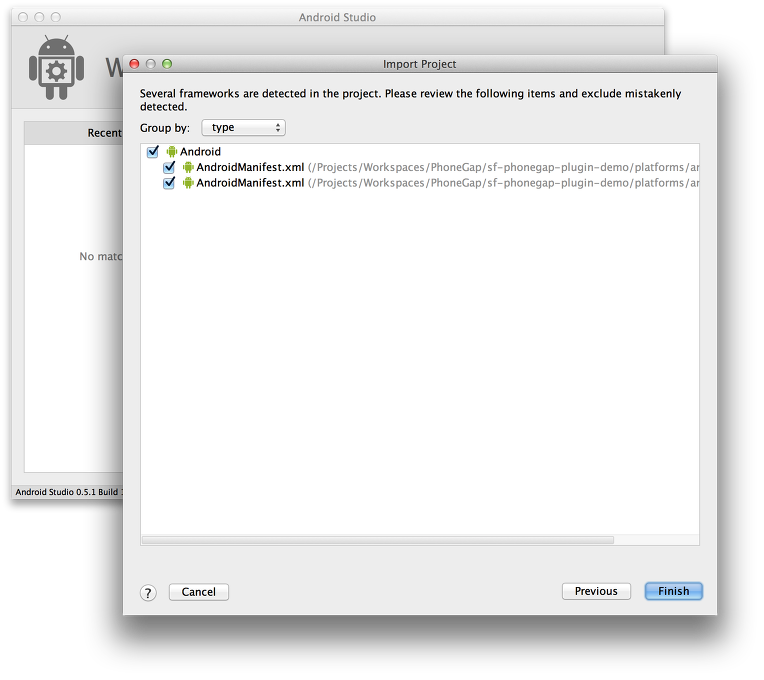
이젠 모든 설정이 끝났다. Android Studio가 Android 프로젝트를 import 하였기 때문에 Android 프로젝트가 가진 AndroidManifest.xml을 찾아서 마지막으로 설정을 하게 한다.
Android Studio는 gradle 빌드 시스템을 사용하지만 위와 같이 PhoneGap의 프로젝트를 import 할 때는 gradle을 사용하지 않는다. gradle로 migration하는 방법은 나중에 따로 포스팅을 할 예정이다. 모든 설정이 마치면 PhoneGap Android Plugins를 개발할 수 있는 Android 프로젝트가 만들어지게 된다.
JavaScript 파일 공동 사용
우리는 iOS에서 JavaScript와 iOS의 네이티브 코드와 연결하기 위해서 JavaScript 인터페이스를 ./js/sf_phonegap_plugin_demo_echo.js 파일로 만들었다. Android 코드와 연결하기 위해서 이 JavaScript를 그대로 사용하면 된다. PhoneGap의 구조가 그러하다. 동일한 웹 코드로 다양한 멀티플랫폼 자원에 접근 가능하게 설계했기 때문이다. 그래서 JavaScript의 코드는 변환 사항없이 JavaScript가 호출하는 Android 코드만 추가하면 된다.
//
//  sf_phonegap_plugin_echo.js
//
//  Created by SungKwang Song on 3/12/14.
//
//


function SFPluginEcho() {}
SFPluginEcho.prototype.echo = function(message) {

  cordova.exec(null, null, "SFPluginEcho", "echo", [message]);
};


SFPluginEcho.prototype.getMessage = function(){
  var callbackSuccess = function(result){
    alert(result.name);
  };

  var callbackFail = function(error){
    alert(error);
  };

  cordova.exec(callbackSuccess, callbackFail, "SFPluginEcho", "getMessage", []);

}

SFPluginEcho.prototype.runJavaScriptFunction = function(functionName){
  var callbackFail = function(error){
    alert(error);
  };

  cordova.exec(null, callbackFail, "SFPluginEcho", "runJavasScriptFunction", [functionName]);

}

// function print_message(result){
//   alert(result.name);
// }

module.exports = new SFPluginEcho();
우리는 위 JavaScript를 다시한번 이해하기로 한다. PhoneGap 프로젝트에서 SFPluginEcho 라는 Custom Plugins을 설치하고 난 다음에 우리는 SFPluginEcho로 네이티브 자원에 접근할 수 있는 인스턴스를 사용할 수 있는데 예제에서는 세가지 메소드를 가지고 있다.
1) echo
네이티브코드 SFPluginEcho 서비스의 이름이 echo인 액션을 호출한다.
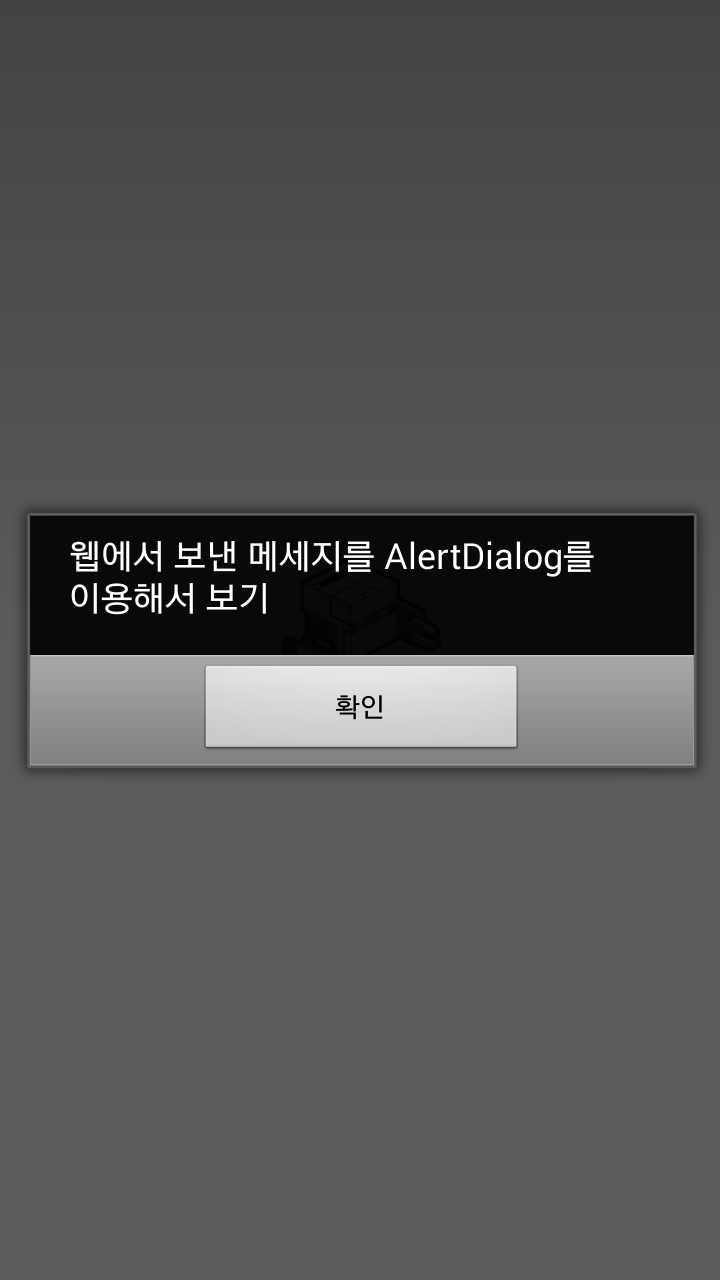
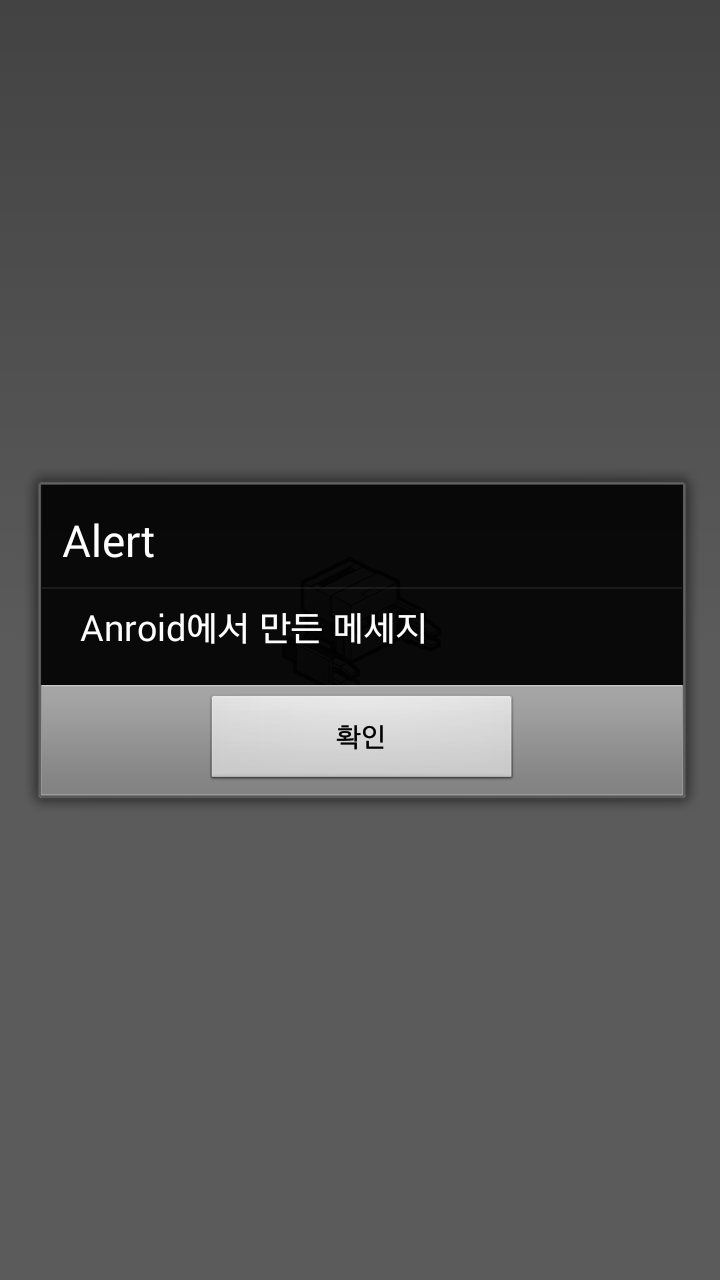
예제에서는 JavaScript에서 만든 message를 네이티브 코드로 넘겨줘서 네이티브 코드의 UI 자원인 AlertDialog로 메세지를 출력한다.
2) getMessage
네이티브코드 SFPluginEcho 서비스의 이름이 getMessage인 액션을 호출한다.
예제에서는 Java에서 만든 JSONObject를 JavaScript로 넘겨서 JavaScript에서 alert()`로 메세지를 출력한다.
3) runJavaScriptFunction
네이티브코드 SFPluginEcho 서비스의 이름이 rungJavaScriptFunction인 액션을 호출한다.
예제에서는 JavaScript에서 함수이름을 네이티브 코드로 넘겨줘서, Java에서 만든 JSONObject를 JavaScript의 함수로 넘겨서 alert()로 출력한다.
PhoneGap Plugins을 만들기 위해서 CordovaPlugin을 상속 받은 클래스 생성
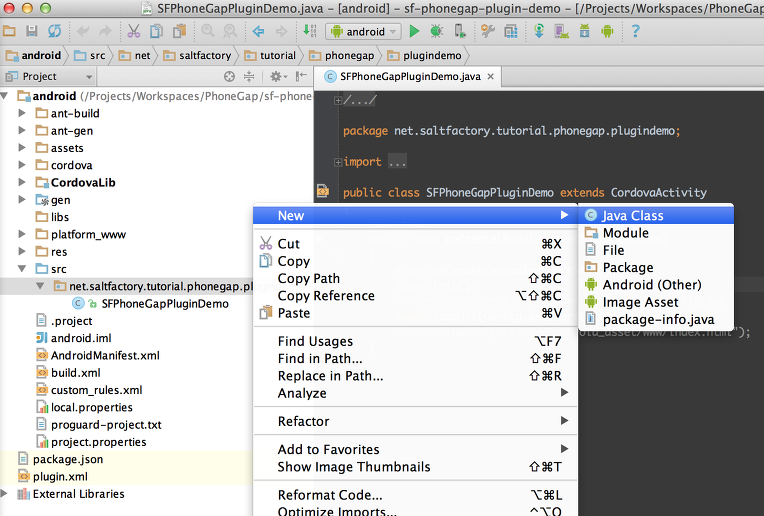
이전 포스트에서 iOS 플러그인을 만들기 위해서 CDVPlugin.h를 import 하여 상속받아서 만든것과 동일하게 Android 용 Plugins을 개발하기 위해서는 org.apache.cordova.CordovaPlugin을 상속받아서 클래스를 생성한다. 이름은 iOS 플러그인을 만들 때와 동일하게 SFPluginEcho로 만든다.
CordovaPlugin을 상속받은 SFPluginEcho는 PhoneGap의 Android Plugins을 만들 수 있는 메소드들을 사용할 수 있게 된다. SFPluginEcho.java 파일을 열어서 다음과 같이 수정한다. iOS용 Plugins을 만들때와 마찬가지로 JavaScript에서 네이티브코드에 접근하기 위해서는 서비스이름(클래스이름)과 action이름(메소드이름)으로 접근하기 때문에 ACTION 이름을 다음과 같이 정해주고 각각 해당하는 메소드를 호출할 수 있도록 한다. JavaScript에서 action 이름을 호출할 때는 echo, getMessage, runJavaScriptFunction으로 접근할 것이기 때문에 이에 해당하는 conditions을 지정하였다.
iOS에서 네이티브 메소드를 구현하고 난 다음에 CDVPluginResult를 이용해서 JavaScript로 CallBack을 호출하였는데 Android에서도 동일하게 PluginResult를 이용해서 CallBack을 처리할 수 있다. (이전 포스팅 참조 : http://blog.saltfactory.net/235)
package net.saltfactory.tutorial.phonegap.plugindemo;

import android.app.AlertDialog;
import android.content.DialogInterface;

import org.apache.cordova.CallbackContext;
import org.apache.cordova.CordovaPlugin;
import org.apache.cordova.PluginResult;
import org.json.JSONArray;
import org.json.JSONException;
import org.json.JSONObject;

/**
 * Created by saltfactory on 3/18/14.
 */
public class SFPluginEcho extends CordovaPlugin {
    private final String ACTION_ECHO = "echo";
    private final String ACTION_GET_MESSAGE = "getMessage";
    private final String ACTION_RUN_JAVASCRIPT_FUNCTION = "runJavasScriptFunction";

    @Override
    public boolean execute(String action, JSONArray args, CallbackContext callbackContext) throws JSONException {
        if (action.equals(ACTION_ECHO)) {
            String message = args.getString(0);
            this.echo(message, callbackContext);
            return true;
        } else if (action.equals(ACTION_GET_MESSAGE)){
            this.getMessage(callbackContext);
        } else if (action.equals(ACTION_RUN_JAVASCRIPT_FUNCTION)){
            String functionName = args.getString(0);
            this.runJavaScriptFunction(functionName, callbackContext);
        }
        return false;
    }

    private void echo(String message, CallbackContext callbackContext) {
        if (message != null && message.length() > 0) {

            AlertDialog.Builder builder = new AlertDialog.Builder(this.cordova.getActivity());
            builder.setMessage(message).setPositiveButton("확인", new DialogInterface.OnClickListener() {
                @Override
                public void onClick(DialogInterface dialogInterface, int i) {

                }
            });

            AlertDialog dialog = builder.create();
            dialog.show();

            callbackContext.sendPluginResult(new PluginResult(PluginResult.Status.OK, message));
            callbackContext.success(message);
        } else {
            callbackContext.sendPluginResult(new PluginResult(PluginResult.Status.ERROR, "Expected one non-empty string argument."));
            callbackContext.error("Expected one non-empty string argument.");
        }
    }


    private void getMessage(CallbackContext callbackContext) throws JSONException {
        JSONObject jsonObject = new JSONObject();
        jsonObject.put("name", "Anroid에서 만든 메세지");

        callbackContext.sendPluginResult(new PluginResult(PluginResult.Status.OK, jsonObject));
    }

    private void runJavaScriptFunction(String functionName, final CallbackContext callbackContext) throws JSONException {
        JSONObject jsonObject = new JSONObject();
        jsonObject.put("name", "Android 에서 JavaScript의 "+functionName + "함수 호출");

        final String javascriptString = "print_message(" + jsonObject.toString() + ")";
        this.webView.sendJavascript(javascriptString);


        callbackContext.sendPluginResult(new PluginResult(PluginResult.Status.OK));


    }
}
코드에 대한 설명은 이전 포스팅(http://blog.saltfactory.net/235)의 내용과 동일하다. iOS에서는 CDV라는 prefix만 붙어있는 것을 제외하고는 동장하는 방법도 클래스와 메소드이름도 거의 비슷하기 때문에 각 코드의 설명은 생략한다. 다만 네이티브 코드에서 JavaScript로 JSON 오브젝트를 넘기는 것을 살펴보면 iOS에서는 NSDictionary 타입으로 만들어서 String으로 변환해서 넘겨준것과 달리 Android에서는 JSONObject를 이용해서 String으로 변환해서 넘겨준다는 것만 틀리다. 그리고 iOS에서는 네이티브코드에서 JavaScript쪽으로 함수를 호출할 때는 [self.commandDelegate evalJs:]를 사용한 것과 달리 Android에서는 webView.sendJavascript() 라는 메소드를 사용하는 것만 다를 뿐이다.
JavaScript 인터페이스는 동일하게 사용
iOS 플러그인을 만들때 웹에서 네이티브 코드로 접근하기 위해서 js/sf_phonegap_plugin_demo_echo.js를 만들어서 사용했는데 PhoneGap의 특성으로 동일한 JavaScript 를 사용해서 cordova.exec가 호출하는 서비스이름과 엑션 이름만으로 웹과 네이티브 코드가 연결되기 때문에 수정을 하지 않고도 바로 매칭되는 네이티브 코드로 접근하기 때문에 JavaScript는 수정할 필요가 없다.
//
//  sf_phonegap_plugin_echo.js
//
//  Created by SungKwang Song on 3/12/14.
//
//


function SFPluginEcho() {}
SFPluginEcho.prototype.echo = function(message) {

  cordova.exec(null, null, "SFPluginEcho", "echo", [message]);
};


SFPluginEcho.prototype.getMessage = function(){
  var callbackSuccess = function(result){
    alert(result.name);
  };

  var callbackFail = function(error){
    alert(error);
  };

  cordova.exec(callbackSuccess, callbackFail, "SFPluginEcho", "getMessage", []);

}

SFPluginEcho.prototype.runJavaScriptFunction = function(functionName){
  var callbackFail = function(error){
    alert(error);
  };

  cordova.exec(null, callbackFail, "SFPluginEcho", "runJavasScriptFunction", [functionName]);

}

// function print_message(result){
//   alert(result.name);
// }

module.exports = new SFPluginEcho();
마찬가지로 www/index.html 파일 역시 iOS 플러그인을 만들 때와 동일하게 사용할 수 있다.
<!DOCTYPE html>
<!--
    Licensed to the Apache Software Foundation (ASF) under one
    or more contributor license agreements.  See the NOTICE file
    distributed with this work for additional information
    regarding copyright ownership.  The ASF licenses this file
    to you under the Apache License, Version 2.0 (the
    "License"); you may not use this file except in compliance
    with the License.  You may obtain a copy of the License at

    http://www.apache.org/licenses/LICENSE-2.0

    Unless required by applicable law or agreed to in writing,
    software distributed under the License is distributed on an
    "AS IS" BASIS, WITHOUT WARRANTIES OR CONDITIONS OF ANY
     KIND, either express or implied.  See the License for the
    specific language governing permissions and limitations
    under the License.
-->
<html>
    <head>
        <meta charset="utf-8" />
        <meta name="format-detection" content="telephone=no" />
        <!-- WARNING: for iOS 7, remove the width=device-width and height=device-height attributes. See https://issues.apache.org/jira/browse/CB-4323 -->
        <meta name="viewport" content="user-scalable=no, initial-scale=1, maximum-scale=1, minimum-scale=1, width=device-width, height=device-height, target-densitydpi=device-dpi" />
        <link rel="stylesheet" type="text/css" href="css/index.css" />
        <title>Hello World</title>
    </head>
    <body>
        <div class="app">
            <h1>PhoneGap</h1>
            <div id="deviceready" class="blink">
                <p class="event listening">Connecting to Device</p>
                <p class="event received">Device is Ready</p>
            </div>
        </div>
        <script type="text/javascript" src="phonegap.js"></script>
        <script type="text/javascript" src="js/sf_phonegap_plugin_demo_echo.js"></script>
        <script type="text/javascript">

        function print_message(result){
          alert(result.name);
        }

        function runEcho() {
          var pluginEcho = new SFPluginEcho();
          // pluginEcho.echo("웹에서 보낸 메세지를 AlertDialog를 이용해서 보기");
          // pluginEcho.getMessage();
          pluginEcho.runJavaScriptFunction("print_message");
        }

        document.addEventListener('deviceready', runEcho, false);

        </script>
    </body>
</html>
JavaScript와 네이티브코드가 연결 설정
위의 과정까지 모두 끝냈으면 이제 JavaScript 코드와 네이티브코드가 서로 연결되는지 살펴보자. 첫번째로 SFPluginEcho의 echo()를 실행해보자. www/index.html 파일을 다음과 같이 수정한다.
<!DOCTYPE html>
<!--
    Licensed to the Apache Software Foundation (ASF) under one
    or more contributor license agreements.  See the NOTICE file
    distributed with this work for additional information
    regarding copyright ownership.  The ASF licenses this file
    to you under the Apache License, Version 2.0 (the
    "License"); you may not use this file except in compliance
    with the License.  You may obtain a copy of the License at

    http://www.apache.org/licenses/LICENSE-2.0

    Unless required by applicable law or agreed to in writing,
    software distributed under the License is distributed on an
    "AS IS" BASIS, WITHOUT WARRANTIES OR CONDITIONS OF ANY
     KIND, either express or implied.  See the License for the
    specific language governing permissions and limitations
    under the License.
-->
<html>
    <head>
        <meta charset="utf-8" />
        <meta name="format-detection" content="telephone=no" />
        <!-- WARNING: for iOS 7, remove the width=device-width and height=device-height attributes. See https://issues.apache.org/jira/browse/CB-4323 -->
        <meta name="viewport" content="user-scalable=no, initial-scale=1, maximum-scale=1, minimum-scale=1, width=device-width, height=device-height, target-densitydpi=device-dpi" />
        <link rel="stylesheet" type="text/css" href="css/index.css" />
        <title>Hello World</title>
    </head>
    <body>
        <div class="app">
            <h1>PhoneGap</h1>
            <div id="deviceready" class="blink">
                <p class="event listening">Connecting to Device</p>
                <p class="event received">Device is Ready</p>
            </div>
        </div>
        <script type="text/javascript" src="phonegap.js"></script>
        <script type="text/javascript" src="js/sf_phonegap_plugin_demo_echo.js"></script>
        <script type="text/javascript">

        function print_message(result){
          alert(result.name);
        }

        function runEcho() {
          var pluginEcho = new SFPluginEcho();
          pluginEcho.echo("웹에서 보낸 메세지를 AlertDialog를 이용해서 보기");
          // pluginEcho.getMessage();
          // pluginEcho.runJavaScriptFunction("print_message");
        }

        document.addEventListener('deviceready', runEcho, false);

        </script>
    </body>
</html>
이젠 PhoneGap CLI를 이용해서 빌드하고 설치해보자.
phonegap local build android
phonegap local install android
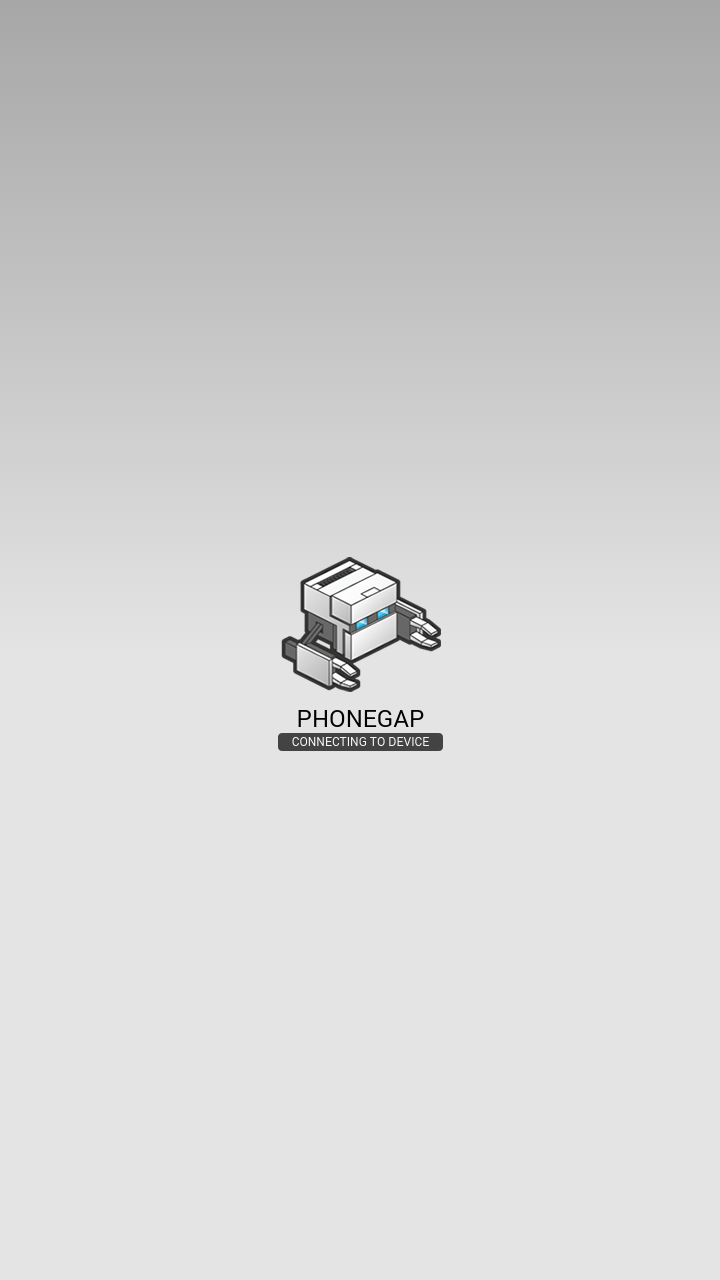
그런데 실행해보면 JavaScript가 SFPluginEcho의 echo()를 호출했음에도 불구하고 아무런 동작이 일어나지 않는다. 이유는 JavaScript에서 SFPluginEcho라는 서비스이름이 어떤 클래스와 매핑되는지를 설정하지 않았기 때문이다. 우리는 앞에서 iOS용 플러그인을 만들 때 context.xml에 feature를 추가한 것을 기억할 것이다. Android의 네이티브 클래스를 사용하기 위해서 존재하는 feature에 다음을 추가한다.
SFPluginEcho는 net.saltfactory.tutorial.phonegap.plugindemo.SFPluginEcho 클래스를 지정하고 있다고 feature에 추가한다.
?xml version="1.0" encoding="UTF-8"?>

<!-- config.xml reference: https://build.phonegap.com/docs/config-xml -->
<widget xmlns     = "http://www.w3.org/ns/widgets"
        xmlns:gap = "http://phonegap.com/ns/1.0"
        id        = "net.saltfactory.tutorial.phonegap.plugindemo"
        version   = "1.0.0">

    <name>SF-PhoneGap-Plugin-Demo</name>

    <description>
        Hello World sample application that responds to the deviceready event.
    </description>

    <author href="http://phonegap.com" email="support@phonegap.com">
        PhoneGap Team
    </author>

    <!--
        Enable individual API permissions here.
        The "device" permission is required for the 'deviceready' event.
    -->
    <feature name="http://api.phonegap.com/1.0/device" />

    <feature name="SFPluginEcho">
        <param name="ios-package" value="SFPluginEcho" />
        <param name="android-package" value="net.saltfactory.tutorial.phonegap.plugindemo.SFPluginEcho"/>
        <param name="onload" value="true" />
    </feature>

    <!--
        If you do not want any permissions to be added to your app, add the
        following tag to your config.xml; you will still have the INTERNET
        permission on your app, which PhoneGap requires.
    -->
    <preference name="permissions"                value="none"/>

    <!-- Customize your app and platform with the preference element. -->
    <!-- <preference name="phonegap-version"      value="3.4.0" /> -->      <!-- all: current version of PhoneGap -->
    <preference name="orientation"                value="default" />        <!-- all: default means both landscape and portrait are enabled -->
    <preference name="target-device"              value="universal" />      <!-- all: possible values handset, tablet, or universal -->
    <preference name="fullscreen"                 value="true" />           <!-- all: hides the status bar at the top of the screen -->
    <preference name="webviewbounce"              value="true" />           <!-- ios: control whether the screen 'bounces' when scrolled beyond the top -->
    <preference name="prerendered-icon"           value="true" />           <!-- ios: if icon is prerendered, iOS will not apply it's gloss to the app's icon on the user's home screen -->
    <preference name="stay-in-webview"            value="false" />          <!-- ios: external links should open in the default browser, 'true' would use the webview the app lives in -->
    <preference name="ios-statusbarstyle"         value="black-opaque" />   <!-- ios: black-translucent will appear black because the PhoneGap webview doesn't go beneath the status bar -->
    <preference name="detect-data-types"          value="true" />           <!-- ios: controls whether data types (such as phone no. and dates) are automatically turned into links by the system -->
    <preference name="exit-on-suspend"            value="false" />          <!-- ios: if set to true, app will terminate when home button is pressed -->
    <preference name="show-splash-screen-spinner" value="true" />           <!-- ios: if set to false, the spinner won't appear on the splash screen during app loading -->
    <preference name="auto-hide-splash-screen"    value="true" />           <!-- ios: if set to false, the splash screen must be hidden using a JavaScript API -->
    <preference name="disable-cursor"             value="false" />          <!-- blackberry: prevents a mouse-icon/cursor from being displayed on the app -->
    <preference name="android-minSdkVersion"      value="7" />              <!-- android: MIN SDK version supported on the target device. MAX version is blank by default. -->
    <preference name="android-installLocation"    value="auto" />           <!-- android: app install location. 'auto' will choose. 'internalOnly' is device memory. 'preferExternal' is SDCard. -->

    <!-- Plugins can also be added here. -->
    <!--
        <gap:plugin name="Example" />
        A list of available plugins are available at https://build.phonegap.com/docs/plugins
    -->

    <!-- Define app icon for each platform. -->
    <icon src="icon.png" />
    <icon src="res/icon/android/icon-36-ldpi.png"   gap:platform="android"    gap:density="ldpi" />
    <icon src="res/icon/android/icon-48-mdpi.png"   gap:platform="android"    gap:density="mdpi" />
    <icon src="res/icon/android/icon-72-hdpi.png"   gap:platform="android"    gap:density="hdpi" />
    <icon src="res/icon/android/icon-96-xhdpi.png"  gap:platform="android"    gap:density="xhdpi" />
    <icon src="res/icon/blackberry/icon-80.png"     gap:platform="blackberry" />
    <icon src="res/icon/blackberry/icon-80.png"     gap:platform="blackberry" gap:state="hover"/>
    <icon src="res/icon/ios/icon-57.png"            gap:platform="ios"        width="57" height="57" />
    <icon src="res/icon/ios/icon-72.png"            gap:platform="ios"        width="72" height="72" />
    <icon src="res/icon/ios/icon-57-2x.png"         gap:platform="ios"        width="114" height="114" />
    <icon src="res/icon/ios/icon-72-2x.png"         gap:platform="ios"        width="144" height="144" />
    <icon src="res/icon/webos/icon-64.png"          gap:platform="webos" />
    <icon src="res/icon/windows-phone/icon-48.png"  gap:platform="winphone" />
    <icon src="res/icon/windows-phone/icon-173.png" gap:platform="winphone"   gap:role="background" />

    <!-- Define app splash screen for each platform. -->
    <gap:splash src="res/screen/android/screen-ldpi-portrait.png"  gap:platform="android" gap:density="ldpi" />
    <gap:splash src="res/screen/android/screen-mdpi-portrait.png"  gap:platform="android" gap:density="mdpi" />
    <gap:splash src="res/screen/android/screen-hdpi-portrait.png"  gap:platform="android" gap:density="hdpi" />
    <gap:splash src="res/screen/android/screen-xhdpi-portrait.png" gap:platform="android" gap:density="xhdpi" />
    <gap:splash src="res/screen/blackberry/screen-225.png"         gap:platform="blackberry" />
    <gap:splash src="res/screen/ios/screen-iphone-portrait.png"    gap:platform="ios"     width="320" height="480" />
    <gap:splash src="res/screen/ios/screen-iphone-portrait-2x.png" gap:platform="ios"     width="640" height="960" />
    <gap:splash src="res/screen/ios/screen-ipad-portrait.png"      gap:platform="ios"     width="768" height="1024" />
    <gap:splash src="res/screen/ios/screen-ipad-landscape.png"     gap:platform="ios"     width="1024" height="768" />
    <gap:splash src="res/screen/windows-phone/screen-portrait.jpg" gap:platform="winphone" />

    <!--
        Define access to external domains.

        <access />            - a blank access tag denies access to all external resources.
        <access origin="*" /> - a wildcard access tag allows access to all external resource.

        Otherwise, you can specify specific domains:
    -->
    <access origin="http://127.0.0.1*"/> <!-- allow local pages -->
    <!--
        <access origin="http://phonegap.com" />                    - allow any secure requests to http://phonegap.com/
        <access origin="http://phonegap.com" subdomains="true" />  - same as above, but including subdomains, such as http://build.phonegap.com/
        <access origin="http://phonegap.com" browserOnly="true" /> - only allows http://phonegap.com to be opened by the child browser.
    -->

</widget>
다시 PhoneGap CLI로 빌드하고 인스톨해보자.
phonegap local build android
phonegap local install android
이젠 다음 그림과 같이 SFPluginEcho의 echo()를 실행해서 네이티브 코드의 SFPluginEcho의 echo 액션을 실행한 것을 확인할 수 있다.
다른 JavaScript 메소드를 실행해보자. 위에는 JavaScript에서 메세지를 Android 네이티브 코드로 보내어 Android의 AlertDialog를 사용해서 출력했다면, getMessage()는 Android의 네이티브 코드에서 생성한 JSONObject를 JavaScript로 반환해서 웹에서 alert()를 출력하는 예제이다. www/index.html을 다음과 같이 수정한다.
<!DOCTYPE html>
<!--
    Licensed to the Apache Software Foundation (ASF) under one
    or more contributor license agreements.  See the NOTICE file
    distributed with this work for additional information
    regarding copyright ownership.  The ASF licenses this file
    to you under the Apache License, Version 2.0 (the
    "License"); you may not use this file except in compliance
    with the License.  You may obtain a copy of the License at

    http://www.apache.org/licenses/LICENSE-2.0

    Unless required by applicable law or agreed to in writing,
    software distributed under the License is distributed on an
    "AS IS" BASIS, WITHOUT WARRANTIES OR CONDITIONS OF ANY
     KIND, either express or implied.  See the License for the
    specific language governing permissions and limitations
    under the License.
-->
<html>
    <head>
        <meta charset="utf-8" />
        <meta name="format-detection" content="telephone=no" />
        <!-- WARNING: for iOS 7, remove the width=device-width and height=device-height attributes. See https://issues.apache.org/jira/browse/CB-4323 -->
        <meta name="viewport" content="user-scalable=no, initial-scale=1, maximum-scale=1, minimum-scale=1, width=device-width, height=device-height, target-densitydpi=device-dpi" />
        <link rel="stylesheet" type="text/css" href="css/index.css" />
        <title>Hello World</title>
    </head>
    <body>
        <div class="app">
            <h1>PhoneGap</h1>
            <div id="deviceready" class="blink">
                <p class="event listening">Connecting to Device</p>
                <p class="event received">Device is Ready</p>
            </div>
        </div>
        <script type="text/javascript" src="phonegap.js"></script>
        <script type="text/javascript" src="js/sf_phonegap_plugin_demo_echo.js"></script>
        <script type="text/javascript">

        function print_message(result){
          alert(result.name);
        }

        function runEcho() {
          var pluginEcho = new SFPluginEcho();
          // pluginEcho.echo("웹에서 보낸 메세지를 AlertDialog를 이용해서 보기");
          pluginEcho.getMessage();
          // pluginEcho.runJavaScriptFunction("print_message");
        }

        document.addEventListener('deviceready', runEcho, false);

        </script>
    </body>
</html>
PhoneGap 소스에 수정이 가해졌기 때문에 다시 빌드하고 인스톨을 진행한다.
phonegap local build android
phonegap local install android
SFPluginEcho의 getMessage() 역시 정상적으로 동작한다. 이 예제는 Android의 SFPluginEcho 안에서 getMessage라는 action이 들어오면 네이티브에서 JSON을 만들어서 JavaScript로 반환하여 JavaScript가 alert()를 보여주는 예제이다. 마지막으로 SFPluginEcho의 runJavaScriptFunction 을 실행하기 위해서 www/index.html 파일을 다음과 같이 수정한다.
<!DOCTYPE html>
<!--
    Licensed to the Apache Software Foundation (ASF) under one
    or more contributor license agreements.  See the NOTICE file
    distributed with this work for additional information
    regarding copyright ownership.  The ASF licenses this file
    to you under the Apache License, Version 2.0 (the
    "License"); you may not use this file except in compliance
    with the License.  You may obtain a copy of the License at

    http://www.apache.org/licenses/LICENSE-2.0

    Unless required by applicable law or agreed to in writing,
    software distributed under the License is distributed on an
    "AS IS" BASIS, WITHOUT WARRANTIES OR CONDITIONS OF ANY
     KIND, either express or implied.  See the License for the
    specific language governing permissions and limitations
    under the License.
-->
<html>
    <head>
        <meta charset="utf-8" />
        <meta name="format-detection" content="telephone=no" />
        <!-- WARNING: for iOS 7, remove the width=device-width and height=device-height attributes. See https://issues.apache.org/jira/browse/CB-4323 -->
        <meta name="viewport" content="user-scalable=no, initial-scale=1, maximum-scale=1, minimum-scale=1, width=device-width, height=device-height, target-densitydpi=device-dpi" />
        <link rel="stylesheet" type="text/css" href="css/index.css" />
        <title>Hello World</title>
    </head>
    <body>
        <div class="app">
            <h1>PhoneGap</h1>
            <div id="deviceready" class="blink">
                <p class="event listening">Connecting to Device</p>
                <p class="event received">Device is Ready</p>
            </div>
        </div>
        <script type="text/javascript" src="phonegap.js"></script>
        <script type="text/javascript" src="js/sf_phonegap_plugin_demo_echo.js"></script>
        <script type="text/javascript">

        function print_message(result){
          alert(result.name);
        }

        function runEcho() {
          var pluginEcho = new SFPluginEcho();
          // pluginEcho.echo("웹에서 보낸 메세지를 AlertDialog를 이용해서 보기");
          // pluginEcho.getMessage();
          pluginEcho.runJavaScriptFunction("print_message");
        }

        document.addEventListener('deviceready', runEcho, false);

        </script>
    </body>
</html>
runJavaScriptFunction()은 말 그대로 네이티브코드로 JavaScript의 함수 이름을 보내어 네이티브코드에서 JavaScript 안에 함수이름과 매칭되는 함수를 호출하게 만들었다. 위와 같이 수정후 다시 빌드하고 인스톨을 해본다.
phonegap local build android
phonegap local install android
이렇게 PhoneGap Plugins 프로젝트에서 JavaScript와 네이티브 클래스와 메소드에 접근하는 것을 확인했다. 이젠 이렇게 만든 PhoneGap Android Plugins을 다른 PhoneGap 프로젝트에 설치를 해보자.
PhoneGap 프로젝트에 PhoneGap Plugins을 설치
설치방법은 이전글에서 소개한 방법과 같다. 이전글은 iOS 플러그인을 설치하는 방법과 동일하게 PhoneGap Plugins의 www/plugin.xml을 수정한다.
<?xml version="1.0" encoding="UTF-8"?>

<plugin xmlns="http://apache.org/cordova/ns/plugins/1.0"
    xmlns:rim="http://www.blackberry.com/ns/widgets"
    xmlns:android="http://schemas.android.com/apk/res/android"
    id="net.saltfactory.tutorial.phonegap.plugindemo"
    version="0.0.1">
    <name>SFPluginEcho</name>
    <description>saltfactory's Echo Plugin Demo</description>

<js-module src="www/js/sf_phonegap_plugin_demo_echo.js" name="sf_phonegap_plugin_demo_echo">
        <clobbers target="sf_phonegap_plugin_demo_echo" />
    </js-module>

    <!-- ios -->
    <platform name="ios">
        <config-file target="config.xml" parent="/*">
            <feature name="SFPluginEcho">
                <param name="ios-package" value="SFPluginEcho"/>
            </feature>
        </config-file>

        <header-file src="platforms/ios/SF-PhoneGap-Plugin-Demo/Plugins/SFPluginEcho.h" />
        <source-file src="platforms/ios/SF-PhoneGap-Plugin-Demo/Plugins/SFPluginEcho.m" />
    </platform>

    <!-- andorid -->
    <platform name="android">
      <config-file target="config.xml" parent="/*">
        <feature name="SFPluginEcho">
          <param name="android-package" value="net.saltfactory.tutorial.phonegap.plugindemo.SFPluginEcho"/>
        </feature>
      </config-file>

      <source-file src="platforms/android/src/net/saltfactory/tutorial/phonegap/plugindemo/SFPluginEcho.java"
        target-dir="src/net/saltfactory/tutorial/phonegap/plugindemo"/>
    </platform>


</plugin>
Plugins 설치
위에 PhoneGap용 Android Plugins에 필요한 설정을 모두 마쳤다. 이젠 다른 PhoneGap 프로젝트에서 만든 Plugins을 설치해보자. 우리는 앞에서부터 계속해서 sf-phonegap-demo 프로젝트를 사용하고 있기 때문에 sf-phonegap-demo 안에서 위에서 만든 SF-PhoneGap-Plugin-Demo 플러그인을 설치해 보기로 한다.
1) sf-phonegap-demo 디렉토리로 이동한다. 2) 현재 sf-phonegap-demo 안에는 이전 포스팅을 진행하느라고 만든 iOS 프로젝트가 추가되어져 있는 상태이다. PhoneGap CLI를 이용해서 android 플랫폼을 추가한다.
phonegap local build android
3) iOS 플러그인만을 만들어서 설치했던 이전 net.saltfactory.tutorial.phonegap.plugindemo 플러그인을 삭제한다.
phonegap local plugin remove net.saltfactory.tutorial.phonegap.plugindemo
4) ios와 android 플러그인을 모두 만들어둔 SF-PhoneGap-Plugin-Demo를 다시 설치한다.
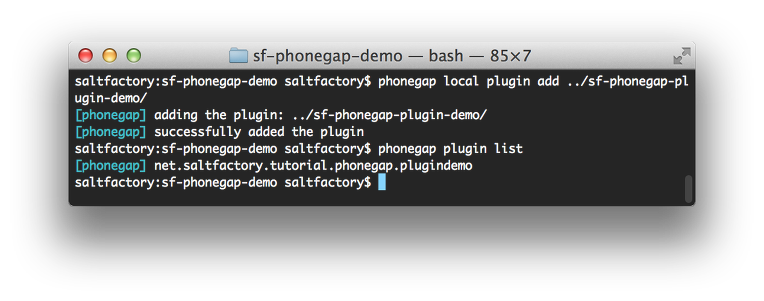
phonegap local plugin add ../sf-phonegap-plugin-demo
이제 PhoneGap 프로젝트에 PhoneGap Plugins이 설치가 모두 완료되었다. PhoneGap 프로젝트의 www/index.html을 열어보자. 이전 포스팅에서 iOS 플러그인을 추가해서 동작하게 한 JavaScript 코드가 그대로 있는데 이것을 Android에도 동일하게 사용 가능한지 테스트해볼 것이다.
<!DOCTYPE html>
<!--
    Licensed to the Apache Software Foundation (ASF) under one
    or more contributor license agreements.  See the NOTICE file
    distributed with this work for additional information
    regarding copyright ownership.  The ASF licenses this file
    to you under the Apache License, Version 2.0 (the
    "License"); you may not use this file except in compliance
    with the License.  You may obtain a copy of the License at

    http://www.apache.org/licenses/LICENSE-2.0

    Unless required by applicable law or agreed to in writing,
    software distributed under the License is distributed on an
    "AS IS" BASIS, WITHOUT WARRANTIES OR CONDITIONS OF ANY
     KIND, either express or implied.  See the License for the
    specific language governing permissions and limitations
    under the License.
-->
<html>
    <head>
        <meta charset="utf-8" />
        <meta name="format-detection" content="telephone=no" />
        <!-- WARNING: for iOS 7, remove the width=device-width and height=device-height attributes. See https://issues.apache.org/jira/browse/CB-4323 -->
        <meta name="viewport" content="user-scalable=no, initial-scale=1, maximum-scale=1, minimum-scale=1, width=device-width, height=device-height, target-densitydpi=device-dpi" />
        <link rel="stylesheet" type="text/css" href="css/index.css" />
        <title>Hello World</title>
    </head>
    <body>
        <div class="app">
            <h1>PhoneGap</h1>
            <div id="deviceready" class="blink">
                <p class="event listening">Connecting to Device</p>
                <p class="event received">Device is Ready</p>
            </div>
        </div>
        <script type="text/javascript" src="phonegap.js"></script>
        <script type="text/javascript">

        function print_message(result){
          alert(result.name);
        }


        function runEcho() {
          sf_phonegap_plugin_demo_echo.runJavaScriptFunction("print_message");
        }

        document.addEventListener('deviceready', runEcho, false);

        </script>

    </body>
</html>
현재 Android와 iOS 플러그인이 모두 설치가 되어 있는 상태이다. sf-phonegap-demo 프로젝트를 빌드하고 인스톨해보자.
cd sf-phonegap-demo
phonegap local build android
phonegap local install android
정상적으로 Plugins이 설치가 되어서 동작하는 것을 확인할 수 있다. 이렇게 두 포스팅에 걸쳐서 iOS와 Android용 PhoneGap Plugins을 개발하는 방법을 살펴보았다.
결론
PhoneGap은 하이브리드 앱을 개발하는 프레임워크이다. PhoneGap은 웹 자원(JavaScript)와 네이티브 자원(Objective-C, Java)이 서로 연동해서 사용하기 위해서는 PhoneGap Plugins을 사용해야한다. PhoneGap에서는 이미 많은 Plugins를 만들어서 배포하고 있고 개발자들이 Plugins을 만들어서 공유하고 있다. 만약 자신이 새롭게 하이브리드하게 앱을 개발하기 위해서 필요한 것들이 있으면 직접 Plugins을 만들어서 사용하면 된다. iOS는 CDVPlugin을 상속받아서 만들고 Android는 org.apache.cordova.CordovaPlugin을 상속받아서 만들면 된다. 그리고 다른 PhoneGap 프로젝트에서 Plugins을 설치해서 사용하기 위해서 plugin.xml에 source를 설정해주면 된다.
PhoneGap은 동일한 JavaScript 코드로 다른 플랫폼의 네이티브 코드로 접근이 가능하다. 서비스와 액션의 이름으로 JavaScript에서 네이티브 코드를 호출하기 때문이다. 이젠 PhoneGap을 이용해서 하이브리드하고 멀티플랫폼을 지원하는 앱을 만들 모든 준비를 마쳤다. PhoneGap은 아직 완벽하거나 안전하지 않다. 하지만 많은 부분의 개발을 편리하게 만들어두었고 무엇보다도 웹 개발 코드로 필요한 부분만 네이티브코드를 호출해서 사용하면 될 수 있는 환경을 지원한다. PhoneGap을 보면 볼수록 KT의 Appspresso가 얼마나 좋은 하이브리드 개발 플랫폼이였는지를 느끼게 된다. 지금은 멈추어진 프로젝트이지 개인적으로 다시 Appspresso 프로젝트가 진행되어 세계적으로 인정받고 편리한 하이브리드 앱 개발 플랫폼으로 부활되기 바래본다.
참고
- http://docs.phonegap.com/en/edge/guide_platforms_android_plugin.md.html#Android%20Plugins
- http://devgirl.org/2013/09/17/how-to-write-a-phonegap-3-0-plugin-for-android/
연구원 소개
- 작성자 : 송성광 개발 연구원
- 블로그 : http://blog.saltfactory.net
- 이메일 : saltfactory@gmail.com
- 트위터 : @saltfactory
- 페이스북 : https://facebook.com/salthub
- 연구소 : 하이브레인넷 부설연구소
- 연구실 : 창원대학교 데이터베이스 연구실
