UITableView에서 header와 footer 높이 변경하기
서론
UITableView는 iOS 기반 앱을 개발할 때 가장 많이 사용하는 UIKit 중에 하나이다. 이러한 UITableView에서는 UITable의 속성을 외부에서 (다른 클래스에서)변경하기 쉽게 하기 위해서 View의 처리를 하는 부분을 위임하는 delgate 방식을 사용한다. (물론 속성을 바로 접근해서 사용할 수 있는 것도 있다.)
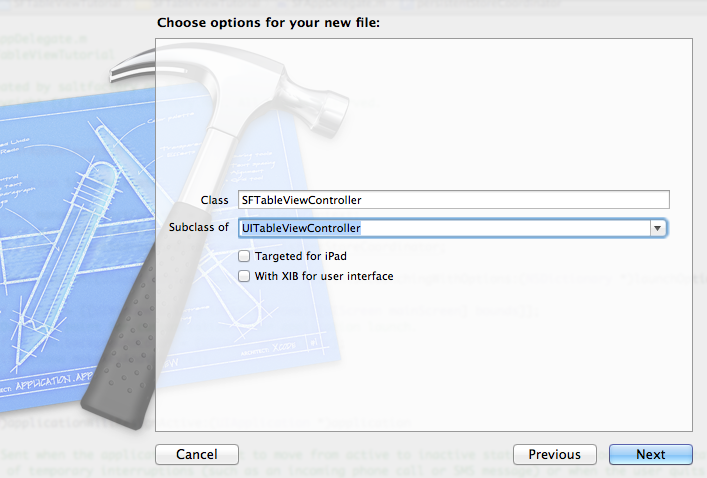
이 아티클에서 테스트를 하기 위해서 우리는 empty 프로젝트를 하나 만들고 UITableView 기반의 ViewController를 하나 추가하자. 이름은 SFTableViewController라고 지정했다. 편의에 맞게 다른 이름을 사용해도 상관없다. 그리고 특별히 XIB는 생성하지 않는다. 특별한 UI 구성 이외에 XIB를 사용할 일이 거의 없기 때문이다.
뷰컨트롤러를 추가하고 난 다음에는 우리는 테스트를 위해서 AppDelegate에 UINavigationController에 포함되어서 가장 처음에 나타나게 rootViewController로 지정할 것이다.
//
//  SFAppDelegate.m
//  SFTableViewTutorial
//
//  Created by saltfactory on 8/10/12.
//  Copyright (c) 2012 saltfactory.net. All rights reserved.
//

#import "SFAppDelegate.h"
#import "SFTableViewController.h"
@implementation SFAppDelegate

@synthesize managedObjectContext = _managedObjectContext;
@synthesize managedObjectModel = _managedObjectModel;
@synthesize persistentStoreCoordinator = _persistentStoreCoordinator;

- (BOOL)application:(UIApplication *)application didFinishLaunchingWithOptions:(NSDictionary *)launchOptions
{
    self.window = [[UIWindow alloc] initWithFrame:[[UIScreen mainScreen] bounds]];

    // Override point for customization after application launch.
    SFTableViewController *tableViewController = [[SFTableViewController alloc] init];
    UINavigationController *navigationController = [[UINavigationController alloc] initWithRootViewController:tableViewController];
    self.window.rootViewController = navigationController;

    self.window.backgroundColor = [UIColor whiteColor];
    [self.window makeKeyAndVisible];
    return YES;
}

.. 이하 생략
build 하고 실행하면 다음과 같이 비어있는 UITableView가 보이게 될 것이다.
우리는 테스트를 위해서 HeaderView를 가질수 있게 임시 데이터를 저장해보자. 간단하게 NSMutableDictionary에 두가지 데이터를 집어넣었고 각각 First Items와 Second Items라는 Key를 가지고 저장이 되었다.
//
//  SFTableViewController.m
//  SFTableViewTutorial
//
//  Created by saltfactory on 8/10/12.
//  Copyright (c) 2012 saltfactory.net. All rights reserved.
//

#import "SFTableViewController.h"

@interface SFTableViewController ()
{
    NSMutableDictionary *itemsInfo;
}
@end

... 중략...
- (void)viewDidLoad
{
    [super viewDidLoad];

    // Uncomment the following line to preserve selection between presentations.
    // self.clearsSelectionOnViewWillAppear = NO;

    // Uncomment the following line to display an Edit button in the navigation bar for this view controller.
    // self.navigationItem.rightBarButtonItem = self.editButtonItem;
    self.title = @"UITableView Test";
}

- (id)init
{
    self = [super initWithStyle:UITableViewStylePlain];
    if (self){
        itemsInfo = [NSMutableDictionary dictionary];

        NSArray *firstItems = [NSArray arrayWithObjects:@"date1", @"date2", @"date3", nil];
        [itemsInfo setValue:firstItems forKey:@"First Items"];

        NSArray *secondItems = [NSArray arrayWithObjects:@"items1", @"items2", @"items3", nil];
        [itemsInfo setValue:secondItems forKey:@"Second Items"];

    }
    return self;
}
... 생략 ...
다음에는 UITableView 가 사용하는 데이터를 어떻게 다룰건지 DataSource에 대한 UITableView의 delegate method를 구현한다. itemsInfo에서 key 갯수만큼 section을 만들고 그 section 별로 저장된 데이터를 가져와서 UITableView의 cell.textLabel에 나타날 수 있게 하였다.
... 생략 ...
#pragma mark - Table view data source

- (NSInteger)numberOfSectionsInTableView:(UITableView *)tableView
{
    // Return the number of sections.
    return [[itemsInfo allKeys] count];
}

- (NSInteger)tableView:(UITableView *)tableView numberOfRowsInSection:(NSInteger)section
{
    // Return the number of rows in the section.
    NSString *key = [[itemsInfo allKeys] objectAtIndex:section];
    return [[itemsInfo objectForKey:key] count];
}

- (UITableViewCell *)tableView:(UITableView *)tableView cellForRowAtIndexPath:(NSIndexPath *)indexPath
{
    static NSString *CellIdentifier = @"Cell";
    UITableViewCell *cell = [tableView dequeueReusableCellWithIdentifier:CellIdentifier];

    // Configure the cell...
    if (cell == nil) {
        cell =[[UITableViewCell alloc] initWithStyle:UITableViewCellStyleValue1 reuseIdentifier:CellIdentifier];
    }

    NSString *key = [[itemsInfo allKeys] objectAtIndex:indexPath.section];
    cell.textLabel.text =[[itemsInfo objectForKey:key] objectAtIndex:indexPath.row];

    return cell;
}
... 생략 ...
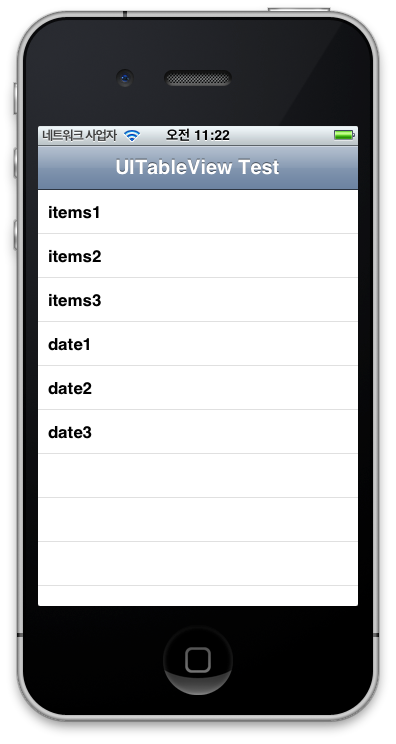
다시한번 Build하고 Run 시켜보자. 우리가 의도한 대로 데이터가 나왔는가? 우리가 의도한 UITableView의 형태는 Header를 가지고 있는 모양이다. 하지만 위의 코드는 UITableView의 cell에 대한 코드만 존재를 한다.
우리는 Header를 만들기 위해서 다음 UITableView의 뷰 속성을 다루는 delegate method를 구현하기 위해서 다음 코드를 추가한다.
#pragma mark - UITableView delegate method
- (NSString *)tableView:(UITableView *)tableView titleForHeaderInSection:(NSInteger)section
{
    return [[itemsInfo allKeys] objectAtIndex:section];
}
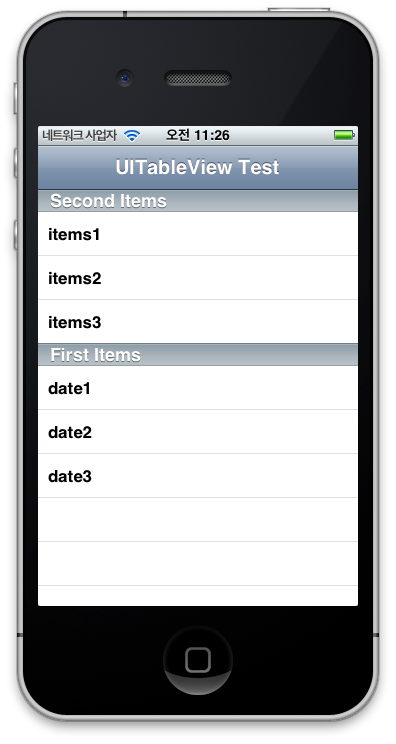
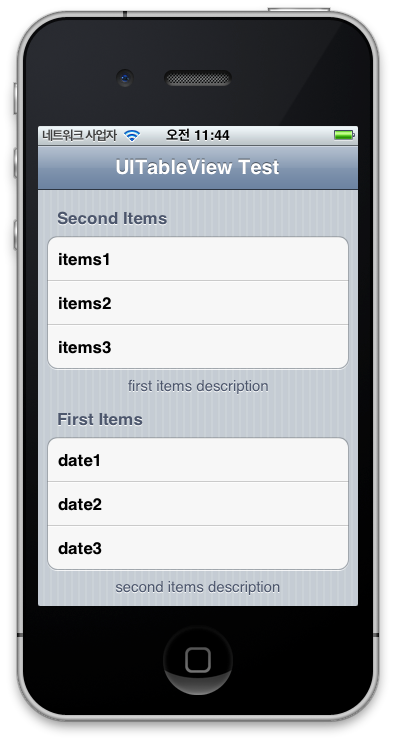
다시 build하고 run 실행해보자. 이제 우리가 의도한 header view가 나타났다. 각 섹션별로 그 섹션의 key가 나타나게 된 것이다.
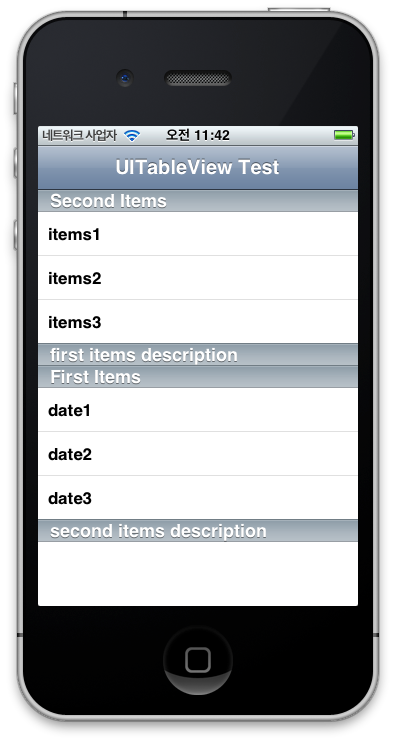
그리고 footer view를 추가하기 위해서 다음과 같이 코드를 수정해보자. 아이템별로 description을 footer에 추가한다.
- (NSString *)tableView:(UITableView *)tableView titleForFooterInSection:(NSInteger)section
{
    return section == 0 ? @"first items description" : @"second items description";
}
UITableViewStylePlain에 모양에서 이렇게 나타나지만 UITableViewGrouped 에서는 다음과 같이 나타난다.
- (id)init
{
    self = [super initWithStyle:UITableViewStyleGrouped];
    if (self){
        itemsInfo = [NSMutableDictionary dictionary];

        NSArray *firstItems = [NSArray arrayWithObjects:@"date1", @"date2", @"date3", nil];
        [itemsInfo setValue:firstItems forKey:@"First Items"];

        NSArray *secondItems = [NSArray arrayWithObjects:@"items1", @"items2", @"items3", nil];
        [itemsInfo setValue:secondItems forKey:@"Second Items"];

    }
    return self;
}
UITableView Header, Footer 높이조절
이제 우리가 원하는 Heade와 Footer의 높이를 조절해보자. UITableView의 view delegate를 구현하기 위해서 다음 코드를 추가한다. 높이를 확인하기 위해서 tableView의 style을 다시 UITableViewStylePlain으로 변경한다.
- (float)tableView:(UITableView *)tableView heightForHeaderInSection:(NSInteger)section
{
    return 44;
}

- (float)tableView:(UITableView *)tableView heightForFooterInSection:(NSInteger)section
{
    return 44;
}
다시 build와 run을 해보면 header와 footer의 높이가 변경된 것을 확인할 수 있을 것이다.
만약 UITableViewController를 상속받아서 만들어서 사용하지 않고 UIViewController에 UITableView를 추가해서 사용할 경우도 동일하다. 우리는 UITableViewController를 상속받아서 만든 SFTableViewController를 UIViewController를 상속받아서 사용하는 것으로 변경할 것이다. SFTableViewController.h 파일을 다음과 같이 수정한다.
//
//  SFTableViewController.h
//  SFTableViewTutorial
//
//  Created by saltfactory on 8/10/12.
//  Copyright (c) 2012 saltfactory.net. All rights reserved.
//

#import <UIKit/UIKit.h>

@interface SFTableViewController : UIViewController<UITableViewDataSource, UITableViewDelegate>;
@property (nonatomic, strong) UITableView *tableView;
@end
SFTableViewController.m 파일을 다음과 같이 수정한다.
//
//  SFTableViewController.m
//  SFTableViewTutorial
//
//  Created by saltfactory on 8/10/12.
//  Copyright (c) 2012 saltfactory.net. All rights reserved.
//

#import "SFTableViewController.h"

@interface SFTableViewController ()
{
    NSMutableDictionary *itemsInfo;
}
@end

@implementation SFTableViewController
@synthesize tableView;
//- (id)initWithStyle:(UITableViewStyle)style
//{
//    self = [super initWithStyle:style];
//    if (self) {
//        // Custom initialization
//    }
//    return self;
//}

- (id)init
{
//    self = [super initWithStyle:UITableViewStylePlain];
    self = [super init];
    if (self){
        itemsInfo = [NSMutableDictionary dictionary];

        NSArray *firstItems = [NSArray arrayWithObjects:@"date1", @"date2", @"date3", nil];
        [itemsInfo setValue:firstItems forKey:@"First Items"];

        NSArray *secondItems = [NSArray arrayWithObjects:@"items1", @"items2", @"items3", nil];
        [itemsInfo setValue:secondItems forKey:@"Second Items"];

    }
    return self;
}

- (void)viewDidLoad
{
    [super viewDidLoad];

    // Uncomment the following line to preserve selection between presentations.
    // self.clearsSelectionOnViewWillAppear = NO;

    // Uncomment the following line to display an Edit button in the navigation bar for this view controller.
    // self.navigationItem.rightBarButtonItem = self.editButtonItem;
    self.title = @"UITableView Test";

    self.tableView  = [[UITableView alloc] initWithFrame:self.view.bounds style:UITableViewStylePlain];
    self.tableView.dataSource = self;
    self.tableView.delegate = self;
    [self.view addSubview:self.tableView];
}

- (void)viewDidUnload
{
    [super viewDidUnload];
    // Release any retained subviews of the main view.
    // e.g. self.myOutlet = nil;
    self.tableView = nil;
다른 UITableView의 data source delegate와 view delegate는 동일하게 위임해서 구현하기 때문에 변경할 필요가 없다. Build하고 Run을 실행해보면 위에서 나타난 결과와 동일하게 확인할 수 있을 것이다. 즉, UITableView의 header와 footer의 높이를 변경하기 위해서는 UITableView의 delegate 메소드인 - (float)tableView:(UITableView *)tableView heightForHeaderInSection:(NSInteger)section 과 - (float)tableView:(UITableView *)tableView heightForFooterInSection:(NSInteger)section 메소를 이용해서 사용할 수 있다. 또한 다음과 같이 tableView.sectionHeaderHeight 와 tableView.sectionFooterHeight 를 이용하여 조절할 수 있다.
... 생략...
- (void)viewDidLoad
{
    [super viewDidLoad];

    // Uncomment the following line to preserve selection between presentations.
    // self.clearsSelectionOnViewWillAppear = NO;

    // Uncomment the following line to display an Edit button in the navigation bar for this view controller.
    // self.navigationItem.rightBarButtonItem = self.editButtonItem;
    self.title = @"UITableView Test";

    self.tableView  = [[UITableView alloc] initWithFrame:self.view.bounds style:UITableViewStylePlain];
    self.tableView.dataSource = self;
    self.tableView.delegate = self;
    self.tableView.sectionHeaderHeight = 44.0;
    self.tableView.sectionFooterHeight = 44.0;

    [self.view addSubview:self.tableView];
}
... 생략...

//- (float)tableView:(UITableView *)tableView heightForHeaderInSection:(NSInteger)section
//{
//    return 44;
//}
//
//- (float)tableView:(UITableView *)tableView heightForFooterInSection:(NSInteger)section
//{
//    return 44;
//}
소스
- https://github.com/saltfactory/Saltfactory_iOS_Tutorial/tree/t3-uitableview
참고
- http://developer.apple.com/library/ios/#documentation/uikit/reference/UITableViewDelegate_Protocol/Reference/Reference.html
연구원 소개
- 작성자 : 송성광 개발 연구원
- 블로그 : http://blog.saltfactory.net
- 이메일 : saltfactory@gmail.com
- 트위터 : @saltfactory
- 페이스북 : https://facebook.com/salthub
- 연구소 : 하이브레인넷 부설연구소
- 연구실 : 창원대학교 데이터베이스 연구실
