UITableViewCellStyle을 이용하여 UITableViewCell 스타일 변경하기
서론
UITableView는 집합데이터를 목록형으로 나타내는데 매우 효율적이고 효과적이다. 우리가 일반적으로 사용하고 있는 대부분의 뷰는 목록형으로 사용되고 있다. UITableViewCell는 이러한 목록형 데이터를 만드는 UITableView에서 row의 하나를 구현하기 위한 객체이다. 이렇게 만들어진 UITableView의 하나의 Cell은 큐에서 자원 재활용이 가능하게 설계되어 있다. 그리고 UITableViewCell은 여러가지 스타일이 기본적으로 제공하고 있다. 뿐만 아니라 사용자가 직접 UITableViewCell을 상속받아서 UITableView 구성을 다시 할 수 있다.
UITableViewCellStyle
다음은 UITableViewCellStyle의 종류들이다.
typedef enum {
    UITableViewCellStyleDefault,	// Simple cell with text label and optional image view (behavior of UITableViewCell in iPhoneOS 2.x)
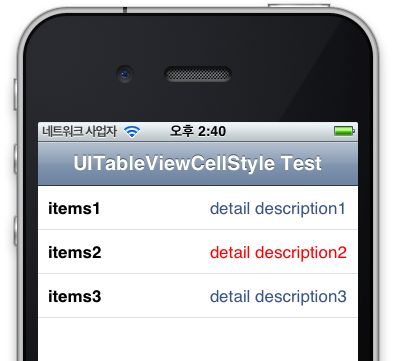
    UITableViewCellStyleValue1,		// Left aligned label on left and right aligned label on right with blue text (Used in Settings)
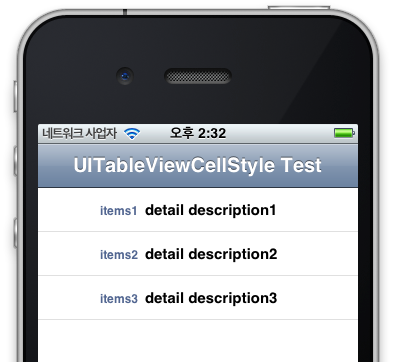
    UITableViewCellStyleValue2,		// Right aligned label on left with blue text and left aligned label on right (Used in Phone/Contacts)
    UITableViewCellStyleSubtitle	// Left aligned label on top and left aligned label on bottom with gray text (Used in iPod).
} UITableViewCellStyle;             // available in iPhone OS 3.0
아마 대부분의 iPhone 개발 서적에서는 UITableViewCellStyleDefault와 UITableViewCellStyleSubtitle만 다루고 있을 것이다. 이번 포스팅에서는 나머지 스타일도 테스트해보고 마지막으로 UILabel을 이용해서 UITableViewCellStyleValue1과 비슷한 구성을 직접 만들어보기로 한다.
테스트를 위해서 empty 프로젝트를 만든다. 이 포스팅에서는 SFTableViewCellTutorial이라는 이름으로 만들었다.
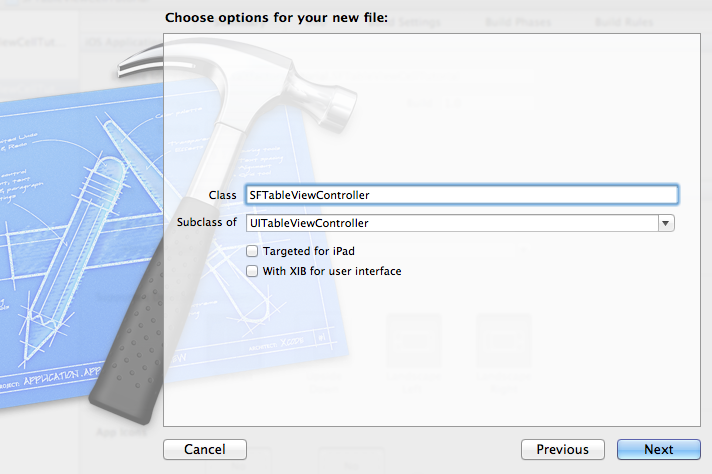
그리고 UITableViewController를 상속받은 SFTableViewController를 추가하여 UINavigationController에 추가하고 rootViewController로 지정한다.
//
//  SFAppDelegate.m
//  SFTableViewCellTutorial
//
//  Created by saltfactory on 8/10/12.
//  Copyright (c) 2012 saltfactory.net. All rights reserved.
//

#import "SFAppDelegate.h"
#import "SFTableViewController.h"

@implementation SFAppDelegate

- (BOOL)application:(UIApplication *)application didFinishLaunchingWithOptions:(NSDictionary *)launchOptions
{
    self.window = [[UIWindow alloc] initWithFrame:[[UIScreen mainScreen] bounds]];
    // Override point for customization after application launch.
    self.window.backgroundColor = [UIColor whiteColor];

    SFTableViewController *tableViewController = [[SFTableViewController alloc] init];
    UINavigationController *navigationController = [[UINavigationController alloc] initWithRootViewController:tableViewController];
    self.window.rootViewController = navigationController;
    [self.window makeKeyAndVisible];
    return YES;
}
...생략...
다음은 SFTableViewController 안에 테스트를 위한 Item 객체를 생성하고 초기 데이터를 입력한다.
//
//  SFTableViewController.m
//  SFTableViewCellTutorial
//
//  Created by saltfactory on 8/10/12.
//  Copyright (c) 2012 saltfactory.net. All rights reserved.
//

#import "SFTableViewController.h"

@interface Item : NSObject
@property (nonatomic, strong) NSString *title;
@property (nonatomic, strong) NSString *description;
- (id)initWithTitle:(NSString *)aTitle description:(NSString *)aDescription;
@end


@implementation Item
@synthesize title, description;
- (id)initWithTitle:(NSString *)aTitle description:(NSString *)aDescription
{
    self = [super init];
    if (self) {
        self.title = aTitle;
        self.description = aDescription;
    }

    return self;
}

@end


@interface SFTableViewController ()
{
    NSArray *items;
}
@end

@implementation SFTableViewController

- (id)initWithStyle:(UITableViewStyle)style
{
    self = [super initWithStyle:style];
    if (self) {
        // Custom initialization
    }
    return self;
}

- (id)init
{
    self = [super initWithStyle:UITableViewStylePlain];

    if (self) {
        items = [NSArray arrayWithObjects:
                    [[Item alloc] initWithTitle:@"items1" description:@"detail description1"],
                    [[Item alloc] initWithTitle:@"items2" description:@"detail description2"],
                    [[Item alloc] initWithTitle:@"items3" description:@"detail description3"],
                    nil];
    }

    return self;
}

- (void)viewDidLoad
{
    [super viewDidLoad];

    // Uncomment the following line to preserve selection between presentations.
    // self.clearsSelectionOnViewWillAppear = NO;

    // Uncomment the following line to display an Edit button in the navigation bar for this view controller.
    // self.navigationItem.rightBarButtonItem = self.editButtonItem;
    self.title = @"UITableViewCellStyle Test";
}
이제 UITableView의 data source delegate를 설정하자.
UITableViewCellStyleDefault
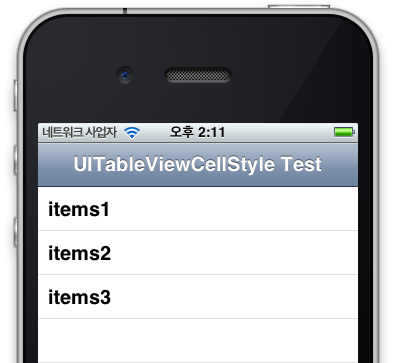
처음으로 UITableViewCellStyleDefault로 지정하고 빌드와 런으로 실행해서 UITableViewCell이 나타나는 것을 확인해보자.
#pragma mark - Table view data source

- (NSInteger)numberOfSectionsInTableView:(UITableView *)tableView
{
    // Return the number of sections.
    return 1;
}

- (NSInteger)tableView:(UITableView *)tableView numberOfRowsInSection:(NSInteger)section
{
    // Return the number of rows in the section.
    return [items count];
}

- (UITableViewCell *)tableView:(UITableView *)tableView cellForRowAtIndexPath:(NSIndexPath *)indexPath
{
    static NSString *CellIdentifier = @"Cell";
    UITableViewCell *cell = [tableView dequeueReusableCellWithIdentifier:CellIdentifier];

    // Configure the cell...
    if (cell == nil) {
        cell = [[UITableViewCell alloc] initWithStyle:UITableViewCellStyleDefault reuseIdentifier:CellIdentifier];
    }


    cell.textLabel.text = [[items objectAtIndex:indexPath.row] valueForKey:@"title"];
    cell.detailTextLabel.text = [[items objectAtIndex:indexPath.row] valueForKey:@"description"];
    return cell;
}
UITableViewCellStyleSubtitle
UITableViewCellStyleDefault는 단순하게 textLabel을 표현하기 위한 기본스타일로 비록 cell.detailTextLabel.text에 데이터가 있더라도 출력되지 않는다. UITableViewCellSytle중에서 detailTextLabel을 유일하게 표현하지 못한다. 우리는 UITableViewCellStyleSubtitle을 지정하고 다시 빌드와 런을 해보도록 하자.
- (UITableViewCell *)tableView:(UITableView *)tableView cellForRowAtIndexPath:(NSIndexPath *)indexPath
{
    static NSString *CellIdentifier = @"Cell";
    UITableViewCell *cell = [tableView dequeueReusableCellWithIdentifier:CellIdentifier];

    // Configure the cell...
    if (cell == nil) {
        cell = [[UITableViewCell alloc] initWithStyle:UITableViewCellStyleSubtitle reuseIdentifier:CellIdentifier];
    }


    cell.textLabel.text = [[items objectAtIndex:indexPath.row] valueForKey:@"title"];
    cell.detailTextLabel.text = [[items objectAtIndex:indexPath.row] valueForKey:@"description"];

    return cell;
}
UITableViewCellStyleSubtitle은 UITableViewCellStyleDefault로 나타난 textLabel 밑에 detailTextLabel을 나타나게 하는 스타일로 만들어준다.
UITableViewCellStyleValue1
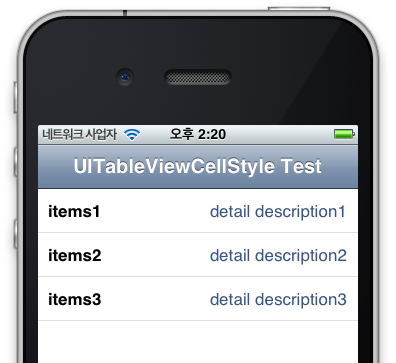
UITableViewCellStyleValue1은 UITableViewCellStyleSubtitle과 달리 detailLabelText의 내용을 출력시키면서 textLabel 과 detailTextLabel은 서로 각각 왼쪽과 오른쪽으로 정력하여 나타내어 준다.
- (UITableViewCell *)tableView:(UITableView *)tableView cellForRowAtIndexPath:(NSIndexPath *)indexPath
{
    static NSString *CellIdentifier = @"Cell";
    UITableViewCell *cell = [tableView dequeueReusableCellWithIdentifier:CellIdentifier];

    // Configure the cell...
    if (cell == nil) {
        cell = [[UITableViewCell alloc] initWithStyle:UITableViewCellStyleValue1 reuseIdentifier:CellIdentifier];
    }


    cell.textLabel.text = [[items objectAtIndex:indexPath.row] valueForKey:@"title"];
    cell.detailTextLabel.text = [[items objectAtIndex:indexPath.row] valueForKey:@"description"];

    return cell;
}
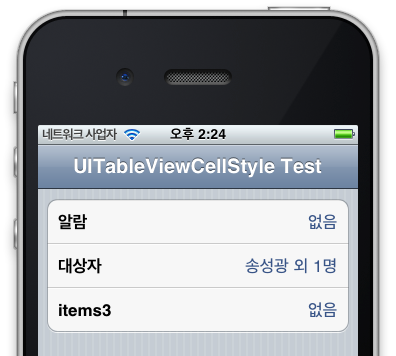
좀더 익숙한 UI로 만들어보려면 UITableViewStyle을 UITableViewStyleGrouped로 변경해보면 된다.
UITableViewCellStyleValue2
UITableViewCellStyleValue2는 UITableViewCellStyleValue1과 반대로 되는 스타일이 된다.
- (UITableViewCell *)tableView:(UITableView *)tableView cellForRowAtIndexPath:(NSIndexPath *)indexPath
{
    static NSString *CellIdentifier = @"Cell";
    UITableViewCell *cell = [tableView dequeueReusableCellWithIdentifier:CellIdentifier];

    // Configure the cell...
    if (cell == nil) {
        cell = [[UITableViewCell alloc] initWithStyle:UITableViewCellStyleValue2 reuseIdentifier:CellIdentifier];
    }


    cell.textLabel.text = [[items objectAtIndex:indexPath.row] valueForKey:@"title"];
    cell.detailTextLabel.text = [[items objectAtIndex:indexPath.row] valueForKey:@"description"];

    return cell;
}
UITalbeViewCellStyleValue1에서 detailTextLabel의 색상을 변경하고 싶을 경우에는 다음과 같이 한다.
- (UITableViewCell *)tableView:(UITableView *)tableView cellForRowAtIndexPath:(NSIndexPath *)indexPath
{
    static NSString *CellIdentifier = @"Cell";
    UITableViewCell *cell = [tableView dequeueReusableCellWithIdentifier:CellIdentifier];

    // Configure the cell...
    if (cell == nil) {
        cell = [[UITableViewCell alloc] initWithStyle:UITableViewCellStyleValue1 reuseIdentifier:CellIdentifier];
    }


    cell.textLabel.text = [[items objectAtIndex:indexPath.row] valueForKey:@"title"];
    cell.detailTextLabel.text = [[items objectAtIndex:indexPath.row] valueForKey:@"description"];

    if (indexPath.row % 2 == 1) {
        cell.detailTextLabel.textColor = [UIColor colorWithRed:1.0 green:0.0 blue:0.0 alpha:1.0];
    } else {
        cell.detailTextLabel.textColor = [UIColor colorWithRed:0.22 green:0.33 blue:0.53 alpha:1.0];
    }
    return cell;
}
위 코드를 추가하고 다시 빌드와 실행을해보고 확인한다.
소스
- https://github.com/saltfactory/Saltfactory_iOS_Tutorial/tree/t4-uitableviewcell
참고
- http://developer.apple.com/library/ios/#documentation/uikit/reference/UITableV
연구원 소개
- 작성자 : 송성광 개발 연구원
- 블로그 : http://blog.saltfactory.net
- 이메일 : saltfactory@gmail.com
- 트위터 : @saltfactory
- 페이스북 : https://facebook.com/salthub
- 연구소 : 하이브레인넷 부설연구소
- 연구실 : 창원대학교 데이터베이스 연구실

