The Pan/Tilt kit that we sell, developed by Dagu with the guys over at Let’s Make Robots, is a great way to mount mobile sensors on your robotic projects. In this tutorial we look at how you can control the Pan/Tilt kit with a Raspberry Pi and the Python programming language.
Required Materials and Equipment
- Pan/Tilt Kit
- Raspberry Pi
- Breadboard for making connections
- Breadboard header pins
- Wires with 2.54mm connectors
- A separate power supply for the servo motors (optional)
Assembly
In order to control the servos of the pan/tilt kit with the Pi, we need to provide the servos with power, and connect their signal lines to GPIO pins on the Pi. Nearly all RC servos have the same wiring layout, although the colours may vary slightly. On the pan/tilt servos, the red (middle) wire is Vcc, the brown wire is Ground and the orange wire is the signal wire.
Connect the servos to the Pi as shown in the circuit diagram below. To begin with, we’d recommend that you get the servos working before you fully assemble the Pan/Tilt kit, as this way you can work out where the centre points of the servos are.
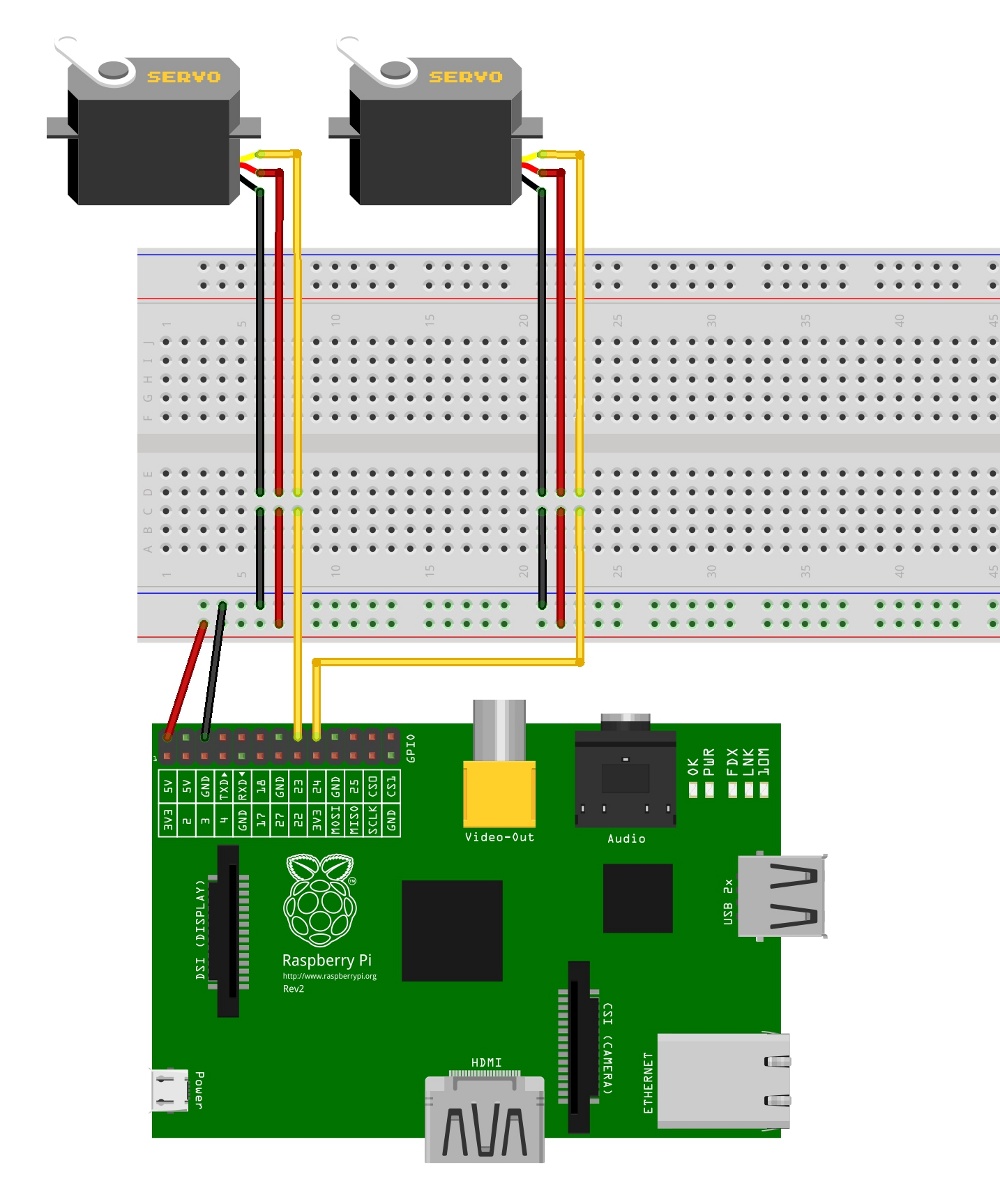
Circuit Diagram – Made using Fritzing

External Servo Power – Diagram made using Fritzing
As the the servos in the Dagu pan/tilt kit don’t require much current, we can power them from the 5V line of the Pi. If you’d prefer to power them from another power supply, or if you’re using different servos that require more current, or a higher voltage, then you can modify the circuit, as shown in this image.
Understanding Servo Motors
Unlike standard DC electric motors, which turn continuously at a given speed, servo motors contain control circuitry which is constantly trying to drive the servo motor to a set angle. Most servo motors are given their target angle by sending a Pulse Width Modulated (PWM) signal along their signal wire. A PWM signal consists of a pulse that repeats at a fixed frequency (usually close to 50Hz for a servo motor), the width of the pulse determines the angle that that we want the servo to move to.
Most servos will be centred with a pulse width of approximately 1500μs, and then turn left or right with smaller or bigger pulse widths. The minimum and maximum allowable pulse widths vary from servo to servo but are usually close to 800μs and 2200μs respectively. You should avoid trying to move a servo beyond its minimum and maximum limits, as this can damage the servo.
Controlling the Pan/Tilt Kit with Python
Once you’ve assembled the circuit, you can control the servos using this Python script. This script requires the RPIO Python library, which can be installed with the following steps
sudo apt-get install python-dev python-pip
sudo pip install RPIO
To use the script run
sudo python py_pan_tilt_control.py
The script will then sit in a loop, waiting for one of 3 commands. A ‘p’ will move the pan servo, ‘t’ will move the tilt servo, and ‘e’ will run an exploration animation, scanning the pan/tilt head back and forth. You can specify either an angle in degrees, or a pulse width in μs for the ‘p’ and ‘t’ commands by putting a number straight after them (no space). The program treats any number less than 500 as an angle in degrees, and all other numbers and a pulse width. As an example
: p90 - Will move the pan servo to 90 degrees
: p2000 - Will set the pan servo's pulse width to 2000μs
: t50 - Will set the tilt servo to 50 degrees
: e - Will the start the exploration animation
The script is a bit too long to explain in detail, but the important bit occurs on lines 144 to 151
#-----------------------------------------------------------
# Create ServoPWM instances to control the servos
panServoPWM = ServoPWM( PAN_PWM_PIN,
    minAnglePulseWidthPair=( 45.0, 1850 ),
    midAnglePulseWidthPair=( 90.0, 1400 ),
    maxAnglePulseWidthPair=( 135.0, 1000.0 ) )
tiltServoPWM = ServoPWM( TILT_PWM_PIN,
    minAnglePulseWidthPair=( 45.0, 1850 ),
    midAnglePulseWidthPair=( 90.0, 1500 ),
    maxAnglePulseWidthPair=( 180.0, 500.0 ) )
This allows you to specify 3 ( angle, pulse width ) pairs for each servo, that tell the script which pulse width corresponds to each angle. The script can then work out the pulse widths to use for other angles by using linear interpolation. The precise pulse widths will vary from servo to servo, so you should experiment with different pulse widths to get your servos turning accurately, and then adjust the ( angle, pulse width ) pairs accordingly.
Once you have your servo motors turning accurately, you can then finish assembling your pan/tilt kit. This approach takes much less time than hurriedly assembling the pan/tilt kit when you first get it, and then having to take it apart again to get it moving accurately, which was our initial approach. ![]()
In order to hold our pan/tilt kit steady as it moved, we mounted the complete circuit onto a bit of foamboard.
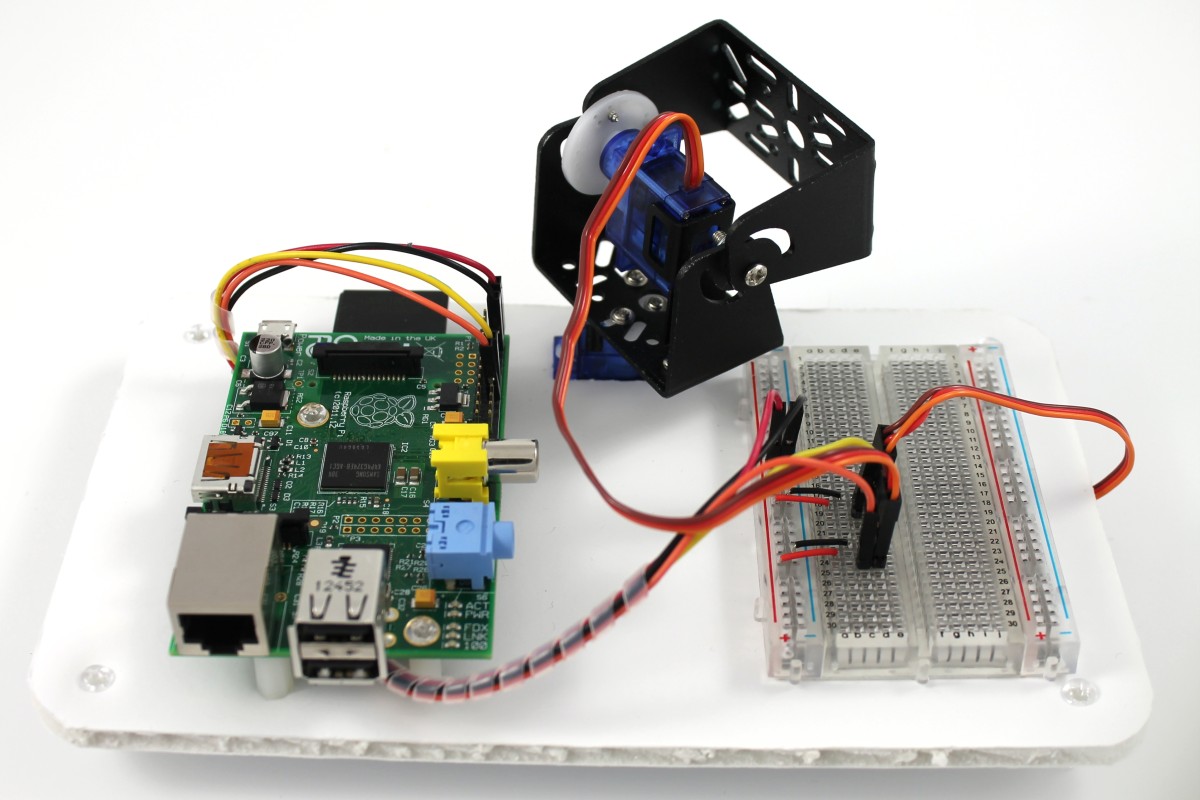
Assembled Circuit
Taking Things Further
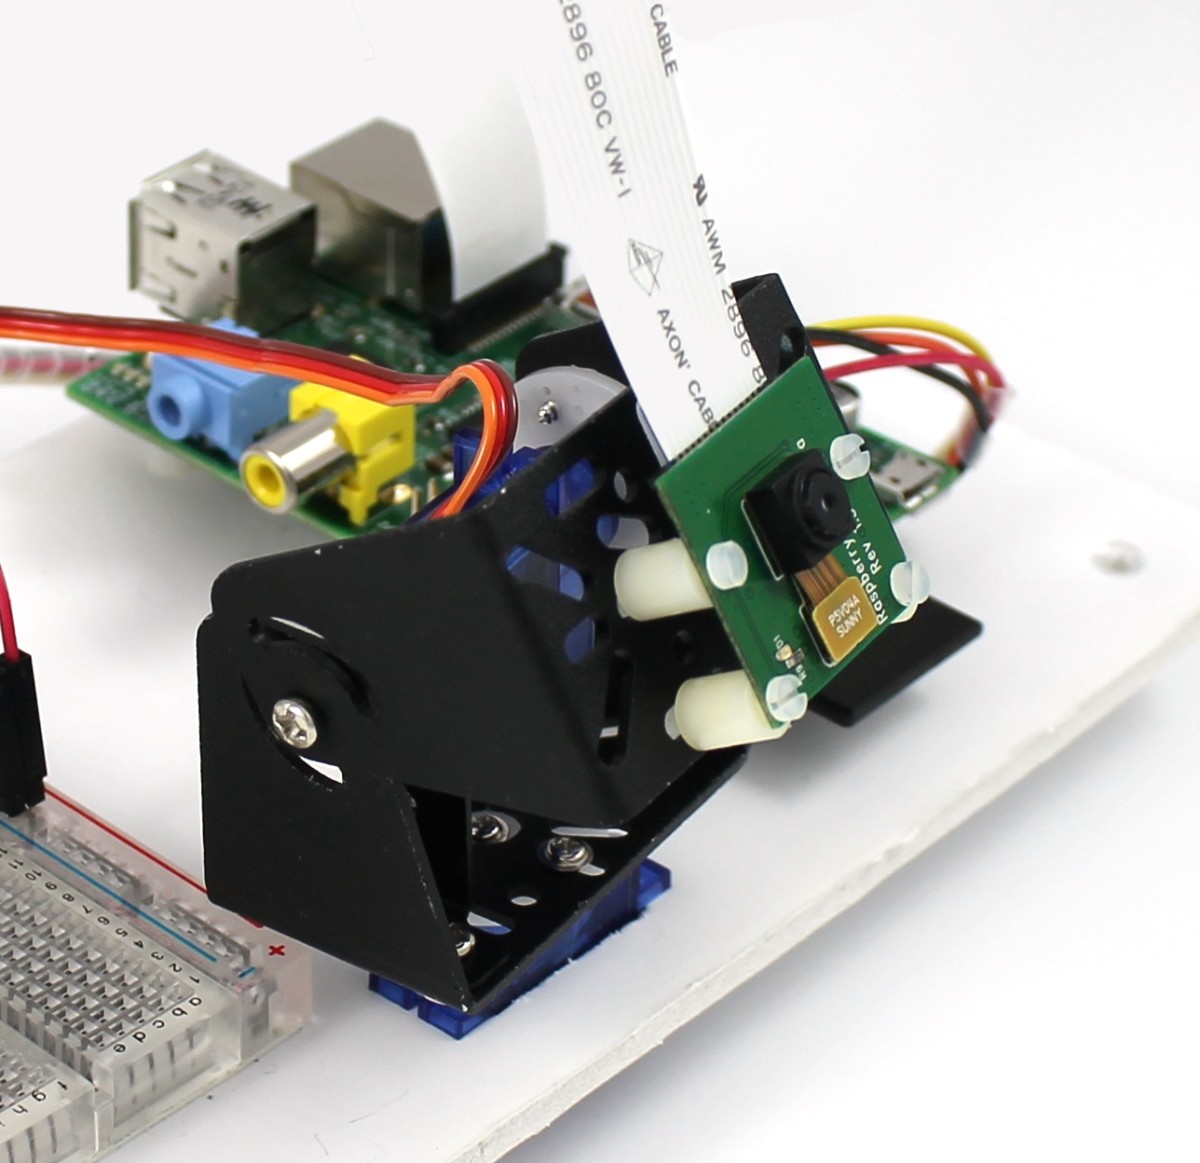
Pan/Tilt Kit with Camera
With the pan/tilt kit up and running, you can now mount sensors on it, and give them a much wider field of view than they would have if they were just mounted statically. The obvious sensor to mount for the Raspberry Pi is the camera, and we’ll hopefully have a look at using the camera with the pan/tilt kit in a future post.
Pingback: Using the Dagu Pan/Tilt kit with the #RaspberryPi | Raspberry PiPod
hello I have successfully installed the 2 servos.
but the problem in the communication command line.
I downloaded and installed
sudo apt-get install python-dev python-pip
sudo pip install RPIO
pyton and scripts.
after launching shell writes:
using hardware PWM
PW increments: 10us
Initializing channel 0 …..
but there is no movement.
you need to change python script?
thanks support
roberto
Hi Roberto,
You shouldn’t need to change the script, some things to look at are
* What commands did you try? The ‘e’ explore command is alwats good
* Are you using the mini servos and pan tilt kit we use here? Bigger servos will need an external battery pack
* Can you check to make sure that you’ve attached the servo signal lines to the correct GPIO pins
* If you’ve got access to an ossiloscope then you should be able to see the PWM signals to control the servos on the GPIO pins
Let me know how you get on.
Regards
Alan
I could move the servo, I need to program servo pan automatically with little or modify existing scripts.
I would like to make panoramic photos automatically with raspicam with insertion script in crontab.
with the actual script pan movement is manual but need to set angle automatically.
are not practical in python.
thanks for the support.
roberto
Hi Roberto,
You can’t do that with the script provided here. But you can modify it a bit to do what you want.
Delete everything from line 158 (above the try statement) down
Replace it with the following
panServoPWM.setCommand( 50 ) # Move pan to 50 degreestiltServoPWM.setCommand( 120 ) # Move tilt to 120 degrees
time.sleep( 0.05 ) # Give time for servos to move (this may not be needed)
RPIO.PWM.clear_channel_gpio( PWM_DMA_CHANNEL, panServoPWM.pwmPin )
RPIO.PWM.clear_channel_gpio( PWM_DMA_CHANNEL, tiltServoPWM.pwmPin )
RPIO.PWM.cleanup()
RPIO.cleanup()
That should set the servos to 50 degrees and 120 degrees. If you use google for a bit you should be able to work out how to use command line arguments to set the pan and tilt angles.
Regards
Alan
Hi, great value kit, although a little fiddly to assemble for the novice (i.e. me!).
I have everything ready, centered and working – to a point. Unfortunately whilst the script works very well, the Pi freezes during or just after a random number of servo moves. I tried putting 1k resistors on the control lines but this doesn’t help.
Can you advise at all?
p.s. was very impressed that you guys added the mountings I needed but didn’t order as the site showed them to be out of stock (I guess they just arrived in the nick of time!) – fantastic customer service <3
Hi Ryan,
This sounds a bit like a power issue. What type of batteries are you using to run your robot?
Cheers
Alan
Hi Alan,
I’m just following the above tutorial, so I only have the two servos hooked into the Pi’s 5v/Ground lines.
Hope you can help!
Hi Ryan,
Apologies, I’m an idiot. I only looked at your commment in the WordPress console and just assumed that you were following our tutorial for building a Pi robot (which often has issues if good batteries aren’t used). I should have read the post title properly.
However, in your case, power could still be an issue. The servo motors on the pan/tilt kit are quite small so the Pi can usually provide enough current. But often with servos, you need to power them with a separate battery pack. I’m assuming that you’re running your Pi from a wall adapter, how many amps is it rated to provide? I find that I can power a Model B Pi, wifi dongle and the pan/tilt kit from a 1.2A wall adapter. Also, if you have a spare battery pack lying around then you could try powering the servos from that (as shown in the diagram entitled ‘External Servo Power’) to see if that improves things.
Regards
Alan
No worries Alan
I tried the Pi with a wall adapter, and same problem. Additionally, the problem happened both when issuing rapid commands (such as having mouse position drive servo position), and issuing sparse commands (such as command-line mode.
The problem can be solved by switching to an external power supply (or presumably, adding something between the Pi’s vcc pin and the servos? Can you advise?). As I say I’m a total electronics newb so I’m not sure exactly what the problem was other than it doesn’t happen when you draw power from an external source. Perhaps it tries drawing too much power and overwhelms the Pi?
Thanks for your continued speedy replies, will definitely be placing further orders
p.s. the servos “buzz” when maintaining position, I assume that’s normal operation…
Hi Ryan,
If the problem can be solved by switching to external power for the servo, then it defintely sounds like your wall adapter can’t deliver enough current. Basically if the current drawn by the servos gets too high then the voltage supplied to the Pi will drop, and it will brownout, shutting down and restarting. The current draw from the servos will increase if they have to change direction quickly or if they’re stalled (i.e. if you stop them from moving with your hand). The wall adapter I tend to use is this one from RS components so it may be worth getting one for your Pi projects.
As for the servo buzz, that is fairly normal for servo motors I’m afraid. Basically the motor control electronics inside the servo are continually seeking back and forth past the target angle, although hopefully you shouldn’t see too much judder. It may be possible to turn off the PWM signal to the servo once you think its reached its target angle which should stop the buzz. But then the servo wouldn’t be held in place and could be turned by hand.
Regards
Alan
yeah no movement here ether does nothing except when I power it on at first
Sorry for the delayed reply.
This sounds a bit odd. Perhaps a bug that’s crept in due to a change in a recent version of Raspbian. Could you maybe try running the script on an older version of Raspbian or one of our older SD card images?
I’ll hopefully have some time to look at this later in the week so that I can check it’s still working on our Pis.
Regards
Alan
Dear All,
Loving the kit, learning about it all the time. A bit fiddly to setup for my fat fingers as initially I forgot to add the washers!
As a point of reference that might help people. I tried this initially on a Raspberry Pi B+, had lots of lock ups and reboots, I figured a power issue. Tried the EXACT same setup on a ‘B’ model, (same GPIO Pins etc) with the same supply and the script worked fine. So if using a Raspberry Pi B+ I would advise using an external power source. I found using a power supply from a crappy powered hub I bought provides a reasonable 5V to use. (Just share the common ground!)
Hi all,
I finally got a chance to test this tutorial with the new Model B+ this weekend, but didn’t get any lockups. The steps I took were
With this setup I was able to run the control script and didn’t get any lock ups at all.
It’s interesting that you were able to run the servos from the Pi on a Model B, but not on a B+ Mark, as in theory the Model B+ consumes less power, and so should have more to spare for the servos. Do you have a link to the wall adapter you used? As if it’s not too much I might buy one to check it out.
Regards
Alan
Alan,
I’m actually powering my Pi using a Pi-Hub by Pimoroni – http://shop.pimoroni.com/products/pihub
It claims to be rated at 3000 mA.
At the time nothing else other than keyboard and mouse were connected to it. I agree the results were not as expected.
Thanks for the response.
Mark
I would like to say thanks for an excellent service Alan. I ordered the Pan/Tilt kit on a Sunday evening and it arrived Tuesday morning, the neatest packaged box I think I’ve ever received! I bet your Xmas parcels look great!!
I’m also very pleased with the Pan/Tilt, requires some patience to put together but does ‘what it says on the tin’ once complete.
Cheers for the kind comments Steve. Can’t take the credit for the neat packaging, that’s my colleague Martin, who helps with packing and shipping the orders. But yes, he does take great pride in his work.
You are welcome. Merry Christmas to all!