Bluetooth is a very low cost and flexible way to add wireless communication to your projects. However, it can also be a bit tricky to set up. In this post we show you how to set up a Raspberry Pi with a USB Bluetooth dongle so that it can communicate with an Arduino using a Bluetooth serial module.
Once the set up is complete, we’ll have a new serial port on the Raspberry Pi that can be used to communicate with the serial Bluetooth module, either using a program such as Cutecom, or using one of the many serial programming libraries such as pySerial.
This tutorial is aimed at a Raspberry Pi running Raspbian, but it should work on other popular Linux distributions such as Ubuntu. To get a USB serial port set up on Windows, a good tutorial can be found here.
Required Materials
- Raspberry Pi with Raspbian installed (this tutorial may also work with other distributions)
- USB Bluetooth dongle
- Arduino, or an Arduino compatible device such as a Seeeduino
- A serial Bluetooth module
Preparing the Arduino/Seeeduino for Connection
To test out the Bluetooth serial connection we’ll use a Seeeduino attached to a Bluetooth serial module. First upload the following sketch to the Seeeduino. This program listens on the serial connection for 2 numbers, and then adds them together before sending them back over the serial connection.
void setup()
{
    Serial.begin( 9600 );    // 9600 is the default baud rate for the
                              // serial Bluetooth module
}

void loop()
{
    // Listen for data on the serial connection
    if ( Serial.available() > 1 )
    {
        // Read in 2 numbers
        float a = Serial.parseFloat();
        float b = Serial.parseFloat();

        // Add them together and return the result
        Serial.println( a + b );
    }
}
Connect the two devices up as shown in the diagram below. These connections will power the Bluetooth serial module from the 5V line of the Seeeduino, and connect RX => TX and TX => RX. Whilst the Bluetooth serial module is connected to the UART lines of the Seeeduino, you won’t be able to program the Seeeduino, but you can still power it with a USB cable.
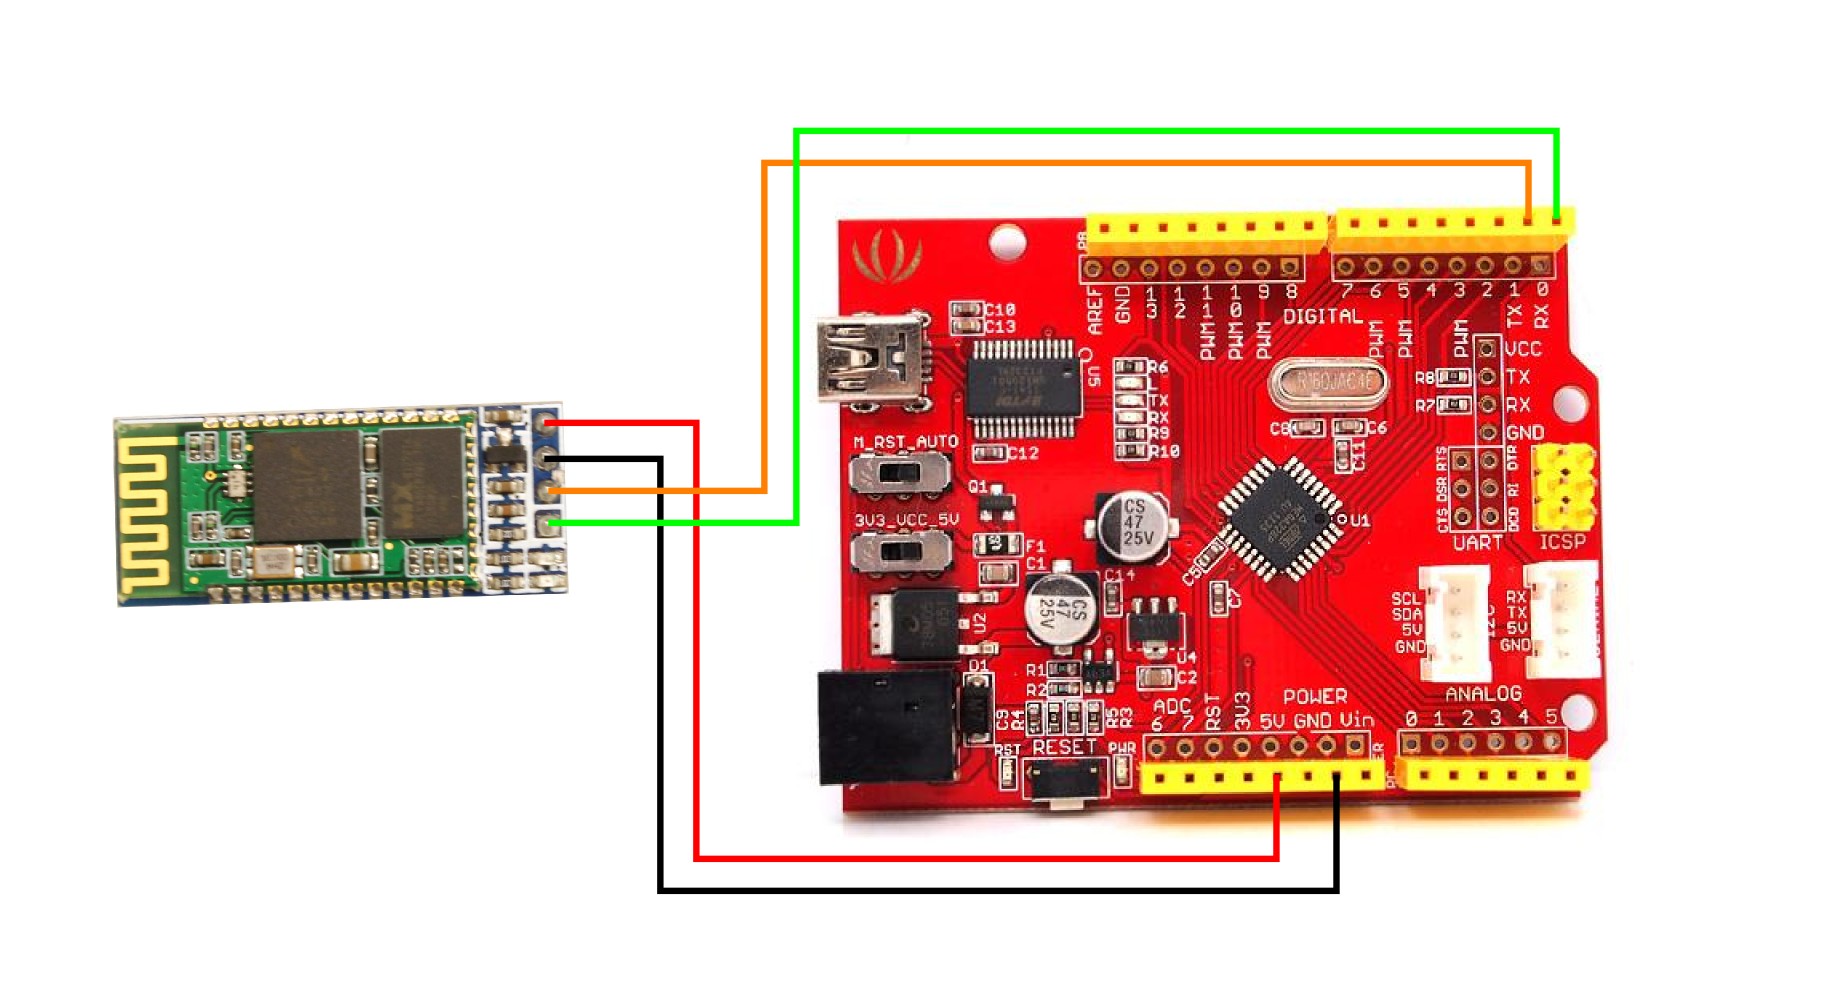
Circuit diagram
Setting up the USB Bluetooth Dongle and Pairing it with the Bluetooth Serial Module
Plug the USB Bluetooth dongle into the Raspberry Pi. Then open up a command line terminal and run the following commands
sudo apt-get update
sudo apt-get install bluetooth bluez-utils blueman
Get the name of your USB Bluetooth dongle by running
hciconfig
It should be something like ‘hci0′
Now, ensuring that the Seeeduino is powered on, run the following command to find out the address of the serial Bluetooth module.
hcitool scan
After a short delay, this should return the addresses of nearby Bluetooth devices. The Bluetooth serial module that we sell should be called something like ‘linvor’.
Before Bluetooth devices can communicate, they need to be paired. This can be done by running the following command
sudo bluez-simple-agent hci# xx:xx:xx:xx:xx:xx
where # is the number of your device (probably hci0) and xx:xx:xx:xx:xx:xx is the address of the serial Bluetooth module. After a pause, this program should ask you for the pin code of the Bluetooth module. By default, the pin for the module we sell is 1234.
At this point, we have 2 Bluetooth devices that can communicate with each other, but we need to set up a protocol called RFCOMM so that they can communicate over a serial connection. Run
sudo nano /etc/bluetooth/rfcomm.conf
to edit rfcomm.conf, and add the following lines
rfcomm1 {
    bind yes;
    device xx:xx:xx:xx:xx:xx;
    channel 1;
    comment "Connection to Bluetooth serial module";
}
Where again, xx:xx:xx:xx:xx:xx is the address of the Bluetooth serial module. Once that is done, save the file and un the following command in order to get the serial port /dev/rfcomm1.
sudo rfcomm bind all
To test that your connection works, you could use a serial terminal such as minicom or cutecom (you may need to install these first). However, we’re going to use a Python script and the pySerial library.
Install pySerial if you don’t already have it using
sudo apt-get install python-serial
Then save the following Python script on your Raspberry Pi as bluetooth_serial_example.py
#! /usr/bin/python

import serial

bluetoothSerial = serial.Serial( "/dev/rfcomm1", baudrate=9600 )

a = None
while a == None:
    try:
        a = float( raw_input( "Please enter the first number: " ) )
    except:
        pass    # Ignore any errors that may occur and try again

b = None
while b == None:
    try:
        b = float( raw_input( "Please enter the second number: " ) )
    except:
        pass    # Ignore any errors that may occur and try again

bluetoothSerial.write( "{0} {1}".format( a, b ) )
print bluetoothSerial.readline()
Navigate to the script and run it using
python bluetooth_serial_example.py
If all goes well, then you should be asked for 2 numbers which are then added together for you. All very trivial, but the cool thing is that the calculation was done on the Seeeduino, with communication over thin air via a Bluetooth serial connection. ![]()
Taking Things Further
You now have a wireless serial connection which you can use for a whole host of applications. You could set up your Raspberry Pi to communicate with remote sensors, or use it to control a swarm of robots!
If you need a baud rate higher than 9600, then the Bluetooth serial module can be reconfigured by sending it AT commands from the Seeeduino. The command set supported by the Bluetooth serial module is given here.
Thanks your guide was very helpful !!!!
Is it possible to stream commands from a virtual machine on the cloud through the bluetooth dongle connected to the Pi so it can communicate with other bluetooth devices? Assuming I could pair it with the dongle of course.
Hi Guilherme,
Practically anything is possible with computers and robotics, provided that you’ve got enough time. One way to do what you want would be to write a server program that ran on the Pi. Your virtual machine could then talk to this server program over the network, and send commands to the bluetooth device. You can write the server program in whichever language you’re most comfortable with, but personally I’d try to use Python and XML-RPC.
Regards
Alan
Hi,
I follow your guide to connect my Adafruit bluetooth module to my pi but i have cannot pair these two devices together. In fact, when i run this command “sudo bluez-simple-agent hci# xx:xx:xx:xx:xx:xx” ( with my module adresse and number of course ) i get an error “Creating device failed: org.bluez.Error.AuthenticationRejected: Authentication Rejected”
How can i solve that ? ( i already try to change the word ‘KeyboardDisplay’ with ‘DisplayYesNo’ of the file in the “/usr/bin/bluez-simple-agent” directory )
Hi Theo,
I’m not sure I’m afraid. I haven’t seen that particular error before and I haven’t had to try the KeyboardDisplay to DisplayYesNo change. Which 2 bluetooth devices are you trying to pair exactly? I.e. which dongle, and can you post a link to the Adafruit device? Also, are you able to pair a bluetooth enabled smartphone to the target bluetooth device? It’s usually easier to pair phones with devices and you can see if the passcode is as you expect etc.
Regards
Alan
Thanks for the quick reply
My bluetooth module is this one https://www.adafruit.com/products/1588 and my bluetooth dongle is this one https://www.adafruit.com/product/1327. I am able to pair my bluetooth module with my laptop so i guess it work properly
After few test, i finally manage to pair my raspberry to my bluetooth module using the command “sudo bluez-simple-agent hci# xx:xx:xx:xx:xx:xx” but we did not ask me any password ( yet i have to use one to pait it with my laptop ) and when i’ve tried to run a test code, there is an error :
Traceback (most recent call last):File "test.py", line 6, in
bluetoothSerial.write("test")
File "/usr/lib/python2.7/dist-packages/serial/serialposix.py", line 485, in write
raise SerialException('write failed: %s' % (v,))
serial.serialutil.SerialException: write failed: [Errno 107] Transport endpoint is not connected
And here is the test code that i use :
#! /usr/bin/pythonimport serial
import time
bluetoothSerial = serial.Serial( "/dev/rfcomm1", baudrate=9600 )
time.sleep(5)
bluetoothSerial.write( "test")
Thanks
Hi Theo, It’s tough to know what to suggest here. It’s odd that the test script fails on the write command, as by that point, it looks like it’s opened the /dev/rfcomm1 serial port. Also odd that it didn’t ask for the password (perhaps time to go back to DisplayKeyboard?). At this point I would test to see if reading from the serial port works. You can modify the Arduino test program to write data using Serial.println and then listen for it using a serial monitor such as cutecom.
Sorry I can’t be more help, but it’s tough without having the specific devices to hand.
Regards
Alan
i have a error
Traceback (most recent call last):
File “bluetooth_serial_example.py” , line 21, in
buetoothSerial.write( “{0} {1}”.format(a,b ))
file “/usr/lib/python2.7/dist-packages/serial/serialposix.py”, line 485, inwrite
raise SerialException(‘write failed: %s’ % (v,))
serial.serialutil.SerialException: write failed: [Errno 5] Input/output error
…. what i shoud do…. help me…
Hi Kim,
That error is sometimes caused if you have another program using the serial port, have you got another program such as cutecom running?
If that’s not the problem then I’d actually recommend using a separate serial program like cutecom to test that the serial port works, before you try to use it with Python.
On the Raspberry Pi you can install cutecom with
sudo apt-get install cutecom
When you run cutecom (needs to be run from the desktop) you type the name of your serial port in, select the baud rate and then open the connection. At that point you should should be able to send a message with 2 numbers to the Arduino.
Best of luck.
Regards
Alan
Thanks for the tut!
When I do this line: bluetoothSerial = serial.Serial(“/dev/rfcomm1″,baudrate=9600)
I get this error:
Process Process-3:
Traceback (most recent call last):
File “/usr/lib/python2.7/multiprocessing/process.py”, line 258, in _bootstrap
self.run()
File “/usr/lib/python2.7/multiprocessing/process.py”, line 114, in run
self._target(*self._args, **self._kwargs)
File “/home/pi/Desktop/Car/RPiCar/BluetoothServer.py”, line 7, in startBluetoothServer
bluetoothSerial = serial.Serial(“/dev/rfcomm1″,baudrate=9600)
File “/usr/lib/python2.7/dist-packages/serial/serialutil.py”, line 260, in __init__
self.open()
File “/usr/lib/python2.7/dist-packages/serial/serialposix.py”, line 280, in open
self._reconfigurePort()
File “/usr/lib/python2.7/dist-packages/serial/serialposix.py”, line 409, in _reconfigurePort
termios.tcsetattr(self.fd, TERMIOS.TCSANOW, [iflag, oflag, cflag, lflag, ispeed, ospeed, cc])
error: (5, ‘Input/output error’)
Do you have any thoughts?
Hi there,
It could be that the serial port hasn’t appeared properly for some reason. What do you get when you run
ls -alh /dev/rfcomm1and
lsusbRegards
Alan
dude,
you are awesome!
This worked like a blast!
I am just testing my thermal printer which is connected via bluetooth,
It just simply worked and I got a print of what I wrote!
Many many thanks man!
Keep posting such articles..
Hi I have followed these steps exactly and ones similar put on by UUGear, but when I get to the “rfcomm bind all” command the Pi always returns “Missing dev parameter” I copy the information exactly and have checked for errors and have no idea what is missing. Has anyone else had this problem?
thanks for this tutorial, but I am getting the following error:
Creating device failed: org.bluez.Error.AuthenticationCanceled: Authentication Canceled
I am trying to control two arduino robots through raspberry pi using Bluetooth, I have already created the rfcomm file to control one robot, should i include the address of the second one in same rfcomm file? if yes, could someone please tell me how?I’ve done this is it correct?
# RFCOMM configuration file.
rfcomm0 {
# Automatically bind the device at startup
bind yes;
# Bluetooth address of the device
device 30:14:10:15:20:90;
# RFCOMM channel for the connection
channel 1;
# Description of the connection
comment “Example Bluetooth device”;
}
rfcomm1 {
# Automatically bind the device at startup
bind yes;
# Bluetooth address of the device
device 10:14:06:16:00:09;
# RFCOMM channel for the connection
channel 1;
# Description of the connection
comment “Example Bluetooth device”;
}
Hi there,
Sorry for the delay in approving this comment.
Your configuration file looks reasonable, but I’ve no idea if it will work I’m afraid, as I don’t have experience trying to control 2 devices at the same time. Hopefully someone else can give you a more useful answer.
Also, if you’ve been able to make any further progress since you last posted then I’d be very interested to know how you got on.
Regards
Alan