
This is my adventure with an OX build and the V-slot system. Grab a cup of coffee and enjoy (at least the coffee) ... (pictures will follow at some point, sorry ... I'm currently in a train !)
It all started with some innocent surfing of the web. Goes to show what sort of trouble one can get into surfing the web. Here I am building a CNC router / milling machine with NO (!!) real skills or particular knowledge. Sure, my dad was a machinist/tool and die maker since for ever. Some of it might of rubbed off on me. But it is as close as I ever been to being mechanically inclined. Although the last decade or so has amazed myself (and others !) with all sorts of manual work. But on to the myOX build we go.
After much surfing, looking for ... I forget ... something better than surfing the web ?? I accidentally happened unto the OX CNC build, OpenBuilds and related forums. Many many hours later, looking through alternatives, including... turn away... pre-built multi-thousand dollars machines, which are way off any of our budgets, especially mine, I was sold on all of the merits of the OX design.
One can follow the standard builds as detailed in Mark Carew's OpenBuilds OX build (the videos are very good guides) and any of the variations or let their imagination, call it needs or wants, take over for that "perfect" design. I, being who I am, chose the latter route. Thus began my adventure.
Once decided on the base design, I began dreaming about the "perfect" design ... as I perceived it.
I will probably not do much for a while with myOX, but I do like to think way ahead of myself. So I wanted a design which could basically mill a complete door panel or conference table top ! While a reasonable budget was to be allocated. So I grabbed SketchUp, took the base design of the OX and I started modifying. (The file is not clean enough to post, but one will follow; remember, I'm writing this while in a train).
The catch was the size of my garage (technically called a "1.5 car garage" ... if you drive a Smart) and my wife's car occupying the space most of the year. So I started scaling myOX down a bit realizing I might just do the odd cabinet door and probably no more than the odd sign (not sure why yet) and a few molds and parts for my other recent hobbies (scale R/C monster truck, plane and multicopter). Maybe a bit of engraving of my gadgets (if I ever trust myself in pointing myOX's tool end to them).
Oh, I also wanted to keep the cutting of V-slot, or anything for that matter, to a minimum.
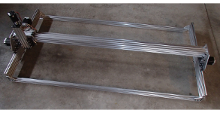
myOX became a 1500 mm wide (X axis) by 750 mm deep (Y axis) with a Z axis of about 10". This is about 4' x 2' work area. With the 4+' width, call it the throat, I could, one day, route/mill plenty of projects ... as long as I do it in sections of about 2'. Just slide the work piece between sections. The approach sounds reasonable enough, for now. I'll figure the part about aligning sections when time comes to work such a project.
At this point, I'm real happy and eager to get started since I should "soon" be able to work full 4'x8' sheet of whatever and even "real" thick pieces.
With the Z-axis and a plan for myOX to be become bottomless, at least in a fair sized section of it's work area, I could work on projects needing a bit more depth than normal. In fact, the plan goes a step further with the thought of having some form of a 4th axis "beneath" the myOX. It could be a manual one for all I care at this point. Think of working on 5 faces of a mold for a scale truck body (bottom remains flat) without a 5 axis milling machine ! Just "rotate and align" the next face ...
Now armed with a ... vision, I was off shopping for the components. I'll post my parts list 'later' ...
I, like several others, had to hunt for the many parts... including the sometimes elusive V-slot. The first lesson came hard : make certain you have updated the parts list for YOUR design ! It seems as obvious a step as any other, but even the standard OX parts list has a few ... say ... discrepancies.
OpenBuilds Partstore, OpenSource Luthier Supply, ProtoDrake (in Canada, like me), StepperOnLine, McMaster-Carr, Fastenal (on Canadian side for me) and even unlikely sources such as BangGood, the local Canada Salvage and Canadian Tire stores came into play as the build became more precise and I started ordering some extras and even bling to dress up the yet to be finished myOX.
As of now, June 19, 2014, the mechanical assembly is just about done ... short of the spacer length to hold the work surface as I am short of ... ya ! ... T-nuts. It's always the lowest cost part which will be holding up a project. My parts list was short on a few items, my dyslexia (?) also had an eror or two sneak in (ex: some M3 screws ordered instead of M5) and just being in a rush to get started slowed things down. For now, this remains a weekend project for me having a full time job (and wife).
Mind you, all of the electronics is in. So, if not for this trip to Ottawa over an extended weekend, I would be working on the second phase : cabling and bringing to life to myOX.
On the mechanical side, I came up with a few tweaks, some due to getting regular head M5 screws - required a few extra shims here and there, others just because I tend to be "lazy" - quit and dirty jib for assembling the XZ assembly without sweating it. (photos to follow).
Let me post the pictures and such some place so I can refer to them here.
By the time I get around to finishing the cabling and electronics I might call myOX FrankenOX ... The saga will continue.
myOX : a 4' x 2' OX CNC with potential
Build in 'Cartesian Style CNC' published by Serge E., Jun 19, 2014 at 6:36 PM.
This is the story of me building myOX - my version of the "ideal" OX. I wanted a machine which could work piece at least 4' wide, as long as I could feed through (don't be shy, think "infinity") AND go deep on multiple faces - a manual 4th axis to carve, say, molds for thermoforming polycarbonate shells. I have loads of ideas to take myOX towards that goal and way beyond. Time will tell and I will update this build as I go along, probably creating a few other builds along the way ...
-
-
Build Author Serge E., Find all builds by Serge E.
-
- Loading...
-
Build Details
- Build License:
-
- CC - Attribution Share Alike - CC BY SA
Reason for this Build
I sure would like to know ...
It started with my getting into scale R/C monster truck and not wanting to pay a fortune for body shells I'll be destroying. I started building a thermoforming thing realizing I needed to do molds and not wanting to play with plaster of paris ... So here I am building myOX, having spent well over 1000$ and still no mold done - that's in neighborhood of ... 30 body shells ! Should I mention my monster truck is shelved having burnt the dual motor and exploded the transmission during an eventful stunt ?
But myOX will allow me to engrave and even sculpt a complete extra wide door or even a real big table top ... along with a bunch of signs and whatnots. First, a keychain or something manageable by me more than myOX.
... I guess it was for the challenge as I am not mechanically inclined and needed to challenge more than my overactive single grey cell. Let's get physical ... do some chips, lots of noise late at night and probably more dust than I should !")
Inspired by
The one and only OX CNC Machine by Mark Carew and those who followed in his foot steps, as I am doing with the build of myOX
© XenZine Articles from Pick a Tutor