posted Sep 7, 2014, 9:13 PM by Jonathan Dowdall
[
updated Sep 7, 2014, 9:16 PM
]
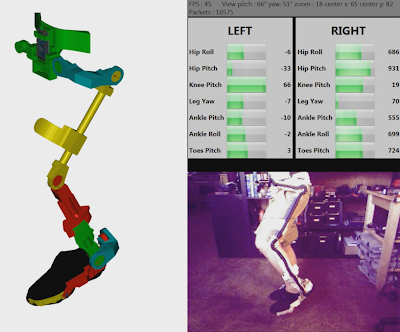
Finally got the exoskeleton electronics all hooked up. Making the wire guides integrate with the frame and look decent turned out to be a bit more involved than I initially anticipated. In the end I 3d printed them using a new flexible PLA. The wireless communication (WiFi) is working better now that I'm using an Android phone attached to the Arduino Mega rather than the CC3000. The left leg is decently calibrated and the model in the video is moving based on the joint positions being streamed from the exoskeleton in real-time ( video). There are still the occasional hiccups in the display update (example at 27s into the video), but I'm not sure it is a communication issue or something with the display thread.
|
posted Aug 14, 2014, 8:42 AM by Jonathan Dowdall
[
updated Sep 8, 2014, 8:49 AM
]
Added a yaw joint to the exoskeleton to allow the foot to rotate which gives the wearer the ability to turn instead of only walking forward. The first version of the yaw joint (the T shaped piece near the bottom of my calf) used ball bearings and wasn't very smooth ( video). For the second version I used 10 small ring bearings to create rollers which works much better. I also wired up all of the potentiometers on the left leg. Reading their values and sending them over wifi with an Adruino Mega and a TI CC3000 wifi board is fast (tested up to 20Hz). The only problem is that the CC3000 randomly blocks on sending sometimes for up to a full second. If this can't be fixed I'll need to figure out another way to transmit the data wirelessly (wifi from an android device, beaglebone, or maybe bluetooth).
|
posted Jul 24, 2014, 9:28 AM by Jonathan Dowdall
[
updated Aug 14, 2014, 8:42 AM
]

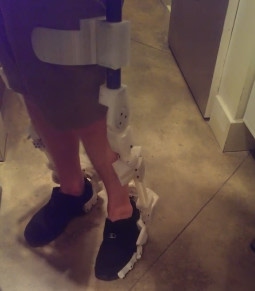
After becoming exceedingly tired of moving individual sliders for each joint for each frame of a walking cycle I started thinking about better ways to control a walking robot. A couple of years ago I had tried using a Kinect to do real-time skeletal extraction to control FOBO (the fourth prototype). While I could get this approach to recognize large gestures, it was never close to accurate or fast enough to do real-time joint level actuation for a complicated dynamical system. Around that same time I also looked into using potentiometers and a harness on my legs to extract the joint positions. This approach showed promise because the joint positions could be read very quickly, but the harness was flimsy, didn't give consistent results, and required a lot of calibration every time it was used. Recently when I started thinking about this problem again I did some analysis on why my original harness had failed and realized that the harness needed to be rigid and that the potentiometers had to be isolated from any joint torque to keep them from failing. When I made the original harness I didn't really have the option to 3D print a rigid harness because my printer at the time (Makerbot Thingomatic) wasn't exactly capable of making the size and volume of parts needed for such a large build. My current printer, the Replicator2, is a real work horse and has been printing like a champ for over 2 years now, so I was able to move forward with fully engineered rigid version of the exoskeleton. The picture shows the exoskeleton hanging on its docking station and there is a quarter near the top for scale. The exoskeleton is made of 3D printed parts (white) and PVC sprinkler pipe (grey), and an Arduino Mega for reading the sensors and external communication. The legs and waist have latching straps to hold them in place while the exoskeleton is being worn. It currently has 10 joints each with a torque isolated potentiometer to measure the rotation. I'm planning on adding at least another joint in each foot for the toes and maybe another in the legs for yaw (although this one will be a bit tricky). I haven't tested reading all of the joints together yet, but some initial experiments look promising.
|
posted Oct 20, 2013, 4:46 PM by Jonathan Dowdall
[
updated Oct 20, 2013, 4:48 PM
]
The September 2013 print edition of the technology and gadget magazine, Stuff U.K., had a feature on cool 3D printed things which included a full page on ROFI! A big thanks to Mark Wilson, the features editor at Stuff Magazine U.K., for reaching out to me and coordinating the photo shoot. |
posted Jun 25, 2013, 9:14 AM by Jonathan Dowdall
 Bot Object Bot Object is a new 3D printer company that just launched. They printed a ROFI with some sweet feet ... the gradient is really cool. The printer has some amazing features, but is at the high end of the hobby market price range, so I'm eager to hear some feedback from early adopters. Had to give them a post for putting ROFI on their main page! |
posted Feb 4, 2013, 9:22 AM by Jonathan Dowdall
I've been designing an actuator that is powerful enough for a full sized humanoid robot. The goal is to get something that has huge torque, a parts cost of around $100, meets durability requirements, and is easy to build. The early stages look promising ( video), but I think that it will take a long time and many iterations to get it right ... which is why I'm starting now! |
posted Jan 1, 2013, 9:28 PM by Jonathan Dowdall
[
updated Jan 2, 2013, 8:54 PM
]
Stumbled onto a design for a 3D printed Jansen Linkage on Thingiverse. A Jansen linkage is a mechanical linkage system for creating a complex gait that is actuated by a single servo. To create a full walking robot 3 leg pairs are needed. I was intrigued and tried to print out several Thingiverse designs but couldn't get anything that was low enough friction to actually be functional. The Thingiverse designs were also lacking a servo harness and instructions. I created a new design that uses radial bearings and a MG996R servo that looks very promising (see the video). Unfortunately I ran out of bearings, so I couldn't finish the robot (more bearing on order now). I might post the parts if anyone is interested. Could be fun to try and design a mechanical linkage for some portion of a bipedal leg. Check out the TED talk that Theo Jansen gave where he shows off his beach walking robots ... interesting for the walking mechanism and simple mechanical "intelligence". Also found an interesting site that compares the Jensen linkage with a Klann linkage. |
posted Dec 26, 2012, 9:11 PM by Jonathan Dowdall
[
updated Apr 26, 2013, 6:18 PM
]
I've been experimenting with a new version of the Strain Wave Drive (same idea as a harmonic drive but not made by the Harmonic drive company). It is fully functional and includes a dynamic spline for the output rather than the stabilizer and cup style flex spline as in the previous prototype. This version still uses bbs for the bearings, which is probably a weak point in the design but keeps the cost of the drive below $5. The double ring bearings on the dynamic spline help to stabilize the output of the drive and reduce any off axis wobble. Video of the new strain wave drive in action. |
posted Dec 6, 2012, 6:38 PM by Jonathan Dowdall
[
updated Mar 29, 2013, 8:46 AM
]
A big thanks to Andy for designing a custom electronics board for FOBO! This combines the parts from the Arudino Uno and the servo shield into one inexpensive board. He went above and beyond by also creating a great tutorial on how to make the board and assemble the components. This will be really helpful to everyone who hasn't been able to get a hold of the discontinued servo shield used in FOBO. Really great work! |
posted Nov 27, 2012, 5:59 PM by Jonathan Dowdall
[
updated Nov 27, 2012, 6:00 PM
]
Made a 1/3 scale model of ROFI. It has all of the same parts
as ROFI, but the electronics and servos are all printed (i.e. the robot
isn't going to be moving by itself without a lot of imagination ;-). I
originally created it because I just got a Replicator 2 and wanted to
see what the new printer was capable of. After the model was printed and
sitting on my desk two things occurred to me :
1. Working at 1/3 scale would be really useful for prototyping future robots.
2. Because it was so fast and cheap (3 hours to print and $2 in parts)
it might be a good "gateway drug" to get more people to try building
robots. After all, I never really thought I could build robots until I
downloaded the parts and built a modified Z stage for my Cupcake
printer. |
|