Skip to content

Scala Projects Classified Properly

We just fixed an issue where some Scala projects were being misclassified as Java projects. Now, recent projects like Twitter's FlockDB and Gizzard show up in the Scala language dashboard as they should.

package examples

/** Quick sort, functional style */
object sort1 {
  def sort(a: List[Int]): List[Int] = {
    if (a.length < 2)
      a
    else {
      val pivot = a(a.length / 2)
      sort(a.filter(_ < pivot)) :::
           a.filter(_ == pivot) :::
           sort(a.filter(_ > pivot))
    }
  }
  def main(args: Array[String]) {
    val xs = List(6, 2, 8, 5, 1)
    println(xs)
    println(sort(xs))
  }
}

You can also use Scala syntax highlighting in Gist now. It's bonus.

Tracking Deploys with Compare View

We log a message to Campfire anytime someone deploys code to staging or production. It looks like this:

campfire notification screencap

Recently, we added the link pointing to a Compare View where you can review the commits that were shipped out along with a full diff of changes:

compare view screencap

This makes it really easy for everyone to keep tabs on what's being deployed and encourages on the fly code review. And because Campfire keeps transcripts when you're offline, it doubles as a kind of deployment log. I typically start my day by catching up on the Campfire backlog, hitting the Compare View links as I go. When I'm done, I have a bunch of tabs queued up in my browser for review.

How It Works

The most important piece of this trick is generating the Compare View URL. The example in the screen cap above is truncated, so I'll reproduce it here in full here:

https://github.com/defunkt/github/compare/88ad045...46be4aa

Here, defunkt/github is the repository with the code we're deploying. Just in case it isn't obvious: you'll need to change that to your own repository.

The last part of the URL is the commit range. It's important to use commit SHA1s as the starting and ending points. We could have used the name of the branch being deployed as the ending point, but doing so would cause the Compare View to change when commits are pushed to the branch in the future. By using the commit SHA1s, we're guaranteed that the Compare View will never change.

Here's the Capistrano recipe we use to generate the Compare View URL and send the Campfire notification (config/deploy/notify.rb):

require 'etc'
require 'campfire'

namespace :notify do
  desc 'Alert Campfire of a deploy'
  task :campfire do
    branch_name = branch.split('/', 2).last
    deployer = Etc.getlogin
    deployed = `curl -s https://github.com/site/sha`[0,7]
    deploying = `git rev-parse HEAD`[0,7]
    compare_url = "#{source_repo_url}/compare/#{deployed}...#{deploying}"

    Campfire.notify(
      "#{deployer} is deploying " +
      "#{branch_name} (#{deployed}..#{deploying}) to #{rails_env} " +
      "with `cap #{ARGV.join(' ')}` (#{compare_url})"
    )
  end
end

before "deploy:update", "notify:campfire"

This isn't something you can drop into an existing project unmodified, but it should serve as a good starting point. A bit more detail on what's happening in there:

  • deployed = `curl -s https://github.com/site/sha `[0,7]
    This is how we figure out what's already deployed. The response is a 40 character SHA1 of the commit the site is currently running under.

  • deploying = `git rev-parse HEAD`[0,7]
    This is how we figure out what's being deployed right now. Again, a 40 character SHA1 of the working repository's HEAD commit.

  • Campfire.notify(...) This is a lightweight wrapper over the Campfire API.

And that's it, really.

This technique could easily be adapted for other deployment strategies (Heroku -- where you at) or notification systems like email, IRC, or Twitter.

New Languages Highlighted

CoffeeScript (.coffee)

LotteryDraw: {
  play: ->
    result:   LotteryTicket.new_random()
    winners:  {}
    this.tickets.each (buyer, ticket_list) ->
      ticket_list.each (ticket) ->
        score: ticket.score(result)
        return if score is 0
        winners[buyer] ||= []
        winners[buyer].push([ticket, score])
    this.tickets: {}
    winners
}

Objective-J (.j)

+ (id)boxEnclosingView:(CPView)aView
{
    var box = [[self alloc] initWithFrame:CGRectMakeZero()],
        enclosingView = [aView superview];

    [box setFrameFromContentFrame:[aView frame]];

    [enclosingView replaceSubview:aView with:box];

    [box setContentView:aView];

    return box;
}

Haml (.haml)

%div[@article]
  %h1= @article.title
  %div= @article.body
#id[@article] id
.class[@article] class
#id.class[@article] id class
%div{:class => "article full"}[@article]= "boo"
%div{'class' => "article full"}[@article]= "moo"
%div.articleFull[@article]= "foo"
%span[@not_a_real_variable_and_will_be_nil]
  Boo

Sass (.sass)

#main
  :width 15em
  :color #0000ff
  p
    :border
      :style dotted
      /* Nested comment
        More nested stuff */
      :width 2px
  .cool
    :width 100px

#left
  :font
    :size 2em
    :weight bold
  :float left

Optimizing asset bundling and serving with Rails

We spend a lot of time optimizing the front end experience at GitHub. With that said, our asset (css, javascript, images) packaging and serving has evolved to be the best setup I've seen out of any web application I've worked on in my life.

Originally, I was going to package what we have up into a plugin, but realized that much of our asset packaging is specific our particular app architecture and choice of deployment strategy. If you haven't read up on our deployment recipe read it now. I cannot stress enough how awesome it is to have 14 second no downtime deploys. In any case, you can find the relevant asset bundling code in this gist

Benefits of our asset bundling

  • Users never have to wait while the server generates bundle caches, ever. With default Rails bundling, each time you deploy, each request until your server generates the bundle has to wait for the bundle to finish. This makes your site pause for about 30s after each deploy.
  • We can use slower asset minifiers (such as YUI or Google Closure) without consequence to our users.
  • Adding new stylesheets or javascripts is as easy as creating the file. No need to worry about including a new file in every layout file.
  • Because we base our ASSET_ID off our git modified date, we can deploy code updates without forcing users to lose their css/js cache.
  • We take full advantage of image caching with SSL while eliminating the unauthenticated mixed content warnings some browsers throw.

Our asset bundling is comprised of several different pieces:

  1. A particular css & js file structure
  2. Rails helpers to include css & js bundles in production and the corresponding files in development.
  3. A rake task to bundle and minify css & javascript as well as the accompanying changes to deploy.rb to make it happen on deploy
  4. Tweaks to our Rails environment to use smart ASSET_ID and asset servers

CSS & JS file layout

Our file layout for CSS & JS is detailed in the README for Javascript, but roughly resembles something like this:

public/javascripts
|-- README.md
|-- admin
| |-- date.js
| `-- datePicker.js
|-- common
| |-- application.js
| |-- jquery.facebox.js
| `-- jquery.relatize_date.js
|-- dev
| |-- jquery-1.3.2.js
| `-- jquery-ui-1.5.3.js
|-- gist
| `-- application.js
|-- github
| |-- _plugins
| | |-- jquery.autocomplete.js
| | `-- jquery.truncate.js
| |-- application.js
| |-- blob.js
| |-- commit.js
`-- rogue
    |-- farbtastic.js
    |-- iui.js
    `-- s3_upload.js

I like this layout because:

  • It allows me to namespace specific files to specific layouts (gist, github.com, iPhone, admin-only layouts, etc) and share files between apps (common).
  • I can lay out files however I want within each of these namespaces, and reorganize them at will.

Some might say that relying on including everything is bad practice -- but remember that web-based javascript is almost exclusively onDOMReady or later. That means that there is no dependency order problems. If you run into dependency order issues, you're writing javascript wrong.

Rails Helpers

To help with this new bundle strategy, I've created some Rails helpers to replace your standard stylesheet_link_tag and javascript_include_tag. Because of the way we bundle files, it was necessary to use custom helpers. As an added benefit, these helpers are much more robust than the standard Rails helpers.

Here's the code:

require 'find'
module BundleHelper
  def bundle_files?
    Rails.production? || Rails.staging? || params[:bundle] || cookies[:bundle] == "yes"
  end

  def javascript_bundle(*sources)
    sources = sources.to_a
    bundle_files? ? javascript_include_bundles(sources) : javascript_include_files(sources)
  end

  # This method assumes you have manually bundled js using a rake command
  # or similar. So there better be bundle_* files.
  def javascript_include_bundles(bundles)
    output = ""
    bundles.each do |bundle|
      output << javascript_src_tag("bundle_#{bundle}", {}) + "\n"
    end
    output
  end

  def javascript_include_files(bundles)
    output = ""
    bundles.each do |bundle|
      files = recursive_file_list("public/javascripts/#{bundle}", ".js")
      files.each do |file|
        file = file.gsub('public/javascripts/', '')
        output << javascript_src_tag(file, {}) + "\n"
      end
    end
    output
  end

  def javascript_dev(*sources)
    output = ""
    sources = sources.to_a
    sources.each do |pair|
      output << javascript_src_tag(Rails.development? ? "dev/#{pair[0]}" : pair[1], {})
    end
    output
  end

  def stylesheet_bundle(*sources)
    sources = sources.to_a
    bundle_files? ? stylesheet_include_bundles(sources) : stylesheet_include_files(sources)
  end

  # This method assumes you have manually bundled css using a rake command
  # or similar. So there better be bundle_* files.
  def stylesheet_include_bundles(bundles)
    stylesheet_link_tag(bundles.collect{ |b| "bundle_#{b}"})
  end

  def stylesheet_include_files(bundles)
    output = ""
    bundles.each do |bundle|
      files = recursive_file_list("public/stylesheets/#{bundle}", ".css")
      files.each do |file|
        file = file.gsub('public/stylesheets/', '')
        output << stylesheet_link_tag(file)
      end
    end
    output
  end

  def recursive_file_list(basedir, extname)
    files = []
    basedir = RAILS_ROOT + "/" + basedir
    Find.find(basedir) do |path|
      if FileTest.directory?(path)
        if File.basename(path)[0] == ?.
          Find.prune
        else
          next
        end
      end
      files << path.gsub(RAILS_ROOT + '/', '') if File.extname(path) == extname
    end
    files.sort
  end
end

Our application.html.erb now looks something like this:

<%= javascript_dev ['jquery-1.3.2', "#{http_protocol}://ajax.googleapis.com/ajax/libs/jquery/1.3.2/jquery.min.js"] %>
<%= javascript_bundle 'common', 'github' %>

This includes jQuery and all javascript files under public/javascripts/common and public/javascripts/github (recursively). Super simple and we probably won't need to change this for a very long time. We just add files to the relevant directories and they get included magically.

For pages that have heavy javascript load, you can still use the regular javascript_include_tag to include these files (we keep them under the public/javascripts/rogue directory).

Bundle rake & deploy tasks

The javascript_bundle and stylesheet_bundle helpers both assume that in production mode, there'll be a corresponding bundle file. Since we are proactively generating these files, you need to create these manually on each deploy.

RAILS_ROOT ||= ENV["RAILS_ROOT"]

namespace :bundle do
  task :all => [ :js, :css ]

  task :js do
    compression_method = "closure"

    require 'lib/js_minimizer' if compression_method != "closure"
    closure_path = RAILS_ROOT + '/lib/closure_compressor.jar'

    paths = get_top_level_directories('/public/javascripts')

    targets = []
    paths.each do |bundle_directory|
      bundle_name = bundle_directory.gsub(RAILS_ROOT + '/public/javascripts/', "")
      files = recursive_file_list(bundle_directory, ".js")
      next if files.empty? || bundle_name == 'dev'
      target = RAILS_ROOT + "/public/javascripts/bundle_#{bundle_name}.js"

      if compression_method == "closure"
        `java -jar #{closure_path} --js #{files.join(" --js ")} --js_output_file #{target} 2> /dev/null`
      else
        File.open(target, 'w+') do |f|
          f.puts JSMinimizer.minimize_files(*files)
        end
      end
      targets << target
    end

    targets.each do |target|
      puts "=> bundled js at #{target}"
    end
  end

  task :css do
    yuipath = RAILS_ROOT + '/lib/yuicompressor-2.4.1.jar'

    paths = get_top_level_directories('/public/stylesheets')

    targets = []
    paths.each do |bundle_directory|
      bundle_name = bundle_directory.gsub(RAILS_ROOT + '/public/stylesheets/', "")
      files = recursive_file_list(bundle_directory, ".css")
      next if files.empty? || bundle_name == 'dev'

      bundle = ''
      files.each do |file_path|
        bundle << File.read(file_path) << "\n"
      end

      target = RAILS_ROOT + "/public/stylesheets/bundle_#{bundle_name}.css"
      rawpath = "/tmp/bundle_raw.css"
      File.open(rawpath, 'w') { |f| f.write(bundle) }
      `java -jar #{yuipath} --line-break 0 #{rawpath} -o #{target}`

      targets << target
    end

    targets.each do |target|
      puts "=> bundled css at #{target}"
    end
  end

  require 'find'
  def recursive_file_list(basedir, ext)
    files = []
    Find.find(basedir) do |path|
      if FileTest.directory?(path)
        if File.basename(path)[0] == ?. # Skip dot directories
          Find.prune
        else
          next
        end
      end
      files << path if File.extname(path) == ext
    end
    files.sort
  end

  def get_top_level_directories(base_path)
    Dir.entries(RAILS_ROOT + base_path).collect do |path|
      path = RAILS_ROOT + "#{base_path}/#{path}"
      File.basename(path)[0] == ?. || !File.directory?(path) ? nil : path # not dot directories or files
    end - [nil]
  end
end

Throw this into lib/tasks/bundle.rake and the corresponding YUI & Closure jars and then run rake bundle:all to generate your javascript. You can customize this to use the minifying package of your choice.

To make sure this gets run on deploy, you can add this to your deploy.rb:

namespace :deploy do
  desc "Shrink and bundle js and css"
  task :bundle, :roles => :web, :except => { :no_release => true } do
    run "cd #{current_path}; RAILS_ROOT=#{current_path} rake bundle:all"
  end
end

after "deploy:update_code", "deploy:bundle"

Tweaks to production.rb

The last step in optimizing your asset bundling for deploys is to tweak your production.rb config file to make asset serving a bit smarter. The relevant bits in our file are:

config.action_controller.asset_host = Proc.new do |source, request|
  non_ssl_host = "http://assets#{source.hash % 4}.github.com"
  ssl_host = "https://assets#{source.hash % 4}.github.com"

  if request.ssl?
    if source =~ /\.js$/
      ssl_host
    elsif request.headers["USER_AGENT"] =~ /(Safari)/
      non_ssl_host
    else
      ssl_host
    end
  else
    non_ssl_host
  end
end

repo = Grit::Repo.new(RAILS_ROOT)
js  = repo.log('master', 'public/javascripts', :max_count => 1).first
css = repo.log('master', 'public/stylesheets', :max_count => 1).first

ENV['RAILS_ASSET_ID'] = js.committed_date > css.committed_date ? js.id : css.id

There's three important things going on here.

First— If you hit a page using SSL, we serve all assets through SSL. If you're on Safari, we send all CSS & images non-ssl since Safari doesn't have a mixed content warning.

It is of note that many people suggest serving CSS & images non-ssl to Firefox. This was good practice when Firefox 2.0 was standard, but now that Firefox 3.0 is standard (and obeys cache-control:public as it should) there is no need for this hack. Firefox does have a mixed content warning (albeit not as prominent as IE), so I choose to use SSL.

Second— We're serving assets out of 4 different servers. This fakes browsers into downloading things faster and is generally good practice.

Third— We're hitting the git repo on the server (note our deployment setup) and getting a sha of the last changes to the public/stylesheets and public/javascripts directory. We use that sha as the ASSET_ID (the bit that gets tacked on after css/js files as ?sha-here).

This means that if we deploy a change that only affects app/application.rb we don't interrupt our user's cache of the javascripts and stylesheets.

Conclusion

What all of this adds up to is that our deploys have almost no frontend consequence unless they intend to (changing css/js). This is huge for a site that does dozens of deploys a day. All browser caches remain the same and there isn't any downtime while we bundle up assets. It also means we're not afraid to deploy changes that may only affect one line of code and some minor feature.

All of this is not to say there isn't room for improvement in our stack. I'm still tracking down some SSL bugs, and always trying to cut down on the total CSS, javascript and image load we deliver on every page.

Multiple file gist improvements

We've always had the ability to embed multiple file gists:

But today we added the ability to embed specific files in a multi-file gist!

We also added permalinks next to each file name so you can hard link to specific files like so

Enjoy!

How We Made GitHub Fast

Now that things have settled down from the move to Rackspace, I wanted to take some time to go over the architectural changes that we’ve made in order to bring you a speedier, more scalable GitHub.

In my first draft of this article I spent a lot of time explaining why we made each of the technology choices that we did. After a while, however, it became difficult to separate the architecture from the discourse and the whole thing became confusing. So I’ve decided to simply explain the architecture and then write a series of follow up posts with more detailed analyses of exactly why we made the choices we did.

There are many ways to scale modern web applications. What I will be describing here is the method that we chose. This should by no means be considered the only way to scale an application. Consider it a case study of what worked for us given our unique requirements.

Understanding the Protocols

We expose three primary protocols to end users of GitHub: HTTP, SSH, and Git. When browsing the site with your favorite browser, you’re using HTTP. When you clone, pull, or push to a private URL like git@github.com:mojombo/jekyll.git you’re doing so via SSH. When you clone or pull from a public repository via a URL like git://github.com/mojombo/jekyll.git you’re using the Git protocol.

The easiest way to understand the architecture is by tracing how each of these requests propagates through the system.

Tracing an HTTP Request

For this example I’ll show you how a request for a tree page such as http://github.com/mojombo/jekyll happens.

The first thing your request hits after coming down from the internet is the active load balancer. For this task we use a pair of Xen instances running ldirectord. These are called lb1a and lb1b. At any given time one of these is active and the other is waiting to take over in case of a failure in the master. The load balancer doesn’t do anything fancy. It forwards TCP packets to various servers based on the requested IP and port and can remove misbehaving servers from the balance pool if necessary. In the event that no servers are available for a given pool it can serve a simple static site instead of refusing connections.

For requests to the main website, the load balancer ships your request off to one of the four frontend machines. Each of these is an 8 core, 16GB RAM bare metal server. Their names are fe1, …, fe4. Nginx accepts the connection and sends it to a Unix domain socket upon which sixteen Unicorn worker processes are selecting. One of these workers grabs the request and runs the Rails code necessary to fulfill it.

Many pages require database lookups. Our MySQL database runs on two 8 core, 32GB RAM bare metal servers with 15k RPM SAS drives. Their names are db1a and db1b. At any given time, one of them is master and one is slave. MySQL replication is accomplished via DRBD.

If the page requires information about a Git repository and that data is not cached, then it will use our Grit library to retrieve the data. In order to accommodate our Rackspace setup, we’ve modified Grit to do something special. We start by abstracting out every call that needs access to the filesystem into the Grit::Git object. We then replace Grit::Git with a stub that makes RPC calls to our Smoke service. Smoke has direct disk access to the repositories and essentially presents Grit::Git as a service. It’s called Smoke because Smoke is just Grit in the cloud. Get it?

The stubbed Grit makes RPC calls to smoke which is a load balanced hostname that maps back to the fe machines. Each frontend runs four ProxyMachine instances behind HAProxy that act as routing proxies for Smoke calls. ProxyMachine is my content aware (layer 7) TCP routing proxy that lets us write the routing logic in Ruby. The proxy examines the request and extracts the username of the repository that has been specified. We then use a proprietary library called Chimney (it routes the smoke!) to lookup the route for that user. A user’s route is simply the hostname of the file server on which that user’s repositories are kept.

Chimney finds the route by making a call to Redis. Redis runs on the database servers. We use Redis as a persistent key/value store for the routing information and a variety of other data.

Once the Smoke proxy has determined the user’s route, it establishes a transparent proxy to the proper file server. We have four pairs of fileservers. Their names are fs1a, fs1b, …, fs4a, fs4b. These are 8 core, 16GB RAM bare metal servers, each with six 300GB 15K RPM SAS drives arranged in RAID 10. At any given time one server in each pair is active and the other is waiting to take over should there be a fatal failure in the master. All repository data is constantly replicated from the master to the slave via DRBD.

Every file server runs two Ernie RPC servers behind HAProxy. Each Ernie spawns 15 Ruby workers. These workers take the RPC call and reconstitute and perform the Grit call. The response is sent back through the Smoke proxy to the Rails app where the Grit stub returns the expected Grit response.

When Unicorn is finished with the Rails action, the response is sent back through Nginx and directly to the client (outgoing responses do not go back through the load balancer).

Finally, you see a pretty web page!

The above flow is what happens when there are no cache hits. In many cases the Rails code uses Evan Weaver’s Ruby memcached client to query the Memcache servers that run on each slave file server. Since these machines are otherwise idle, we place 12GB of Memcache on each. These servers are aliased as memcache1, …, memcache4.

BERT and BERT-RPC

For our data serialization and RPC protocol we are using BERT and BERT-RPC. You haven’t heard of them before because they’re brand new. I invented them because I was not satisfied with any of the available options that I evaluated, and I wanted to experiment with an idea that I’ve had for a while. Before you freak out about NIH syndrome (or to help you refine your freak out), please read my accompanying article Introducing BERT and BERT-RPC about how these technologies came to be and what I intend for them to solve.

If you’d rather just check out the spec, head over to http://bert-rpc.org.

For the code hungry, check out my Ruby BERT serialization library BERT, my Ruby BERT-RPC client BERTRPC, and my Erlang/Ruby hybrid BERT-RPC server Ernie. These are the exact libraries we use at GitHub to serve up all repository data.

Tracing an SSH Request

Git uses SSH for encrypted communications between you and the server. In order to understand how our architecture deals with SSH connections, it is first important to understand how this works in a simpler setup.

Git relies on the fact that SSH allows you to execute commands on a remote server. For instance, the command ssh tom@frost ls -al runs ls -al in the home directory of my user on the frost server. I get the output of the command on my local terminal. SSH is essentially hooking up the STDIN, STDOUT, and STDERR of the remote machine to my local terminal.

If you run a command like git clone tom@frost:mojombo/bert, what Git is doing behind the scenes is SSHing to frost, authenticating as the tom user, and then remotely executing git upload-pack mojombo/bert. Now your client can talk to that process on the remote server by simply reading and writing over the SSH connection. Neat, huh?

Of course, allowing arbitrary execution of commands is unsafe, so SSH includes the ability to restrict what commands can be executed. In a very simple case, you can restrict execution to git-shell which is included with Git. All this script does is check the command that you’re trying to execute and ensure that it’s one of git upload-pack, git receive-pack, or git upload-archive. If it is indeed one of those, it uses exec to replace the current process with that new process. After that, it’s as if you had just executed that command directly.

So, now that you know how Git’s SSH operations work in a simple case, let me show you how we handle this in GitHub’s architecture.

First, your Git client initiates an SSH session. The connection comes down off the internet and hits our load balancer.

From there, the connection is sent to one of the frontends where SSHD accepts it. We have patched our SSH daemon to perform public key lookups from our MySQL database. Your key identifies your GitHub user and this information is sent along with the original command and arguments to our proprietary script called Gerve (Git sERVE). Think of Gerve as a super smart version of git-shell.

Gerve verifies that your user has access to the repository specified in the arguments. If you are the owner of the repository, no database lookups need to be performed, otherwise several SQL queries are made to determine permissions.

Once access has been verified, Gerve uses Chimney to look up the route for the owner of the repository. The goal now is to execute your original command on the proper file server and hook your local machine up to that process. What better way to do this than with another remote SSH execution!

I know it sounds crazy but it works great. Gerve simply uses exec(3) to replace itself with a call tossh git@<route> <command> <arg>. After this call, your client is hooked up to a process on a frontend machine which is, in turn, hooked up to a process on a file server.

Think of it this way: after determining permissions and the location of the repository, the frontend becomes a transparent proxy for the rest of the session. The only drawback to this approach is that the internal SSH is unnecessarily encumbered by the overhead of encryption/decryption when none is strictly required. It’s possible we may replace this this internal SSH call with something more efficient, but this approach is just too damn simple (and still very fast) to make me worry about it very much.

Tracing a Git Request

Performing public clones and pulls via Git is similar to how the SSH method works. Instead of using SSH for authentication and encryption, however, it relies on a server side Git Daemon. This daemon accepts connections, verifies the command to be run, and then uses fork(2) and exec(3) to spawn a worker that then becomes the command process.

With this in mind, I’ll show you how a public clone operation works.

First, your Git client issues a request containing the command and repository name you wish to clone. This request enters our system on the load balancer.

From there, the request is sent to one of the frontends. Each frontend runs four ProxyMachine instances behind HAProxy that act as routing proxies for the Git protocol. The proxy inspects the request and extracts the username (or gist name) of the repo. It then uses Chimney to lookup the route. If there is no route or any other error is encountered, the proxy speaks the Git protocol and sends back an appropriate messages to the client. Once the route is known, the repo name (e.g. mojombo/bert) is translated into its path on disk (e.g. a/a8/e2/95/mojombo/bert.git). On our old setup that had no proxies, we had to use a modified daemon that could convert the user/repo into the correct filepath. By doing this step in the proxy, we can now use an unmodified daemon, allowing for a much easier upgrade path.

Next, the Git proxy establishes a transparent proxy with the proper file server and sends the modified request (with the converted repository path). Each file server runs two Git Daemon processes behind HAProxy. The daemon speaks the pack file protocol and streams data back through the Git proxy and directly to your Git client.

Once your client has all the data, you’ve cloned the repository and can get to work!

Sub- and Side-Systems

In addition to the primary web application and Git hosting systems, we also run a variety of other sub-systems and side-systems. Sub-systems include the job queue, archive downloads, billing, mirroring, and the svn importer. Side-systems include GitHub Pages, Gist, gem server, and a bunch of internal tools. You can look forward to explanations of how some of these work within the new architecture, and what new technologies we’ve created to help our application run more smoothly.

Conclusion

The architecture outlined here has allowed us to properly scale the site and resulted in massive performance increases across the entire site. Our average Rails response time on our previous setup was anywhere from 500ms to several seconds depending on how loaded the slices were. Moving to bare metal and federated storage on Rackspace has brought our average Rails response time to consistently under 100ms. In addition, the job queue now has no problem keeping up with the 280,000 background jobs we process every day. We still have plenty of headroom to grow with the current set of hardware, and when the time comes to add more machines, we can add new servers on any tier with ease. I’m very pleased with how well everything is working, and if you’re like me, you’re enjoying the new and improved GitHub every day!

unicorn.god

Some people have been asking for our Unicorn god config.

Here it is:

# http://unicorn.bogomips.org/SIGNALS.html

rails_env = ENV['RAILS_ENV'] || 'production'
rails_root = ENV['RAILS_ROOT'] || "/data/github/current"

God.watch do |w|
  w.name = "unicorn"
  w.interval = 30.seconds # default

  # unicorn needs to be run from the rails root
  w.start = "cd #{rails_root} && /usr/local/bin/unicorn_rails -c #{rails_root}/config/unicorn.rb -E #{rails_env} -D"

  # QUIT gracefully shuts down workers
  w.stop = "kill -QUIT `cat #{rails_root}/tmp/pids/unicorn.pid`"

  # USR2 causes the master to re-create itself and spawn a new worker pool
  w.restart = "kill -USR2 `cat #{rails_root}/tmp/pids/unicorn.pid`"

  w.start_grace = 10.seconds
  w.restart_grace = 10.seconds
  w.pid_file = "#{rails_root}/tmp/pids/unicorn.pid"

  w.uid = 'git'
  w.gid = 'git'

  w.behavior(:clean_pid_file)

  w.start_if do |start|
    start.condition(:process_running) do |c|
      c.interval = 5.seconds
      c.running = false
    end
  end

  w.restart_if do |restart|
    restart.condition(:memory_usage) do |c|
      c.above = 300.megabytes
      c.times = [3, 5] # 3 out of 5 intervals
    end

    restart.condition(:cpu_usage) do |c|
      c.above = 50.percent
      c.times = 5
    end
  end

  # lifecycle
  w.lifecycle do |on|
    on.condition(:flapping) do |c|
      c.to_state = [:start, :restart]
      c.times = 5
      c.within = 5.minute
      c.transition = :unmonitored
      c.retry_in = 10.minutes
      c.retry_times = 5
      c.retry_within = 2.hours
    end
  end
end

That's for starting and stopping the master. It's important to note that god only knows about the master - not the workers. The memory limit condition, then, only applies to the master (and is probably never hit).

To watch the workers we use a cute hack @mojombo came up with (though he promises first class support in future versions of code): we start a thread and periodically check the memory usage of workers. If a worker is gobbling up more than 300mb of RSS, we send it a QUIT. The QUIT tells it to die once it finishes processing the current request. Once that happens the master will spawn a new worker - we should hardly notice.

# This will ride alongside god and kill any rogue memory-greedy
# processes. Their sacrifice is for the greater good.

unicorn_worker_memory_limit = 300_000

Thread.new do
  loop do
    begin
      # unicorn workers
      #
      # ps output line format:
      # 31580 275444 unicorn_rails worker[15] -c /data/github/current/config/unicorn.rb -E production -D
      # pid ram command

      lines = `ps -e -www -o pid,rss,command | grep '[u]nicorn_rails worker'`.split("\n")
      lines.each do |line|
        parts = line.split(' ')
        if parts[1].to_i > unicorn_worker_memory_limit
          # tell the worker to die after it finishes serving its request
          ::Process.kill('QUIT', parts[0].to_i)
        end
      end
    rescue Object
      # don't die ever once we've tested this
      nil
    end

    sleep 30
  end
end

That's it! Don't forget the Unicorn Signals page when working with Unicorn.

Unicorn!

We’ve been running Unicorn for more than a month. Time to talk about it.

What is it?

Unicorn is an HTTP server for Ruby, similar to Mongrel or Thin. It uses Mongrel’s Ragel HTTP parser but has a dramatically different architecture and philosophy.

In the classic setup you have nginx sending requests to a pool of mongrels using a smart balancer or a simple round robin.

Eventually you want better visibility and reliability out of your load balancing situation, so you throw haproxy into the mix:

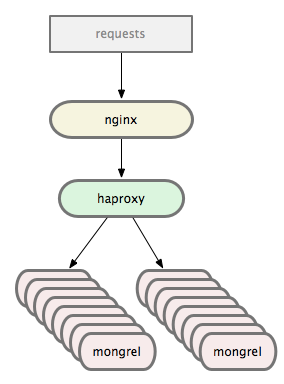
Which works great. We ran this setup for a long time and were very happy with it. However, there are a few problems.

Slow Actions

When actions take longer than 60s to complete, Mongrel will try to kill the thread. This has proven unreliable due to Ruby’s threading. Mongrels will often get into a “stuck” stage and need to be killed by some external process (e.g. god or monit).

Yes, this is a problem with our application. No action should ever take 60s. But we have a complicated application with many moving parts and things go wrong. Our production environment needs to handle errors and failures gracefully.

Memory Growth

We restart mongrels that hit a certain memory threshhold. This is often a problem with parts of our application. Engine Yard has a great post on memory bloat and how to deal with it.

Like slow actions, however, it happens. You need to be prepared for things to not always be perfect, and so does your production environment. We don’t kill app servers often due to memory bloat, but it happens.

Slow Deploys

When your server’s CPU is pegged, restarting 9 mongrels hurts. Each one has to load all of Rails, all your gems, all your libraries, and your app into memory before it can start serving requests. They’re all doing the exact same thing but fighting each other for resources.

During that time, you’ve killed your old mongrels so any users hitting your site have to wait for the mongrels to be fully started. If you’re really overloaded, this can result in 10s+ waits. Ouch.

There are some complicated solutions that automate “rolling restarts” with multiple haproxy setups and restarting mongrels in different pools. But, as I said, they’re complicated and not foolproof.

Slow Restarts

As with the deploys, any time a mongrel is killed due to memory growth or timeout problems it will take multiple seconds until it’s ready to serve requests again. During peak load this can have a noticeable impact on the site’s responsiveness.

Push Balancing

With most popular load balancing solutions, requests are handed to a load balancer who decides which mongrel will service it. The better the load balancer, the smarter it is about knowing who is ready.

This is typically why you’d graduate from an nginx-based load balancing solution to haproxy: haproxy is better at queueing up requests and handing them to mongrels who can actually serve them.

At the end of the day, though, the load balancer is still pushing requests to the mongrels. You run the risk of pushing a request to a mongrel who may not be the best candidate for serving a request at that time.

Unicorn

Unicorn has a slightly different architecture. Instead of the nginx => haproxy => mongrel cluster setup you end up with something like:

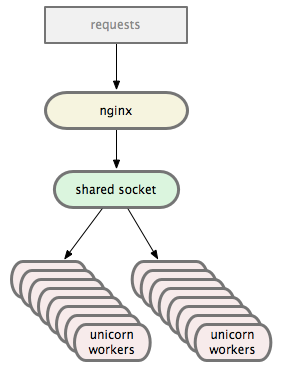
nginx sends requests directly to the Unicorn worker pool over a Unix Domain Socket (or TCP, if you prefer). The Unicorn master manages the workers while the OS handles balancing, which we’ll talk about in a second. The master itself never sees any requests.

Here’s the only difference between our nginx => haproxy and nginx => unicorn configs:

# port 3000 is haproxy
upstream github {
    server 127.0.0.1:3000;
}

# unicorn master opens a unix domain socket
upstream github {
    server unix:/data/github/current/tmp/sockets/unicorn.sock;
}

When the Unicorn master starts, it loads our app into memory. As soon as it’s ready to serve requests it forks 16 workers. Those workers then select() on the socket, only serving requests they’re capable of handling. In this way the kernel handles the load balancing for us.

Slow Actions

The Unicorn master process knows exactly how long each worker has been processing a request. If a worker takes longer than 30s (we lowered it from mongrel’s default of 60s) to respond, the master immediately kills the worker and forks a new one. The new worker is instantly able to serve a new request – no multi-second startup penalty.

When this happens the client is sent a 502 error page. You may have seen ours and wondered what it meant. Usually it means your request was killed before it completed.

Memory Growth

When a worker is using too much memory, god or monit can send it a QUIT signal. This tells the worker to die after finishing the current request. As soon as the worker dies, the master forks a new one which is instantly able to serve requests. In this way we don’t have to kill your connection mid-request or take a startup penalty.

Slow Deploys

Our deploys are ridiculous now. Combined with our custom Capistrano recipes, they’re very fast. Here’s what we do.

First we send the existing Unicorn master a USR2 signal. This tells it to begin starting a new master process, reloading all our app code. When the new master is fully loaded it forks all the workers it needs. The first worker forked notices there is still an old master and sends it a QUIT signal.

When the old master receives the QUIT, it starts gracefully shutting down its workers. Once all the workers have finished serving requests, it dies. We now have a fresh version of our app, fully loaded and ready to receive requests, without any downtime: the old and new workers all share the Unix Domain Socket so nginx doesn’t have to even care about the transition.

We can also use this process to upgrade Unicorn itself.

What about migrations? Simple: just throw up a “The site is temporarily down for maintenance” page, run the migration, restart Unicorn, then remove the downtime page. Same as it ever was.

Slow Restarts

As mentioned above, restarts are only slow when the master has to start. Workers can be killed and re-fork() incredibly fast.

When we are doing a full restart, only one process is ever loading all the app code: the master. There are no wasted cycles.

Push Balancing

Instead of being pushed requests, workers pull requests. Ryan Tomayko has a great article on the nitty gritties of this process titled I like Unicorn because it’s Unix.

Basically, a worker asks for a request when it’s ready to serve one. Simple.

Migration Strategy

So, you want to migrate from thin or mongrel cluster to Unicorn? If you’re running an nginx => haproxy => cluster setup it’s pretty easy. Instead of changing any settings, you can simply tell the Unicorn workers to listen on a TCP port when they are forked. These ports can match the ports of your current mongrels.

Check out the Configurator documentation for an example of this method. Specifically this part:

after_fork do |server, worker|
  # per-process listener ports for debugging/admin/migrations
  addr = "127.0.0.1:#{9293 + worker.nr}"
  server.listen(addr, :tries => -1, :delay => 5, :tcp_nopush => true)
end

This tells each worker to start listening on a port equal to their worker # + 9293 forever – they’ll keep trying to bind until the port is available.

Using this trick you can start up a pool of Unicorn workers, then shut down your existing pool of mongrel or thin app servers when the Unicorns are ready. The workers will bind to the ports as soon as possible and start serving requests.

It’s a good way to get familiar with Unicorn without touching your haproxy or nginx configs.

(For fun, try running “kill -9” on a worker then doing a “ps aux”. You probably won’t even notice it was gone.)

Once you’re comfortable with Unicorn and have your deploy scripts ready, you can modify nginx’s upstream to use Unix Domain Sockets then stop opening ports in the Unicorn workers. Also, no more haproxy.

GitHub’s Setup

Here’s our Unicorn config in all its glory.

I recommend making the SIGNALS documentation your new home page and reading all the other pages available at the Unicorn site. It’s very well documented and Eric is focusing on improving it every day.

Speed

Honestly, I don’t care. I want a production environment that can gracefully handle chaos more than I want something that’s screaming fast. I want stability and reliability over raw speed.

Luckily, Unicorn seems to offer both.

Here are Tom’s benchmarks on our Rackspace bare metal hardware. We ran GitHub on one machine and the benchmarks on a separate machine. The servers are 8 core 16GB boxes connected via gigabit ethernet.

What we’re testing is a single Rails action rendering a simple string. This means each requeust goes through the entire Rails routing process and all that jazz.

Mongrel has haproxy in front of it. unicorn-tcp is using a port opened by the master, unicorn-unix with a 1024 backlog is the master opening a unix domain socket with the default “listen” backlog, and the 2048 backlog is the same setup with an increased “listen” backlog.

These benchmarks examine as many requests as we were able to push through before getting any 502 or 500 errors. Each test uses 8 workers.

mongrel
 8: Reply rate [replies/s]:
          min 1270.4 avg 1301.7 max 1359.7 stddev 50.3 (3 samples)
unicorn-tcp
 8: Reply rate [replies/s]:
          min 1341.7 avg 1351.0 max 1360.7 stddev 7.8 (4 samples)
unicorn-unix (1024 backlog)
 8: Reply rate [replies/s]:
          min 1148.2 avg 1149.7 max 1152.1 stddev 1.8 (4 samples)
unicorn-unix (2048 backlog)
 8: Reply rate [replies/s]:
          min 1462.2 avg 1502.3 max 1538.7 stddev 39.6 (4 samples)

Conclusion

Passenger is awesome. Mongrel is awesome. Thin is awesome.

Use what works best for you. Decide what you need and evaluate the available options based on those needs. Don’t pick a tool because GitHub uses it, pick a tool because it solves the problems you have.

We use Thin to serve the GitHub Services and I use Passenger for many of my side projects. Unicorn isn’t for every app.

But it’s working great for us.

Edit: Tweaked a diagram and clarified the Unicorn master’s role based on feedback from Eric.

Rackspace Move Scheduled for Sunday, September 27th at 5PM Pacific Time

On Sunday, September 27th at 5PM Pacific time (see it in your timezone) we will begin the final move to Rackspace. We are aiming to have less than an hour of website and push unavailability if everything goes according to plan. During this period, public and private clone, fetch, and pull operations will continue to function normally. Once the final data synchronization is complete and the new installation passes a final inspection, we will switch the DNS entries and you’ll be able to start using a new and improved GitHub!

The user impact from the switch should be minimal, but there are a few things to note:

  • On your first SSH operation to the new GitHub IP, your SSH client will issue a warning, but will not cause you any hassle or make you change any configuration:

  • After the move, GitHub Pages CNAME users will need to update their DNS entries that reference GitHub by IP. We will announce on this blog and via the @github twitter account when you should update your entries. The new IP address will be 207.97.227.245. Only domains with A records (top-level domains like tekkub.net) need to make this change. Sub-domains should be using CNAME records, which will update automatically. Please contact support if you have any questions.

We appreciate your patience during this procedure and look forward to all the benefits that the new hardware and architecture will make possible!

Deployment Script Spring Cleaning

Better late than never, right? As we get ready to upgrade our servers I thought it’d be a good time to upgrade our deployment process. Currently pushing out a new version of GitHub takes upwards of 15 minutes. Ouch. My goal: one minute deploys (excluding server restart time).

We currently use Capistrano with a 400 line deploy.rb file. Engine Yard provides a handful of useful Cap tasks (in gem form) that we use along with many of the built-in features. We also use the fast_remote_cache deployment strategy and have written a handful (400 lines or so) of our own tasks to manage things like our service hooks or SVN importer.

As you may know, Capistrano keeps a releases directory where it creates timestamped versions of your app. All your daemons and processes then assume your app lives under a directory called current which is actually a symlink to the latest timestamped version of your app in releases. When you deploy a new version of your app, it’s put into a new timestamped directory under releases. After all the heavy lifting is done the current symlink is switched to it.

Which was really great. Before Git. So I went digging.

First I investigated Vlad the Deployer, the Capistrano alternative in Ruby. I like that it’s built on Rake but it seems to make the same assumptions as Capistrano. Basically both of these tools are modular and built in such a way that they work the same whether you’re using Subversion, Perforce, or Git. Which is great if you’re using SVN but unfortunate if you’re using Git.

For example, this is from Vlad’s included Git deployment strategy:

When you deploy a new copy of your app, Vlad removes the existing copy and does a full clone to get a new version. Capistrano does something similar by default but has a bundled “remote_cache” strategy that is a bit smarter: it caches the Git repo and does a fetch then a reset. It still has to then copy the updated version of your app into a timestamped directory and switch the symlink, but it’s able to cut down on time spent pulling redundant objects. It even knows about the depth option.

The next thing I looked at was Heroku’s rush. It lets you drive servers (even clusters of them) using Ruby over SSH, which looked very promising. Maybe I’d write a little git-deploy script based on it.

Unfortunately for me Rush needs to be installed on every server you’re managing. It also needs a running instance of rushd. Which makes sense – it’s a super powerful library – but that wouldn’t work for deploying GitHub.

Fabric is a library I first heard about back in February. It’s like Capistrano or Vlad but with more emphasis on being a framework/tool for remote management of servers. Easy deployment scripts are just a side effect of that mentality.

It’s very powerful and after playing with it for a while I was extremely pleased. I’ll definitely be using it in all my Python projects. However, I wasn’t looking forward to porting all our custom Capistrano tasks to Python. Also, though I love Python, we’re mostly a Ruby shop and everyone needs to be able to add, debug, and modify our deploy scripts with ease.

Playing with Fabric did inspire me, though. Capistrano is basically a tool for remote server management, too, if you think about it. We may have outgrown its ideas about deployment but I can always write my own deployment code using Capistrano’s ssh and clustering capabilities. So I did.

It turned out to be pretty easy. First I created a config/deploy directory and started splitting up the deploy.rb into smaller chunks:

$ ls -1 config/deploy
gem_eval.rb
import.rb
notify.rb
queue.rb
services.rb
settings.rb
sudo_everywhere.rb
symlinks.rb

Then I pulled them in. Careful here: Capistrano override both load and require so it’s probably best to just use load.

This separation kept the deploy.rb and each specific file small and focused.

Next I thought about how I’d do Git-based deployment. Not too different from Capistrano’s remote_cache, really. Just get rid of all the timestamp directories and have the current directory contain our clone of the Git repo. Do a fetch then reset to deploy. Rollback? No problem.

The best part is that because Engine Yard’s gemified tasks and our own code both call standard Capistrano tasks like deploy and deploy:update, we can just replace them and not change the dependent code.

Here’s what our new deploy.rb looks like. Well, the meat of it at least:

Great. I like this – very Gitty and simple. But copying and removing directories wasn’t the only slow part of our deploy process.

Every Capistrano task you run adds a bit of overhead. I don’t know exactly why, but I imagine each task opens a fresh SSH connection to the necessary servers. Maybe. Either way, the less tasks you run the better.

We were running about eight symlink related tasks during each deploy. Config files and cache directories that only live on the server need to be symlinked into the app’s directory structure after the reset. Cutting these actions down to a single task made everything much, much faster.

Here’s our symlinks.rb:

Finally, bundling CSS and JavaScript. I’d like to move us to Sprockets but we’re not using it yet and this adventure is all about speeding up our existing setup.

Since the early days we’ve been using Uladzislau Latynski’s jsmin.rb to minimize our JavaScript. Our Cap task looked something like this:

Spot the problem? We’re minimizing the JS locally, on every deploy, then uploading it to each server individually. We also do this same process for Gist’s JavaScript and the CSS (using YUI’s CSS compressor). So with N servers, this is basically happening 3N times on each deploy. Yowza.

Solution? Do the minimizing and bundling on the servers. The beefy, beefy servers:

As long as the bundle Rake tasks don’t need to load the Rails environment (which ours don’t), this is much faster.

Conclusion

We moved to a more Git-like deployment setup, cut down the number of tasks we run, and moved bundling and minimizing JS and CSS from our localhost to the server. Did it help?

As I said before, a GitHub deploy can take 15 minutes (not counting server restarts). My goal was to drop it down to 1 minute. How’d we do?

$ time cap production deploy
  * executing `production'
  * executing `deploy'
    triggering before callbacks for `deploy:update'
  * executing `notify:campfire'
  * executing `deploy:update'
  * executing `deploy:update_code'
    triggering after callbacks for `deploy:update_code'
  * executing `symlinks:make'
  * executing `deploy:bundle'
  * executing `deploy:restart'
  * executing `mongrel:restart'
  * executing `deploy:cleanup'

real	0m14.361s
user	0m2.049s
sys	0m0.560s

15 minutes down to 14 seconds. Not bad.

Smart JS Polling

While Comet may be all the rage, some of us are still stuck in web 2.0. And those of us that are use Ajax polling to see if there’s anything new on the server.

Here at GitHub we normally do this with memcached. The web browser polls a URL which checks a memcached key. If there’s no data cached, the request returns and polls again in a few seconds. If there is data, the request returns with it and the browser merrily goes about its business. On the other end our background workers stick the goods in memcached when they’re ready.

In this way we use memcached as a poor man’s message bus.

Yet there’s a problem with this: if after a few Ajax polls there’s no data, there probably won’t be for a while. Maybe the site is overloaded or the queue is backed up. In those circumstances the continued polling adds additional unwanted strain to the site. What to do?

The solution is to increment the amount of time you wait in between each poll. Really, it’s that simple. We wrote a little jQuery plugin to make this pattern even easier in our own JS. Here it is, from us to you:

Any time you see “Loading commit data…” or “Hardcore Archiving Action,” you’re seeing smart polling. Enjoy!

Git as a Data Store in Python (and Ruby)

I recently stumbled across an older article titled Using Git as a versioned data store in Python by @jwiegley.

Basically, it’s a module similar to Python’s shelve which stores your data in a Git repository. Nicely done.

The repository is part of his git-issues project at http://github.com/jwiegley/git-issues/.

(There’s also a similar project in Ruby, GitStore http://github.com/georgi/git_store, worth looking into.)

Keeping GoogleBot Happy

One of the interesting side effects I hadn’t considered when we rolled out some fairly significant caching updates on GitHub in the beginning of January was how much Google’s crawler would take full advantage of the speed increase.

The graph lays it all out pretty clearly what happens when your site is more responsive. The number of pages the bot is able to index goes up dramatically when the time spent downloading the page is reduced dramatically. More pages indexed on Google inevitably means more revenue for us as our traffic grows, so this is a solid win beyond making sure existing GitHubbers are happy.

PHP in Erlang

You heard me right. php_app manages a pool of persistent PHP processes and provides a simple API to evaluate PHP code from Erlang.

The blog post gives a quick overview and some examples.

Thanks for sharing, @skeltoac!

Easy Git!

eg is a nifty piece of work. Are you meeting resistance trying to move your coworkers or friends to Git? (“SVN is good enough.”) Know someone who would love to use GitHub but can’t seem to find the time to learn Git? eg is your answer.

Start with the Easy Git for SVN Users chart.

Then move to the eg cheat sheet:

Committing works similar to SVN but tries to educate you on the idea of the staging area.

$ eg commit
Aborting: You have new unknown files present and it is not clear whether
they should be committed.  Run 'eg help commit' for details.
New unknown files:
  info.txt

Install it:

Download eg.

It’s not Subversion, but it’s a step in the Git direction.

Something went wrong with that request. Please try again.