If you want an affordable way to drive DC motors, to control servos, and to add an ADC to your project, then the Dagu Arduino Mini Driver Board could be well worth a look. It can be hooked up to a Raspberry Pi with a USB cable to provide the hardware interface for a Pi project. Or alternatively, it can be used alone as a much smaller, and cheaper alternative to an Arduino with a motor shield.
Documentation is a bit thin on the ground for this board however, so we thought we’d put together a simple getting started guide, and show you how you can use the Mini Driver to control some motors.
Required Materials
- Dagu Arduino Mini Driver Board
- A pair of motors and a power supply. We’re using the motors and battery holder from the Magician 2WD Chassis.
Wiring up the Board
Connect up the batteries and the motors to the Mini Driver as shown in the diagram below.
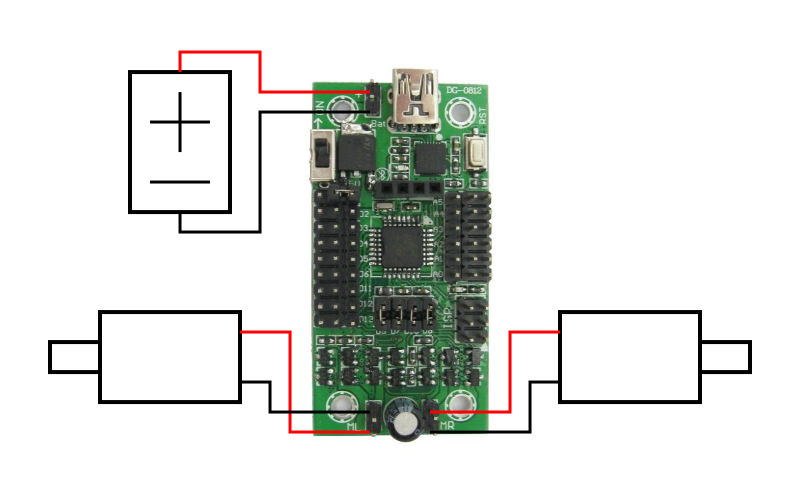
Circuit diagram
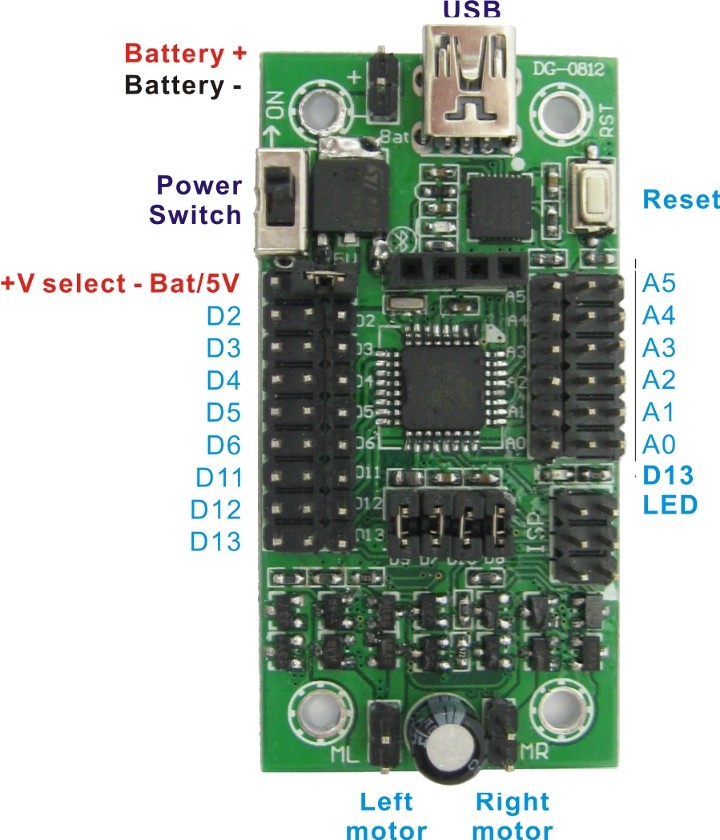
The Mini Driver uses 4 of the Atmega8′s digital pins to control its 2 H-bridges. Each H bridge is controlled by a direction pin, and a PWM pin that determines the speed at which the motor turns. The H-bridges are connected to the Atmega8 using 4 jumpers. if you don’t need to use the H-bridges then you can remove the jumpers and use the digital pins for something else.
The pins that the control the H-bridges are as follows
- D7 controls the direction of the left motor
- D9 controls the speed of the left motor
- D8 controls the direction of the right motor
- D10 controls the speed of the right motor
Programming the Mini Driver
The Mini Driver can be easily programmed by connecting it to your computer with a USB cable, and using the standard Arduino IDE. In order to get the IDE to recognize the Mini Driver, you should set the board to be an ‘Arduino NG or older w/Atmega8′
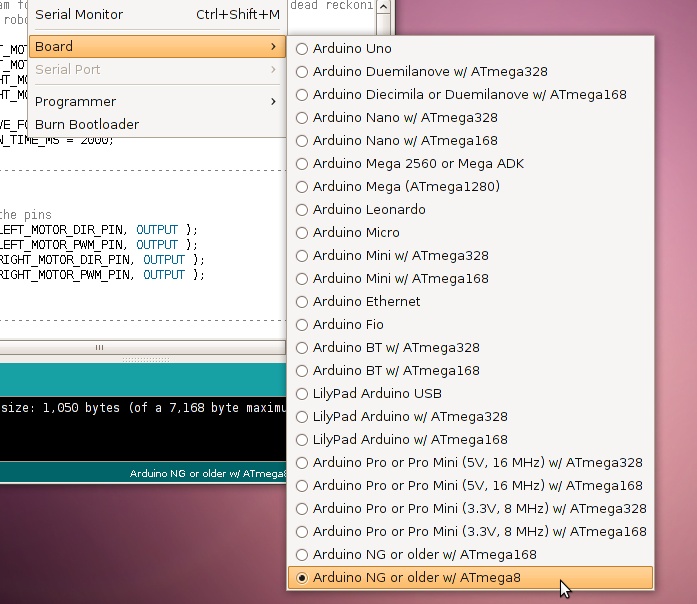
Setting the board type for the Mini Driver
The following sketch is a simple example for how the motors can be used. When attached to the Magician 2WD chassis you should see that the robot drives roughly in a square. ![]()
Note: If the robot doesn’t move, check that the power switch of the Mini Driver is set to ‘On’
// Demo program for the Dagu Arduino Mini Driver. Uses dead reckoning
// to try to drive a robot in a square

const int LEFT_MOTOR_DIR_PIN = 7;
const int LEFT_MOTOR_PWM_PIN = 9;
const int RIGHT_MOTOR_DIR_PIN = 8;
const int RIGHT_MOTOR_PWM_PIN = 10;

const int DRIVE_FORWARD_TIME_MS = 1500;
const int TURN_TIME_MS = 2000;

//----------------------------------------------------------
void setup()
{
    // Setup the pins
    pinMode( LEFT_MOTOR_DIR_PIN, OUTPUT );
    pinMode( LEFT_MOTOR_PWM_PIN, OUTPUT );
    pinMode( RIGHT_MOTOR_DIR_PIN, OUTPUT );
    pinMode( RIGHT_MOTOR_PWM_PIN, OUTPUT );
}

//----------------------------------------------------------
void loop()
{
    // Drive forwards at 100%
    digitalWrite( LEFT_MOTOR_DIR_PIN, HIGH );
    digitalWrite( RIGHT_MOTOR_DIR_PIN, HIGH );
    analogWrite( LEFT_MOTOR_PWM_PIN, 255 );
    analogWrite( RIGHT_MOTOR_PWM_PIN, 255 );
    delay( DRIVE_FORWARD_TIME_MS );

    // Turn left at 50%
    digitalWrite( LEFT_MOTOR_DIR_PIN, HIGH );
    digitalWrite( RIGHT_MOTOR_DIR_PIN, LOW );
    analogWrite( LEFT_MOTOR_PWM_PIN, 128 );
    analogWrite( RIGHT_MOTOR_PWM_PIN, 128 );
    delay( TURN_TIME_MS );
}
Taking Things Further
The mini Driver is ideally suited to controlling servos, and you can attach servos to the column of 3 pin digital connectors down the left hand side. Each set of 3 pins contains a ground, voltage and signal wire which corresponds to the pins of standard RC servos. The supply voltage for the servos is set by the jumper at the top of the digital connectors. It can be set to either 5V, or the battery voltage.
Don’t let the small size of the Mini Driver fool you. With a peak current of 2A for each motor channel, the Mini Driver is capable of driving chassis like the Dagu Rover 5 chassis, and can push some pretty heavy weights (as shown here).
Another thing you can do with the Mini Driver is control it remotely by adding on the Dagu Arduino Bluetooth Module which plugs straight in.