From the makers of the 5" Octocat figurine comes the adorably small 3" Octocat figurine. Find yours in the GitHub Shop.
Managing large files with Git LFS
We recently announced that Git Large File Storage, our open source project for managing large assets with Git, had reached a 1.0 milestone and would be available to all repositories on GitHub.com. If you use GitHub Enterprise, we are happy to share the news that support for Git LFS is now officially available in our version 2.4 release. In this post, we'll take a look at how Git LFS fits into your current workflow, whether you use GitHub's web interface, the command line, or even the GitHub Desktop application.
For more background or to learn the basics about Git LFS, click here.
Seamless integration with GitHub
If you work on a project with assets that you're using Git LFS to manage, one of the first things you may notice is that, despite residing in a separate environment, these large files still show up alongside your other files on GitHub. Rather than showing the text pointers that Git LFS stores in your repository, GitHub uses the pointers to retrieve the asset from the LFS server so you can view them just as you would if they lived in your repository. For renderable content, such as images, this means you have access to the same rich diffing tools available for other in-repository content.
First-class LFS support in GitHub Desktop
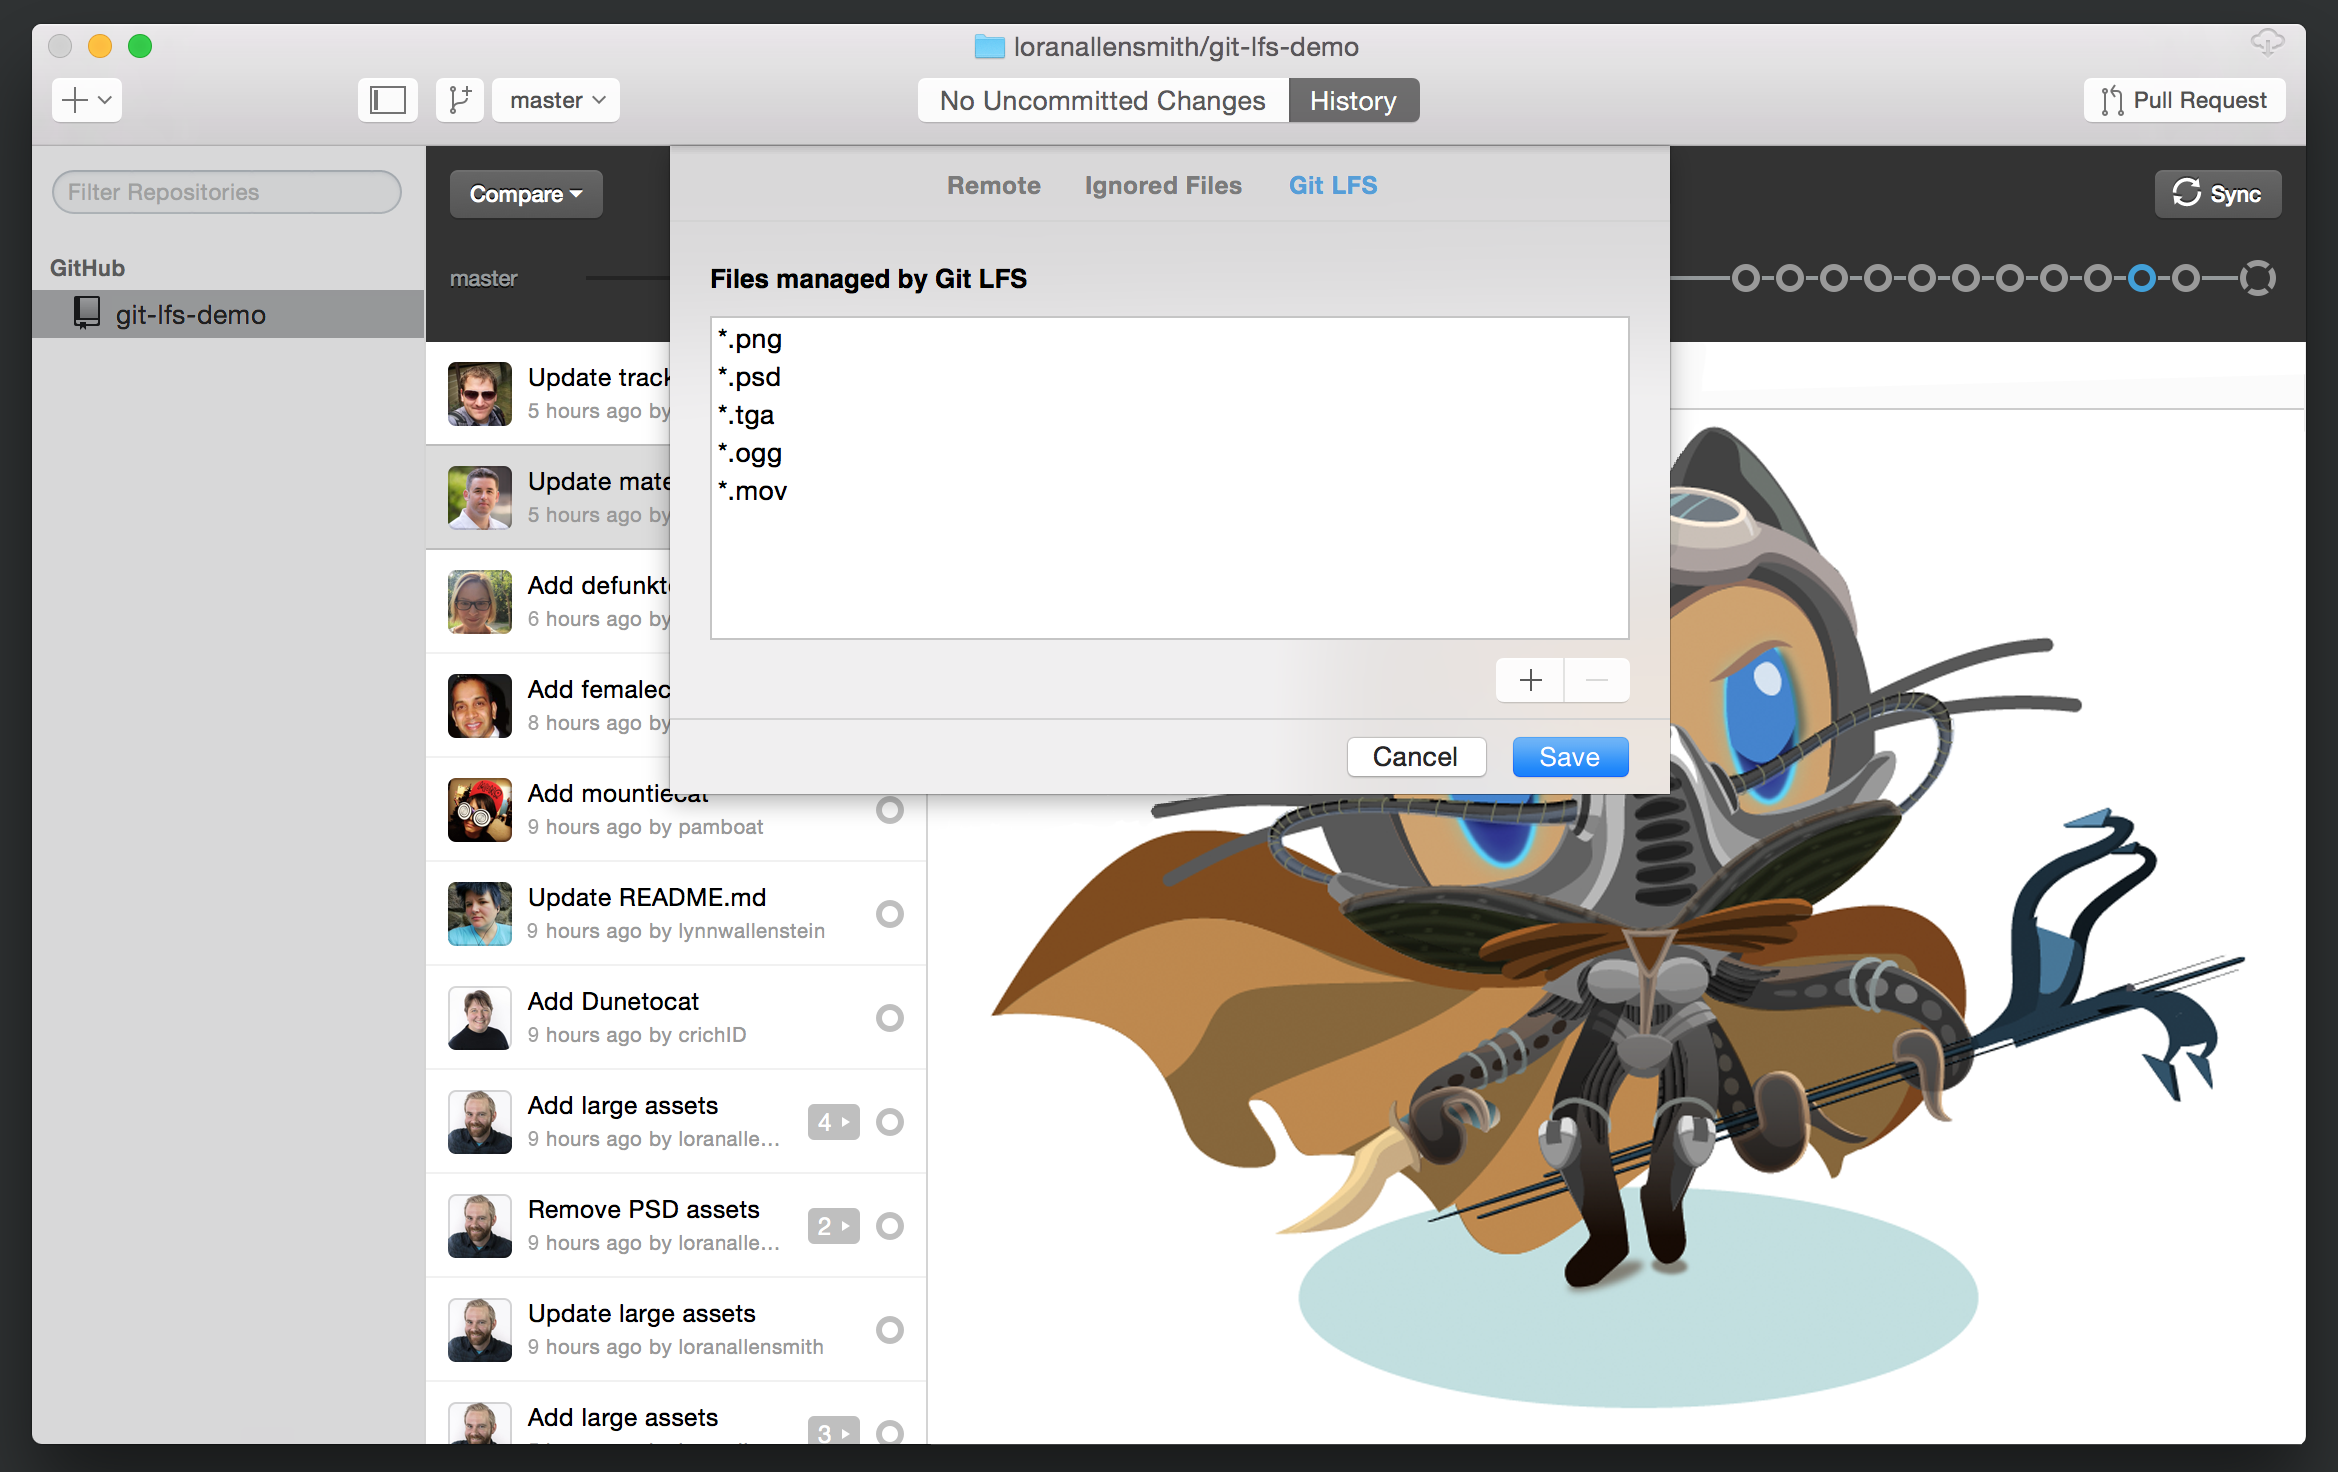
If you use GitHub Desktop to collaborate on projects configured for Git LFS, you can use the same flow you are used to. Git LFS support is baked in, so you can make changes, commit, and sync just as you normally would. To change the list of paths Git LFS is managing, use the Git LFS tab in your repository settings to add, edit, or delete tracking rules.
Git-centric command line flow
If most of your Git work takes place in a terminal window, integrating Git LFS into your workflow is as simple as adding a few extra commands to your proverbial tool belt. In addition to utilizing built-in Git functionality as part of its interface, Git LFS implements a Git-like syntax that helps it feel less like an add-on and more like a subset of topical commands.
Getting started
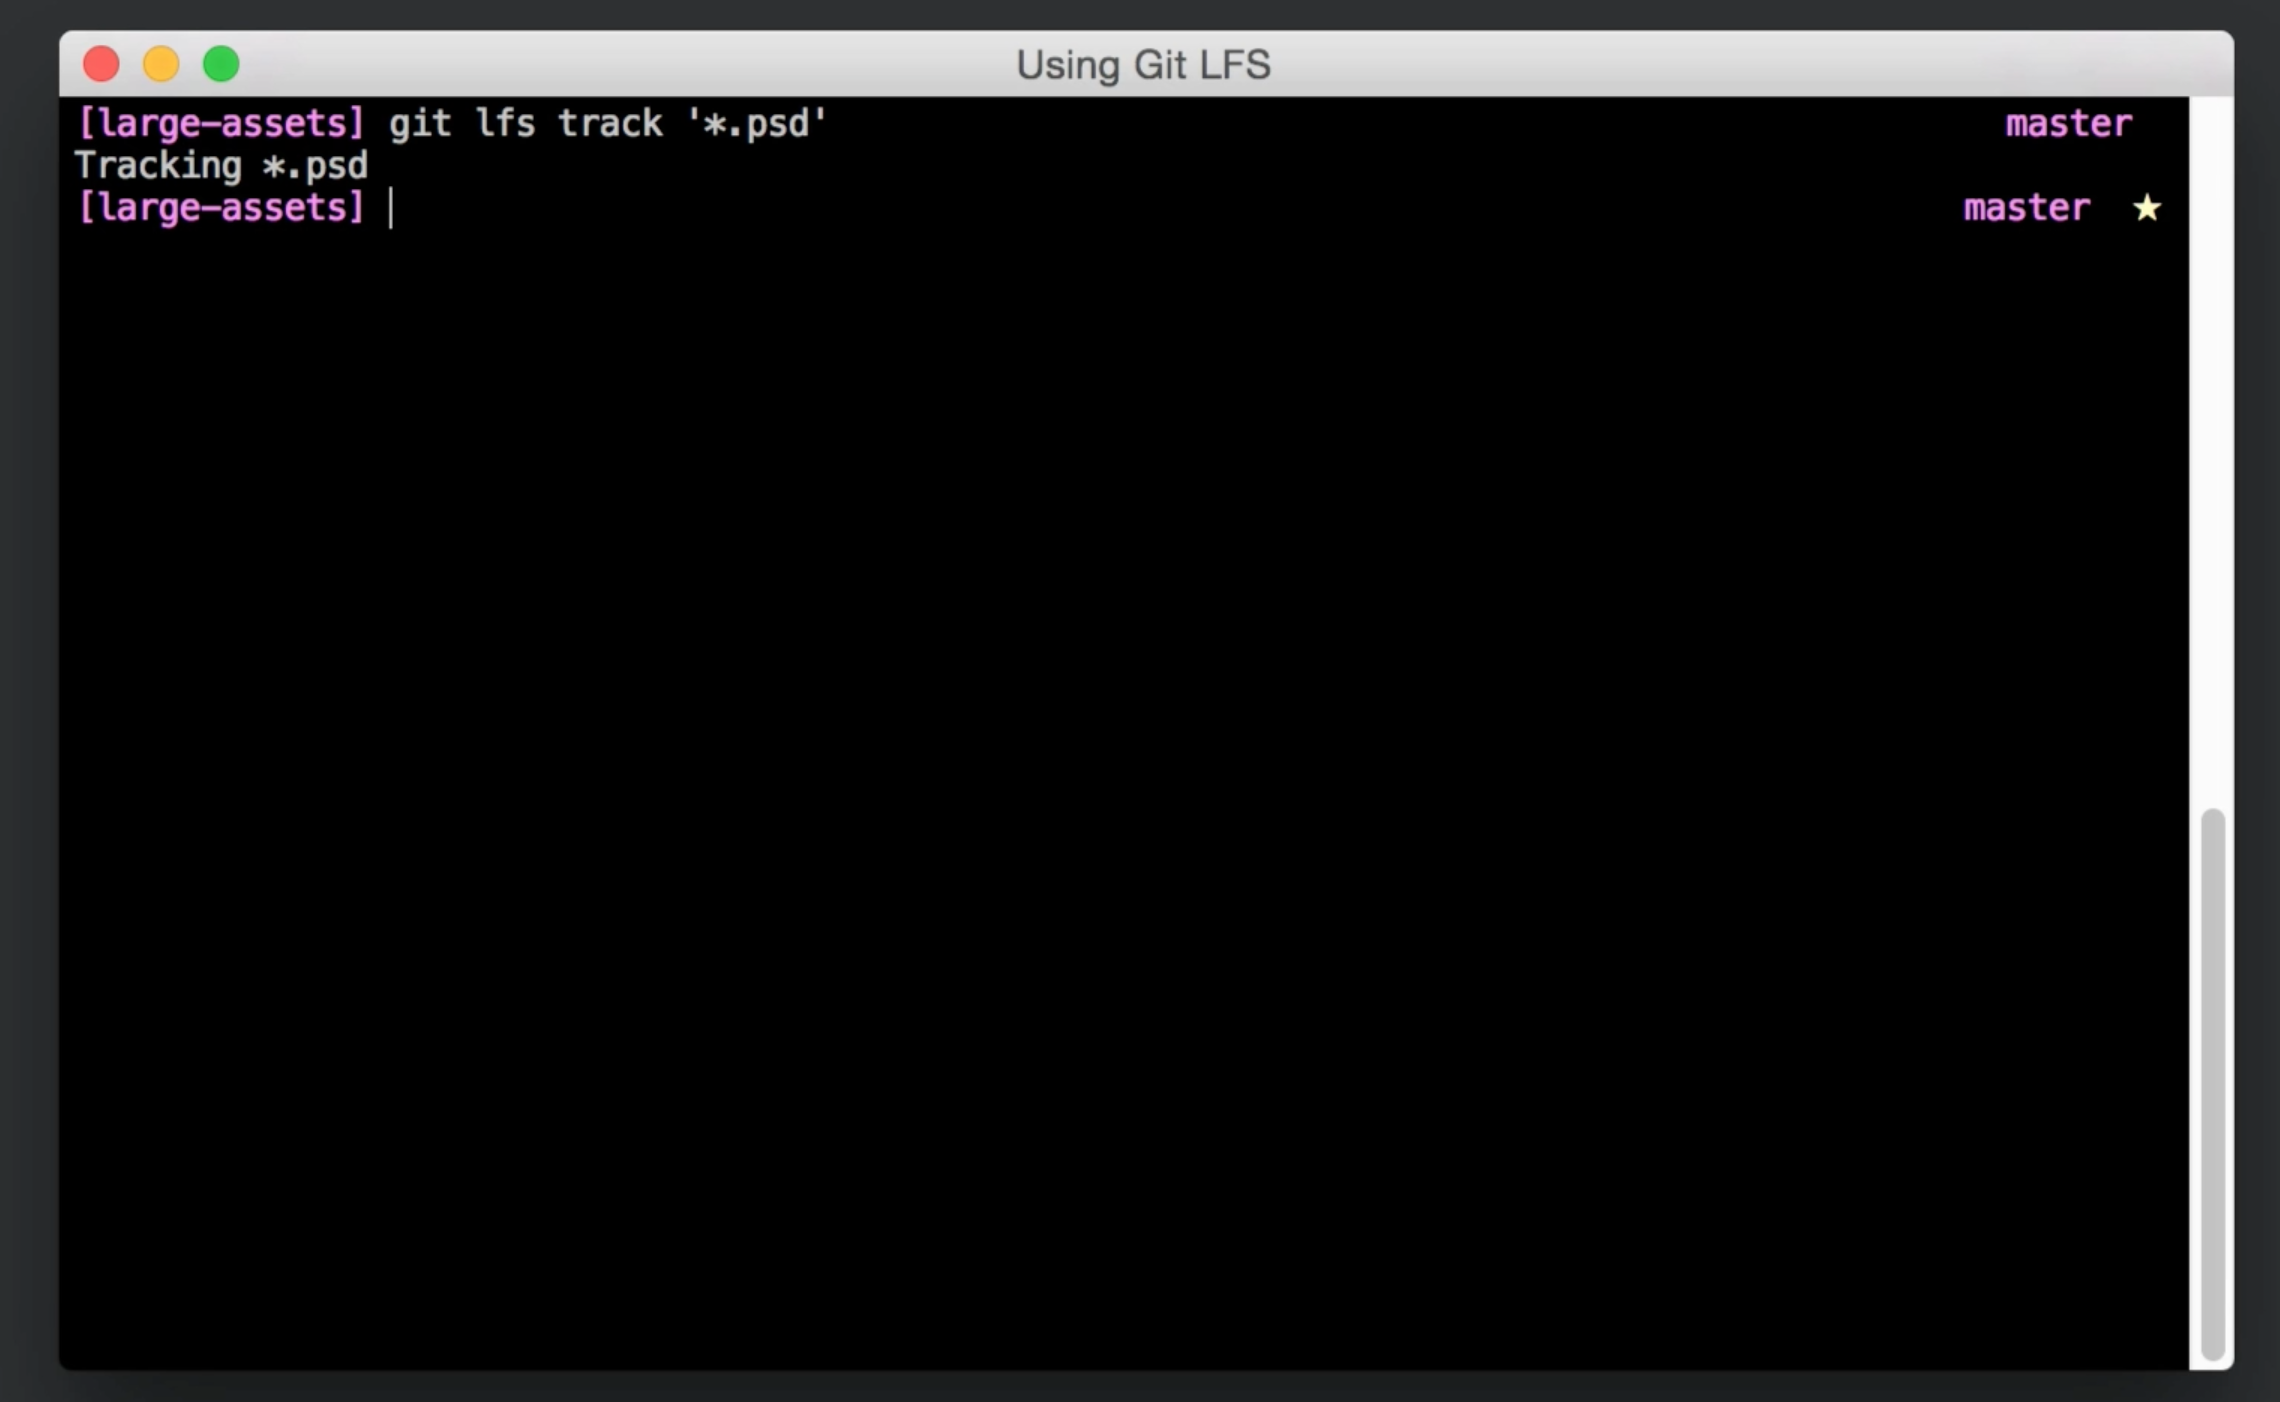
After you download and install Git LFS, you can start managing large files in a Git repository by running git lfs track <your-file>, where <your-file> is a command-line glob specifying a particular file, extension, directory, or any combination thereof. Git LFS writes these globs to a .gitattributes file in your repository that Git uses to pre-process files as they move back and forth from your working directory to your index and commit history.
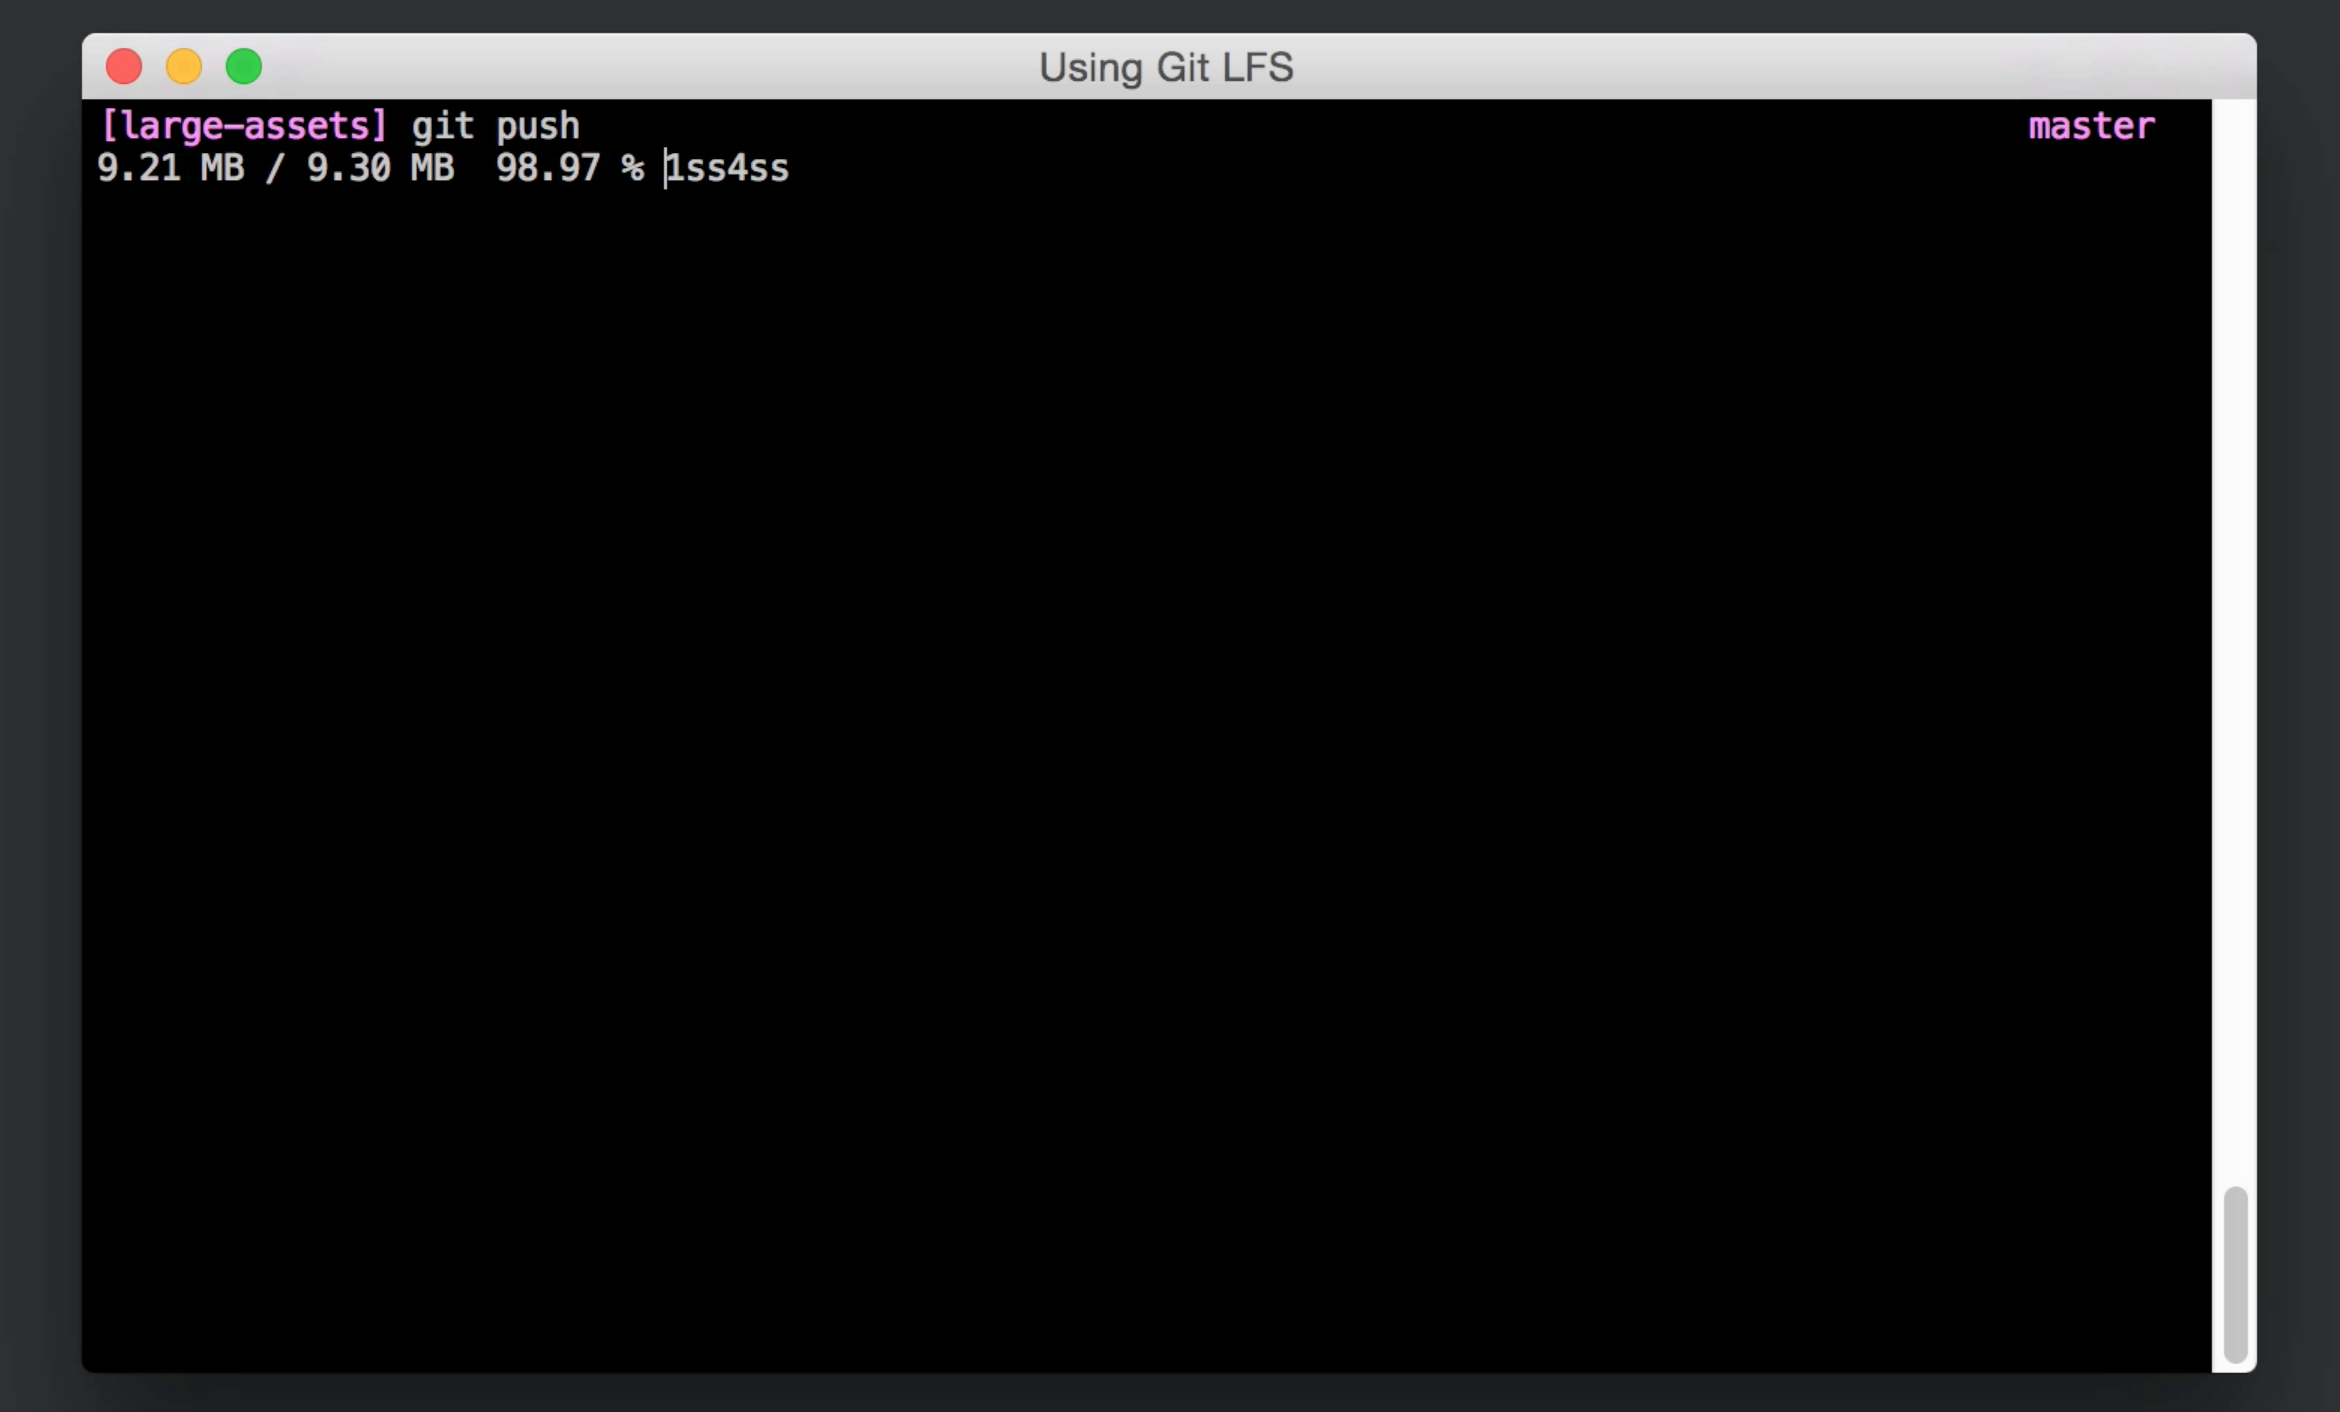
Once you tell Git LFS which files and paths to manage, you can stage, commit, and push just like you normally would; Git LFS handles all of the details for you. When you run git push, you'll notice a progress indicator showing the transfer status of each file as Git LFS uploads it to the LFS server.
Keeping track of things
If you ever need to find out which paths Git LFS is managing, you can run git lfs track with no arguments. You'll get an output of all the tracking rules from the globs listed in the .gitattributes file. For a deeper view of which specific files these globs are catching, you can run git lfs ls-files to see a listing of all the files in your project that Git LFS is managing.
Other resources
- The 1.0 release of Git LFS includes a collection of new features and enhancements, such as batch uploading and selective asset fetching, that extend and optimize it to help your workflow.
- For a deeper dive into the internal workings of Git LFS, you can consult the Git LFS documentation.
- A guided video demonstration of the features outlined in this video is available on our YouTube channel.
- To learn more about the history of Git LFS or the latest features, take a look at this recording of a talk from GitHub Universe featuring the project's core contributors.
New in the GitHub Shop: Octopolo Shirts
Serious business deserves a serious business shirt. We've created the Octopolo Shirt to help you get down to business in the most serious manner possible. Grab yours from the GitHub Shop.

GitHub supports Universal 2nd Factor authentication
To help users better secure their accounts, we are expanding GitHub's authentication system to support FIDO Universal 2nd Factor (U2F)—a rapidly growing open authentication standard.
GitHub encourages developers to build U2F support into their own applications as well, enabling authentication with simple user experience and strong security using public key cryptography. U2F is built to protect against phishing and man-in-the-middle attacks, allowing one U2F authenticator to access any number of services without any shared secrets. Since U2F has native support in platforms and browsers, there’s no need for drivers or client software. Read more about how U2F keys work or take a look at the GitHub U2F documentation to learn how to associate a U2F key with your GitHub account.
In order to take advantage of the security improvements provided by U2F, you'll need to purchase a hardware key. You can purchase the U2F key of your choice from a range of vendors. We are partnering with Yubico, inventor of the YubiKey, co-creator of the U2F protocol, and a leading provider of U2F authenticators. Together with Yubico we are offering discounts to GitHub users for a limited time through a special offer page where you will verify your GitHub account and place your order:
- While supplies last, GitHub users can purchase special edition U2F Security Keys for $5 plus shipping and handling (regular price $18; 5,000 special edition keys available).
- After the special keys are gone, all GitHub users are eligible for a 20% discount on U2F-certified YubiKeys, for a limited time.
- In addition, all students who are eligible for the Student Developer Pack will receive a 20% discount on any U2F-certified YubiKey.
We hope you'll take this step to keep your information secure.

Hacktoberfest: Contribute to Open Source in October
Celebrate open source this October by participating in Hacktoberfest, a month long festival of code organized by DigitalOcean and hosted on GitHub.

How to participate
Participation is simple: Choose any open source project hosted on GitHub and contribute by sending a pull request. You can fix a bug, add a feature, or even improve some documentation. Once you've made your contribution, tell the world about it by sharing with the #hacktoberfest hashtag so we can celebrate with you.
Starting tomorrow, and each day throughout the month of October, there will be an interesting open source project that is looking for contributors highlighted on the Hacktoberfest website. If you need help getting started, be sure to check out our guide to contributing to open source.
Get your t-shirt

Here's everything you need to do to get your free, limited edition Hacktoberfest t-shirt:
- Sign up on the Hacktoberfest website right away
- Open at least four pull requests on any GitHub-hosted open source project(s) by October 31st, 2015
- After the month is over, DigitalOcean will collect your shipping details and mail your shirt
Git 2.6, including flexible fsck and improved status
The open source Git project has just released Git 2.6.0. Here's our take on its most useful new features:
git fsck flexibility
If you're tired of having git fsck remind you of peccadillos from your distant past, read on. With Git 2.6, you can tell git fsck not to be quite so picky about minor data errors in your project's history.
The oddly-named1 git fsck command verifies the integrity of a Git repository, checking both that its data has not been corrupted and that its objects have the right format. You can even enable Git's transfer.fsckObjects configuration variable to make Git apply the same checks to objects that are pushed into your repository. At GitHub, for example, we enable this feature on our servers to block malformed objects from entering your project's history in the first place.
But what happens when you detect a problem in an object that is already part of your project's history? You may recall that Git objects are content-addressed and immutable. Changing an object's content, even to fix a syntactic error, changes its SHA-1 hash. And any commits which build on that object will need to update their references to it, changing their SHA-1 hashes, and so on.
Therefore, fixing a broken object requires all subsequent history to be rewritten. Sometimes it is worth doing. But sometimes, for mild forms of corruption in a repository that has already been cloned by many users, the repair process can be more trouble than it's worth. Accepting the objects as they are can sometimes be the least bad solution. But until now, that meant turning off these fsck checks entirely, losing all of the extra protection.
But now With Git v2.6, there is a better option. You can now adjust the severity of particular fsck warnings, or even tell fsck to ignore warnings entirely for a particular object. To demonstrate, let's create two commit objects with broken email addresses:
$ git cat-file commit HEAD | sed 's/</<</' | git hash-object --stdin -w -t commit
2fae34b45b7202796fbe07fdb73d47ba94af1878
$ git cat-file commit HEAD^ | sed 's/</<</' | git hash-object --stdin -w -t commit
b4a1fc6eed23c19fd5eed3f17d50b2a155d56aa9
git fsck rightly complains about the broken objects:
$ git fsck
error in commit 2fae34b45b7202796fbe07fdb73d47ba94af1878: badEmail: invalid author/committer line - bad email
error in commit b4a1fc6eed23c19fd5eed3f17d50b2a155d56aa9: badEmail: invalid author/committer line - bad email
Checking object directories: 100% (256/256), done.
If your history is riddled with invalid email addresses, you might decide to tell git fsck to ignore this type of corruption in the whole repository:
$ git config fsck.badEmail ignore
$ git fsck
Checking object directories: 100% (256/256), done.
On the other hand, perhaps you only want to tolerate the existing broken objects, but you still want git fsck to complain if any new ones enter your repository. If so, you can tell fsck "don't give these objects any trouble; they're with me."
$ git config fsck.skiplist "$PWD/.git/skiplist"
$ echo 2fae34b45b7202796fbe07fdb73d47ba94af1878 >>.git/skiplist
$ echo b4a1fc6eed23c19fd5eed3f17d50b2a155d56aa9 >>.git/skiplist
$ git fsck
Checking object directories: 100% (256/256), done.
Since Git objects are immutable, you know that the objects you have vouched for cannot develop new problems—unless of course the object's data gets corrupted on disk, in which case fsck will complain anyway, regardless of the skiplist.
git status more informative during interactive rebase
If you've ever used Git's interactive rebase on a large series of commits, you know that it's easy to get confused about where you are. The git status command used to report that you are rebasing, but not much more:
$ git status
rebase in progress; onto 1e7a542
You are currently editing a commit while rebasing branch 'master' on '1e7a542'.

nothing to commit, working directory clean
But as of v2.6, git status gives much more context about your progress through the rebase:
$ git status
interactive rebase in progress; onto 1e7a542
Last commands done (5 commands done):
   pick da6bc48 commit four
   edit 12ee9f3 commit five
Next commands to do (5 remaining commands):
   pick 8262b99 commit six
   squash 0f9e8ec commit seven
You are currently editing a commit while rebasing branch 'master' on '1e7a542'.

nothing to commit, working directory clean
log --date can use custom formats
Git's --date option (and the matching log.date configuration variable) let you format commit dates in a variety of standard formats, including rfc2822 and iso8601. But until now, you couldn't invent your own formats. As of v2.6, Git supports the same formatting language as your system's strftime(3) function. This lets you do silly things:
$ git log --date=format:"On the %d day of %B, my true git gave to me..."
commit bee53d49e0899e697f72ea3cee87427f319f5707
Author: Jeff King <peff@peff.net>
Date:   On the 05 day of April, my true git gave to me...

    ...a commit message in a pear tree.
But it also lets you take advantage of your system's localized date code. For example, %c shows the time in your preferred local format:
$ git config log.date "format:%c"
$ export LANG=es_ES.UTF-8
$ git log
commit bee53d49e0899e697f72ea3cee87427f319f5707
Author: Jeff King <peff@peff.net>
Date:   dom 05 abr 2015 13:02:03 GMT

    ...a commit message in a pear tree
git log --cc now shows diffs by default
The --cc option (e.g., to git log) modifies the way Git displays the diffs for merge commits. But until now it did not actually tell Git to show the diff. Now --cc implies -p, so that you don't have to specify the latter option separately.
The rest of the iceberg
That's just a peek at the improvements in Git v2.6. For the full list of changes, check out the release notes.
This Git release has 665 commits from 67 contributors. We'd especially like to shout out to Junio C Hamano, who recently celebrated his 10th year as Git's maintainer. Thanks, everybody!
[1] The name isn't so odd if you know the history. Unix systems have long had an fsck command, which does a File System ChecK. The original idea of git was to act as a content-addressable filesystem for versioned data. Thus, its checking tool was naturally named git-fsck.
Automating code deployment with GitHub and Azure
There are many cloud services that support automated code deployment from GitHub. In this post, we're going to be taking a look at connecting a GitHub repository to a Microsoft Azure instance. When working with continuously delivered projects like web apps, this connection can be especially helpful for pushing out things like critical bug fixes; but it also removes barriers that might be keeping new features in a holding pattern on stale branches.
And you can set everything up in under 10 minutes.
Prerequisites
You'll need a running web app instance on Azure before you get started. If you need help setting one up, there are quick video tutorials available in the Azure App Service documentation.
When your app is running, browse to its dashboard.
Step 1: Connect your App to its Repository on GitHub
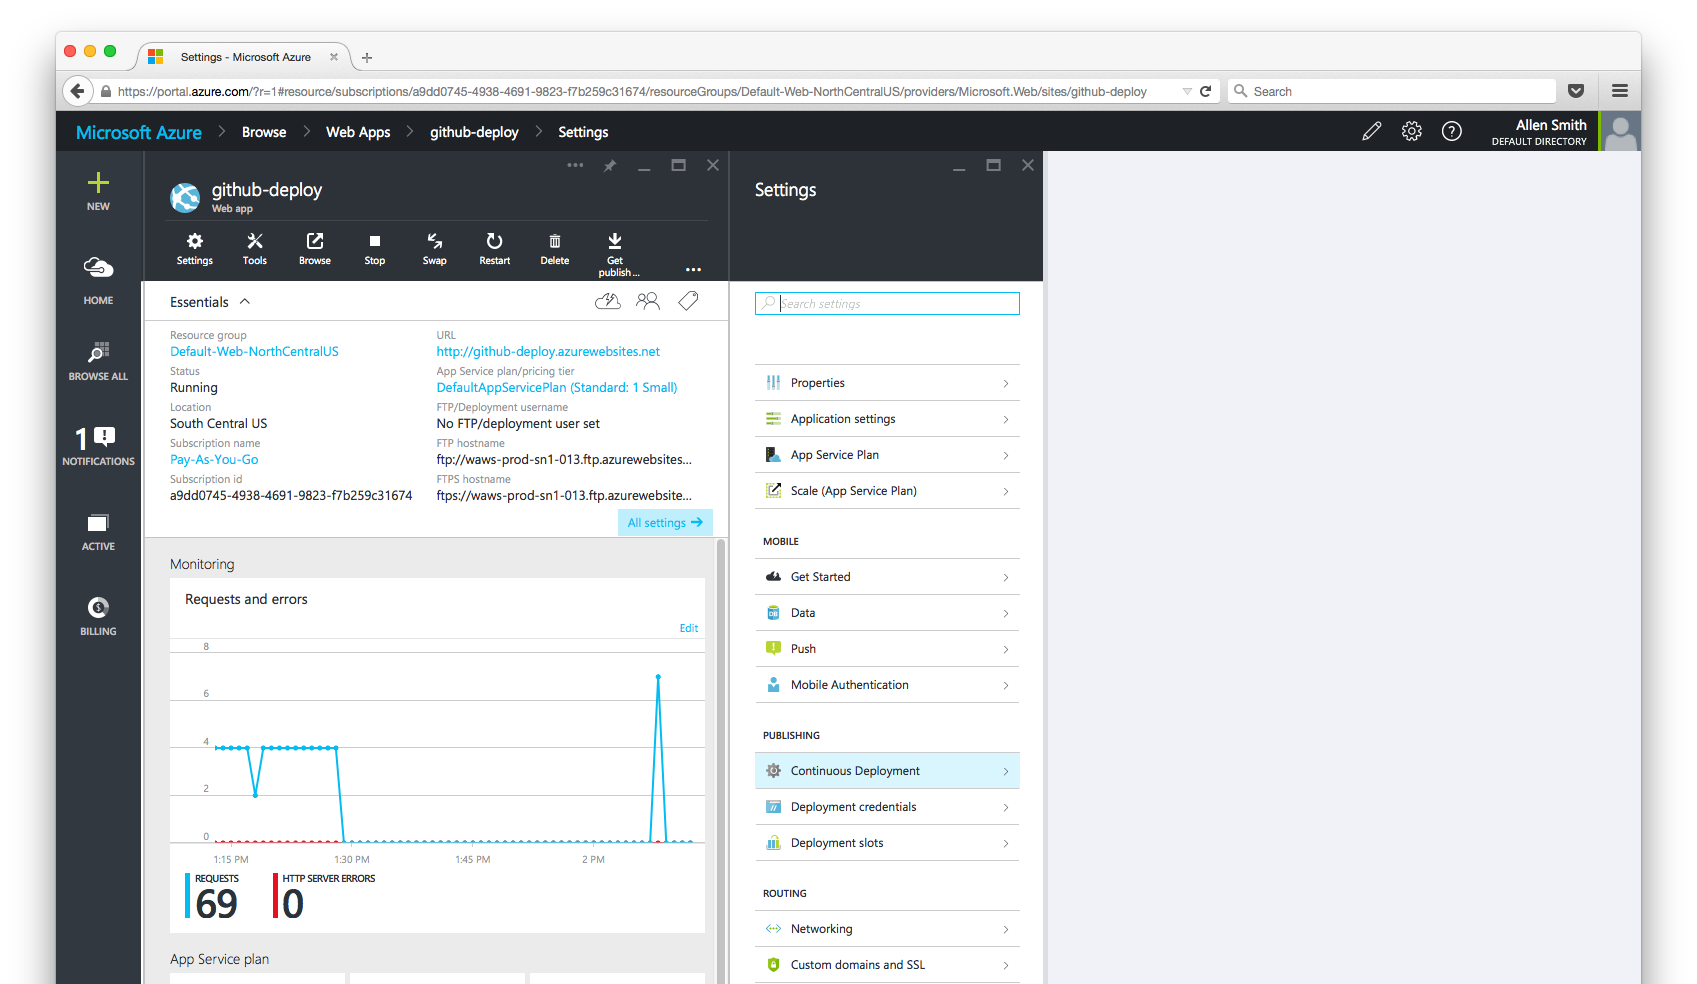
In the All Settings menu on the right, choose the option to set up Continuous Deployment. Then click the Choose Source blade and choose GitHub.
GitHub may ask if you want to authorize Azure to have access to your accounts. It's safe to click Authorize application.
Once authenticated, Azure will ask you which repository and which branch to deploy to your app.
Select your GitHub repository from the list and make sure you are deploying the master branch. Then click OK to finish up.
Azure will show you that your repository has been linked and will automatically begin deploying your code to your site.
When you see the green Active Deployment status, you're all set.
Step 2: There is no Step 2
That's it. If you browse to your app's URL, you'll see your app is now live on the Internet.
With everything connected, GitHub notifies Azure of any changes to the branch you specify (usually master) and Azure automatically deploys them for you. This means anytime you merge a Pull Request into master on GitHub, a single click delivers all of that new work to the people who use your app.
If you use Microsoft Azure to serve your app, this setup not only makes it easy to push out things like bug fixes; it also stimulates new development by removing barriers and helping you focus on shipping great code.
Additional Resources
- A full video walkthrough of setting up an Azure app connected to GitHub is available on the GitHubGuides YouTube channel.
- Likewise, this Microsoft Azure documentation article provides additional detail about deploying different types of projects, such as Visual Studio Solutions.
Language Trends on GitHub
Recently we took a look at the popularity of programming languages used on GitHub.com.
Below is a graph that shows the change in rank of languages since GitHub launched in 2008.
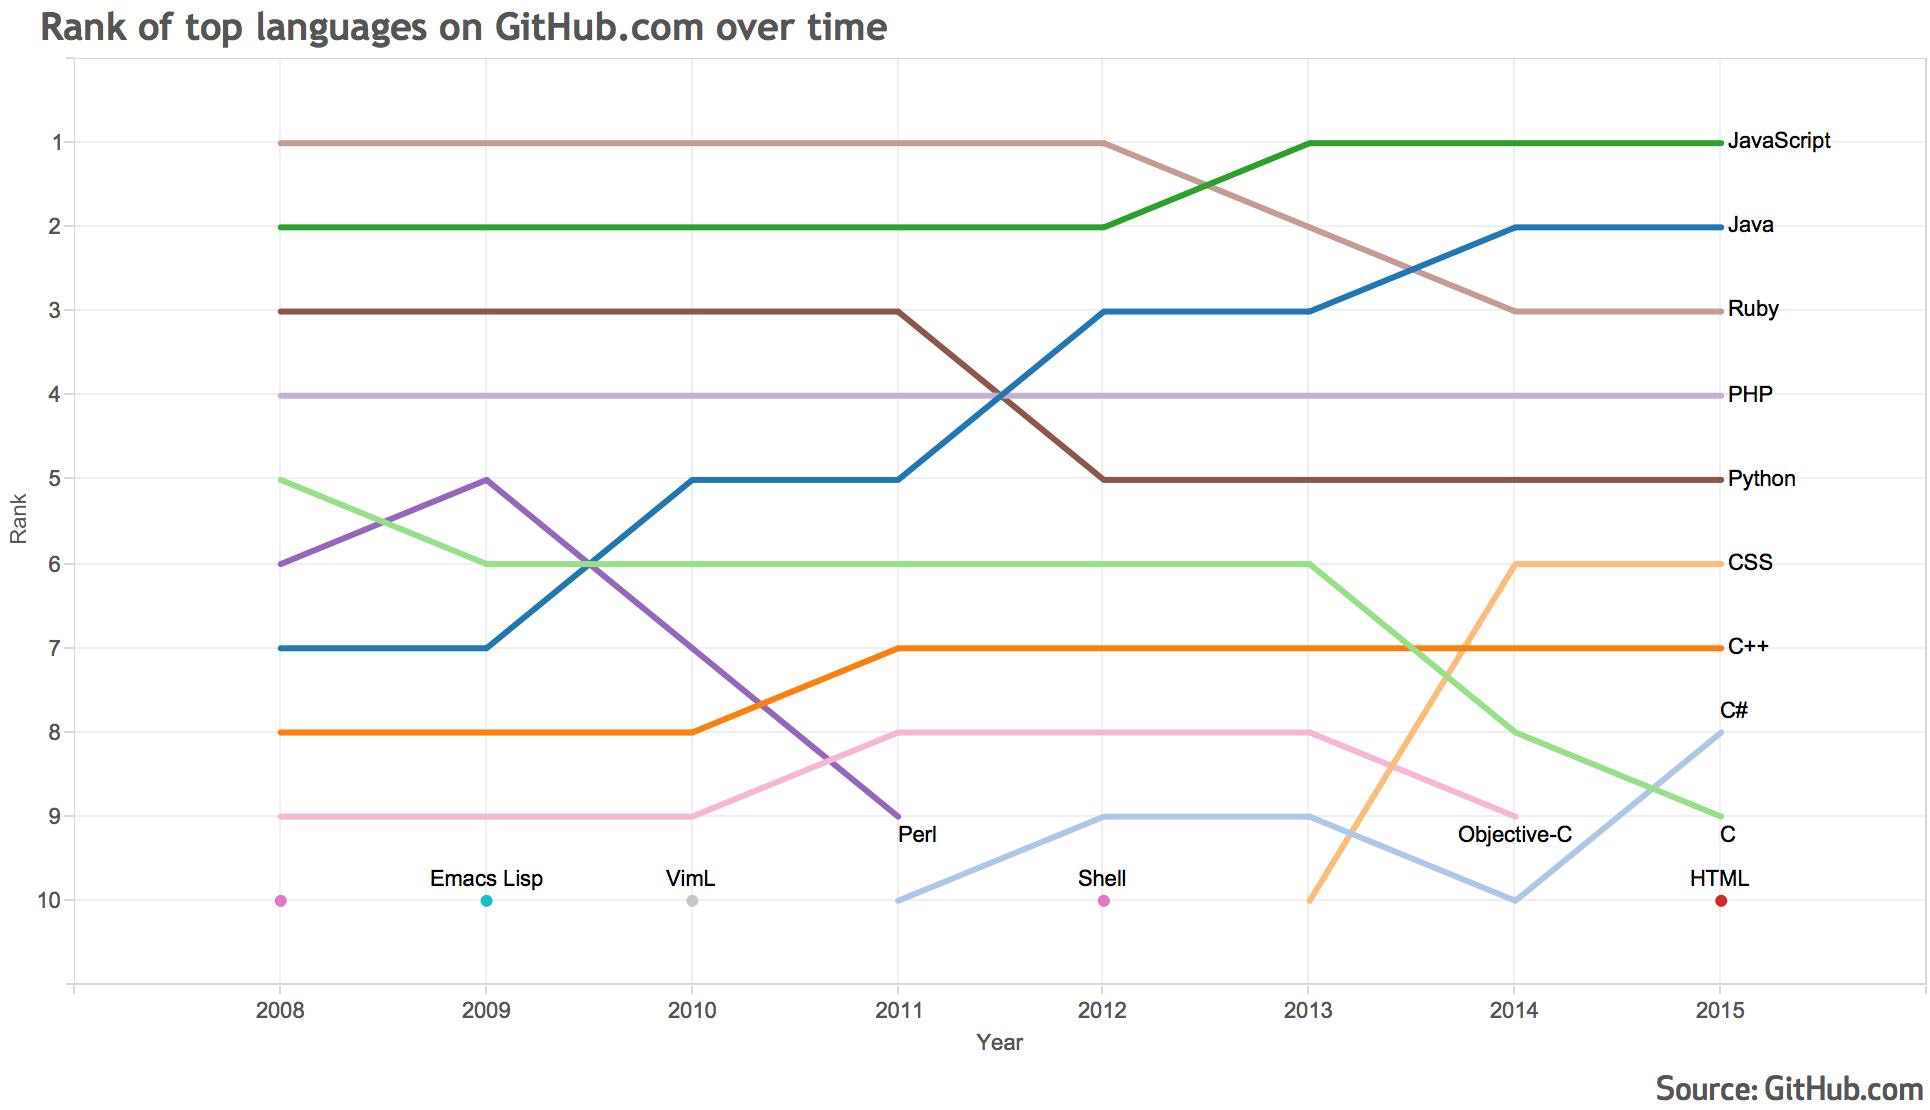
The rank represents languages used in public & private repositories, excluding forks, as detected by Linguist.
It should be noted that this graph represents each language's relative popularity on GitHub. For example, Ruby on Rails has been on GitHub since 2008, which may explain Ruby's early popularity.
Between 2008 and 2015 GitHub gained the most traction in the Java community, which changed in rank from 7th to 2nd. Possible contributing factors to this growth could be the growing popularity of Android and the increasing demand for version control platforms at businesses and enterprises.
The Surftocat Tank Top is here!
Whether you are partaking in the beauty of the outdoors or working on your favorite project, enjoy the sleeveless comfort of our Surftocat tank top, now available in the GitHub Shop

Git 2.5, including multiple worktrees and triangular workflows
The open source Git project has just released Git 2.5. Here's our take on its most useful new features.
git worktree: one Git repository with multiple working trees
It's not very difficult to switch a single Git repository between multiple branches, or to create a second local clone of a repository. This lets you work on two branches simultaneously, or start long-running tests in one clone while continuing development in the other. However, maintaining multiple clones of a repository means extra work to keep the clones in sync with each other and with any remote repositories.
The new Git subcommand git worktree creates additional working trees connected to an existing Git repository [1]. Each linked working tree is a pseudo-repository with its own checked-out working copy. Its .git is actually a file that refers to the history and references from the main repository.
Please note that the worktree feature is experimental. It may have some bugs, and its interface may change based on user feedback. It's not recommended to use git worktree with a repository that contains submodules.
Suppose you're working in a Git repository on a branch called feature, when a user reports a high-urgency bug in master. First you create a linked working tree with a new branch, hotfix, checked out relative to master, and switch to that directory:
$ git worktree add -b hotfix ../hotfix origin/master
Enter ../hotfix (identifier hotfix)
Branch hotfix set up to track remote branch master from origin.
Switched to a new branch 'hotfix'
$ cd ../hotfix
Now you've got a new working tree, with branch hotfix checked out and ready to go. You can fix the bug, push hotfix, and create a pull request. After you've committed the changes to the hotfix branch, you can delete the hotfix directory whenever you like, because the commits are stored in your main repository:
$ cd ../main
$ rm -rf ../hotfix
The main repository and any associated linked working trees all know about each other, which keeps them from getting in each other's way. For example, it's not allowed to have the same branch checked out in two linked working trees at the same time, because that would allow changes committed in one working tree to bring the other one out of sync. So suppose that you want to run long-running tests on the current commit. Create a detached HEAD state, using the --detach option, to check out the current commit independent of the branch:
$ git worktree add --detach ../tests HEAD
Enter ../tests (identifier tests)
HEAD is now at 977212e... add file
$ cd ../tests
$ make super-long-test
[...]
While the test is running, you can continue working in your main repository.
[1] You may have heard of an older script called contrib/workdir/git-new-workdir that does something similar. That script never made it to mainstream because it was non-portable and somewhat fiddly.
Improved support for triangular workflows
When contributing to open source projects, it's common to use what's called a "triangular workflow":
You fetch from a canonical "upstream" repository to keep your local repository up-to-date.
When you want to share your own modifications with other people, you push them to your own fork and open a pull request.
If your changes are accepted, the project maintainer merges them into the upstream repository.
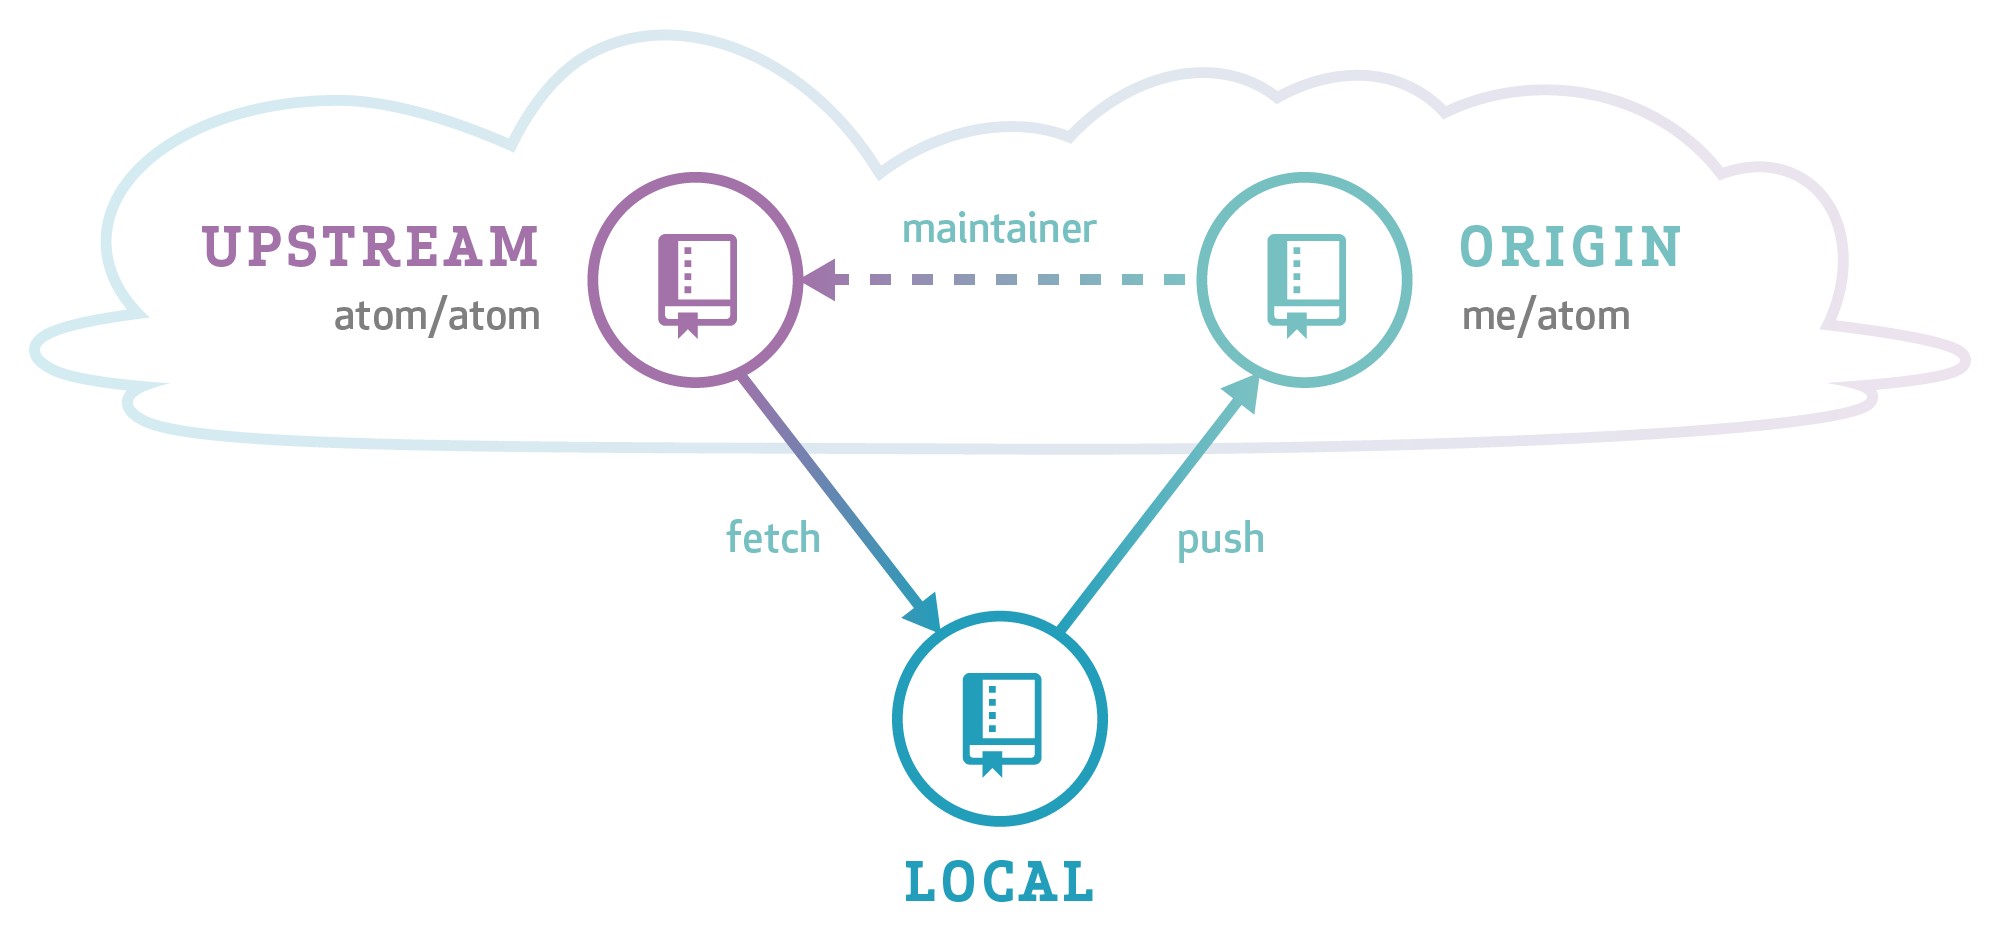
Git has many features that support triangular workflows, but it's sometimes hard to see how to use them together in real life. Let's take a closer look at triangular workflows, including the new command line shorthand <reference>@{push} that was added in Git 2.5.
Preparation
Suppose you want to contribute to the Atom editor. Although you likely don't have push permission to the main Atom repository, you can fork that repo and push your changes to your own fork. Here's how you set that up:
Go to the main Atom repository and click "Fork". This creates a new fork under your account with the URL
https://github.com/YOUR-USERNAME/atom.-
Create a local clone of your fork on your computer:
$ git clone https://github.com/YOUR-USERNAME/atom
$ cd atom
$ git config remote.pushdefault origin
$ git config push.default current
After this step, the remote called
originrefers to your fork of Atom. It also sets the default remote for pushes to beoriginand the default push behavior tocurrent. Together this means that if you just typegit push, the current branch is pushed to theoriginremote. -
Create a second remote called
upstreamthat points at the mainatomrepository and fetch from it:$ git remote add upstream https://github.com/atom/atom $ git fetch upstream
Hacking
You only have to follow the above steps once. From then on, whenever you want to work on a new feature, you can more easily interact with the remote repositories:
-
Make sure that your local repository is up-to-date with the upstream repository:
$ git fetch upstream -
Create a branch
whizbangoff of upstreammasterto work on a new feature, and check out the branch:$ git checkout -b whizbang upstream/masterThis automatically sets up your local
whizbangbranch to track the upstreammasterbranch. This means that if more commits are added tomasterupstream, you can merge those commits into yourwhizbangbranch by typing$ git pullor rebase your branch on top of the new
masterby typing$ git pull --rebaseIf you're ever unsure of the branch that would be pulled from, you can type
$ git rev-parse --abbrev-ref '@{u}' Hack, commit, hack, commit.
-
Push your
whizbangbranch to your fork:$ git pushBecause of the above configuration, and because
whizbangis the current branch, the above command doesn't need any arguments. Continue to hack, commit, hack, commit.
-
See what commits you've added to your current branch since the last push:
$ git log @{push}..This uses the new
@{push}notation, which denotes the current value of the remote-tracking branch that the current branch would be pushed to bygit push, namelyorigin/whizbang. You can also refer to the push destination of an arbitrary branch using the notationwhizbang@{push}. -
Push the new commits to the
whizbangbranch on your GitHub fork:$ git pushIf you're unsure of which branch would be pushed to, you can type
$ git push --dry-runor
$ git rev-parse --abbrev-ref '@{push}'
Performance improvements
Git 2.5 includes performance improvements aimed at large working trees and working trees stored on networked filesystems (e.g., NFS):
You can run
git update-index --untracked-cacheto enable an experimental feature that tells Git to examine only the modification times of directories when looking for new files. This can speed upgit statuson many filesystems.git index-pack(run, for example, bygit gc) now makes far fewer scans of thepacked-refsdirectory. This can make a huge difference if the repository is on a networked filesystem.Git now calls
utimefar less often when it's about to reuse existing packed objects. This also mostly benefits repositories on networked filesystems.
Also, clean/smudge filters are no longer required to read all of their input. This can help speed up filters that don't need to read the whole file contents to do their work (e.g., Git Large File Storage).
Go forth and collaborate
Of course there are many, many other changes in this release; for the full list, check out the 2.5.0 release notes.
We hope that you find something in Git 2.5 that makes your day just a little bit nicer. And the best part is that, through the magic of open source, Git just keeps getting better and better! If you'd like to get more involved in the Git open source community, come check out the community page.
GitHub is a Proud ConnectHome Partner
We are excited to announce GitHub’s partnership with the White House and the Department of Housing and Urban Development that will equip low-income homes with affordable and free broadband wireless internet access. “ConnectHome” will pilot in 27 cities and one tribal nation in the US including Newark, Seattle, Atlanta, and the Choctaw Nation in Oklahoma, providing broadband access, technical training, coding education, and devices for residents in assisted housing.
GitHub will provide
- $3 million in free private repositories for participants;
- $250,000 in financial support; and
- 2,000 hours in volunteer time to train, coach, and mentor those who want to build a career in software development.
We are proud to be a national sponsor while also partnering with local non-profits, educators, and Housing Authorities.
ConnectHome is the first program of its kind, and it is incredibly important because currently, one in four low-income families in the U.S. do not have access to the internet at home.
This is also the first major project launch of GitHub’s newly-formed Social Impact Team which is committed to leveraging resources and people power to cultivate positive change in open source, tech, and communities across the US and internationally.
The next chapter in tech innovation is going to be written by people who have been on the margins of tech for too long. GitHub is committed to making it much easier for people from low-income backgrounds and other underrepresented communities to participate not only in consuming tech, but in creating it. This initiative is part of that ongoing commitment.
Atom and Electron Sticker Pack
Add mass to your laptop and charge your accessories with this sticker pack made of Atoms and Electrons, now available in the GitHub Shop. Keep an ion them, they'll be gone soon.
* Stickers cannot actually charge your laptop
Octicon Buttons Are Here!
Graphs, and pencils, and locks...Oh my! Now you can collect themed Octicon buttons with the four new button packs offered in the GitHub Shop.

A closer look at Europe
Last week we opened our first international office in Japan. This week we thought we'd take a closer look at Europe, which happens to be the largest demographic of GitHub users around the world, representing 36% of site traffic.
Around 32 million people visit GitHub each month, and most of this traffic comes from outside of the United States (74% in fact!). The most active countries in Europe are Germany, the United Kingdom, and France, but if we look at users per capita we see a different story -- Sweden, Finland, and the Netherlands lead the way. London, Paris and Stockholm top the list of European cities most active on GitHub.

The goals of building better software are universal, and several European organizations are setting the example. Companies like SAP and XS4ALL are driving innovation with software, while The UK Government Digital Services and dozens of other European government agencies and services are developing new ways to serve citizens.
Today, around 10% of GitHub employees are based in Europe, with a dozen new faces in the last year alone -- many of whom are focused solely on helping our European customers build great software. A few of us are here in the UK for London Tech Week and EnterConf in Belfast. There will be plenty more meetups ahead if we don't see you there.
How to undo (almost) anything with Git
One of the most useful features of any version control system is the ability to "undo" your mistakes. In Git, "undo" can mean many slightly different things.
When you make a new commit, Git stores a snapshot of your repository at that specific moment in time; later, you can use Git to go back to an earlier version of your project.
In this post, I'm going to take a look at some common scenarios where you might want to "undo" a change you've made and the best way to do it using Git.
Undo a "public" change
Scenario: You just ran git push, sending your changes to GitHub, now you realize there's a problem with one of those commits. You'd like to undo that commit.
Undo with: git revert <SHA>
What's happening: git revert will create a new commit that's the opposite (or inverse) of the given SHA. If the old commit is "matter", the new commit is "anti-matter"—anything removed in the old commit will be added in the new commit and anything added in the old commit will be removed in the new commit.
This is Git's safest, most basic "undo" scenario, because it doesn't alter history—so you can now git push the new "inverse" commit to undo your mistaken commit.
Fix the last commit message
Scenario: You just typo'd the last commit message, you did git commit -m "Fxies bug #42" but before git push you realized that really should say "Fixes bug #42".
Undo with: git commit --amend or git commit --amend -m "Fixes bug #42"
What's happening: git commit --amend will update and replace the most recent commit with a new commit that combines any staged changes with the contents of the previous commit. With nothing currently staged, this just rewrites the previous commit message.
Undo "local" changes
Scenario: The cat walked across the keyboard and somehow saved the changes, then crashed the editor. You haven't committed those changes, though. You want to undo everything in that file—just go back to the way it looked in the last commit.
Undo with: git checkout -- <bad filename>
What's happening: git checkout alters files in the working directory to a state previously known to Git. You could provide a branch name or specific SHA you want to go back to or, by default, Git will assume you want to checkout HEAD, the last commit on the currently-checked-out branch.
Keep in mind: any changes you "undo" this way are really gone. They were never committed, so Git can't help us recover them later. Be sure you know what you're throwing away here! (Maybe use git diff to confirm.)
Reset "local" changes
Scenario: You've made some commits locally (not yet pushed), but everything is terrible, you want to undo the last three commits—like they never happened.
Undo with: git reset <last good SHA> or git reset --hard <last good SHA>
What's happening: git reset rewinds your repository's history all the way back to the specified SHA. It's as if those commits never happened. By default, git reset preserves the working directory. The commits are gone, but the contents are still on disk. This is the safest option, but often, you'll want to "undo" the commits and the changes in one move—that's what --hard does.
Redo after undo "local"
Scenario: You made some commits, did a git reset --hard to "undo" those changes (see above), and then realized: you want those changes back!
Undo with: git reflog and git reset or git checkout
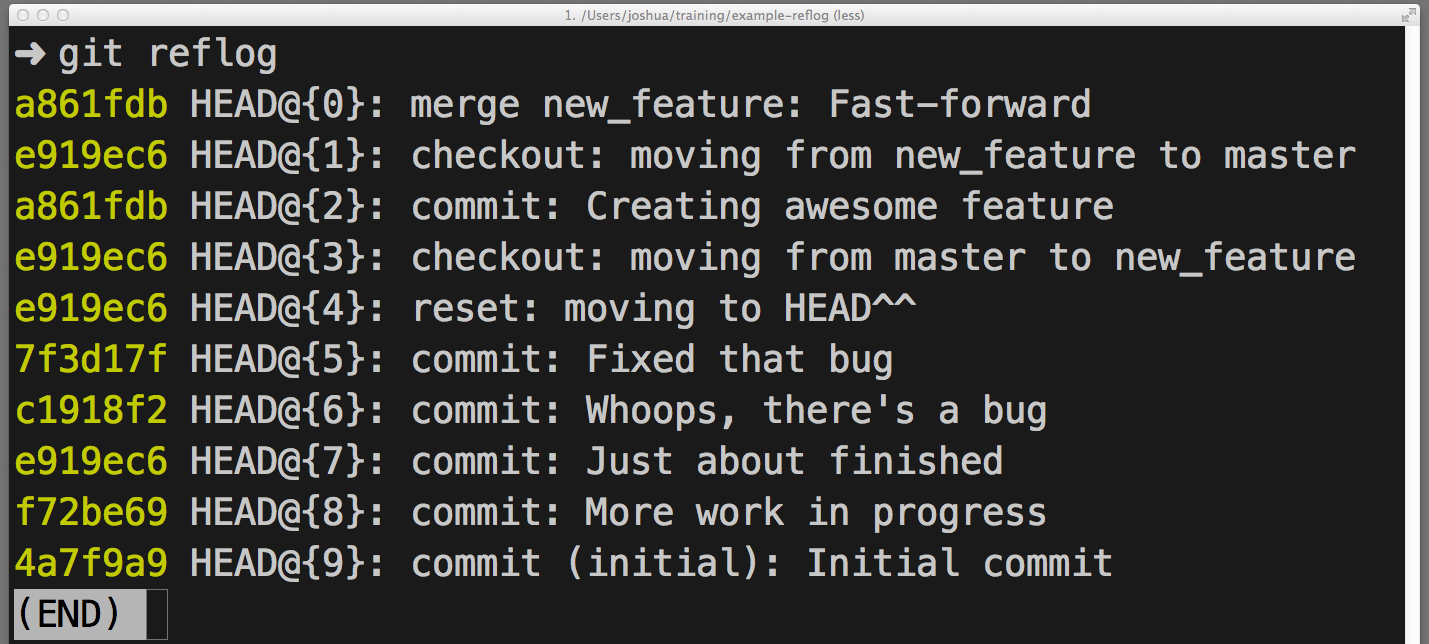
What's happening: git reflog is an amazing resource for recovering project history. You can recover almost anything—anything you've committed—via the reflog.
You're probably familiar with the git log command, which shows a list of commits. git reflog is similar, but instead shows a list of times when HEAD changed.
Some caveats:
-
HEADchanges only.HEADchanges when you switch branches, make commits withgit commitand un-make commits withgit reset, butHEADdoes not change when yougit checkout -- <bad filename>(from an earlier scenario—as mentioned before, those changes were never committed, so the reflog can't help us recover those. -
git reflogdoesn't last forever. Git will periodically clean up objects which are "unreachable." Don't expect to find months-old commits lying around in the reflog forever. - Your
reflogis yours and yours alone. You can't usegit reflogto restore another developer's un-pushed commits.
So... how do you use the reflog to "redo" a previously "undone" commit or commits? It depends on what exactly you want to accomplish:
- If you want to restore the project's history as it was at that moment in time use
git reset --hard <SHA> - If you want to recreate one or more files in your working directory as they were at that moment in time, without altering history use
git checkout <SHA> -- <filename> - If you want to replay exactly one of those commits into your repository use
git cherry-pick <SHA>
Once more, with branching
Scenario: You made some commits, then realized you were checked out on master. You wish you could make those commits on a feature branch instead.
Undo with: git branch feature, git reset --hard origin/master, and git checkout feature
What's happening: You may be used to creating new branches with git checkout -b <name>—it's a popular short-cut for creating a new branch and checking it out right away—but you don't want to switch branches just yet. Here, git branch feature creates a new branch called feature pointing at your most recent commit, but leaves you checked out to master.
Next, git reset --hard rewinds master back to origin/master, before any of your new commits. Don't worry, though, they are still available on feature.
Finally, git checkout switches to the new feature branch, with all of your recent work intact.
Branch in time saves nine
Scenario: You started a new branch feature based on master, but master was pretty far behind origin/master. Now that master branch is in sync with origin/master, you wish commits on feature were starting now, instead of being so far behind.
Undo with: git checkout feature and git rebase master
What's happening: You could have done this with git reset (no --hard, intentionally preserving changes on disk) then git checkout -b <new branch name> and then re-commit the changes, but that way, you'd lose the commit history. There's a better way.
git rebase master does a couple of things:
- First it locates the common ancestor between your currently-checked-out branch and
master. - Then it resets the currently-checked-out branch to that ancestor, holding all later commits in a temporary holding area.
- Then it advances the currently-checked-out-branch to the end of
masterand replays the commits from the holding area aftermaster's last commit.
Mass undo/redo
Scenario: You started this feature in one direction, but mid-way through, you realized another solution was better. You've got a dozen or so commits, but you only want some of them. You'd like the others to just disappear.
Undo with: git rebase -i <earlier SHA>
What's happening: -i puts rebase in "interactive mode". It starts off like the rebase discussed above, but before replaying any commits, it pauses and allows you to gently modify each commit as it's replayed.
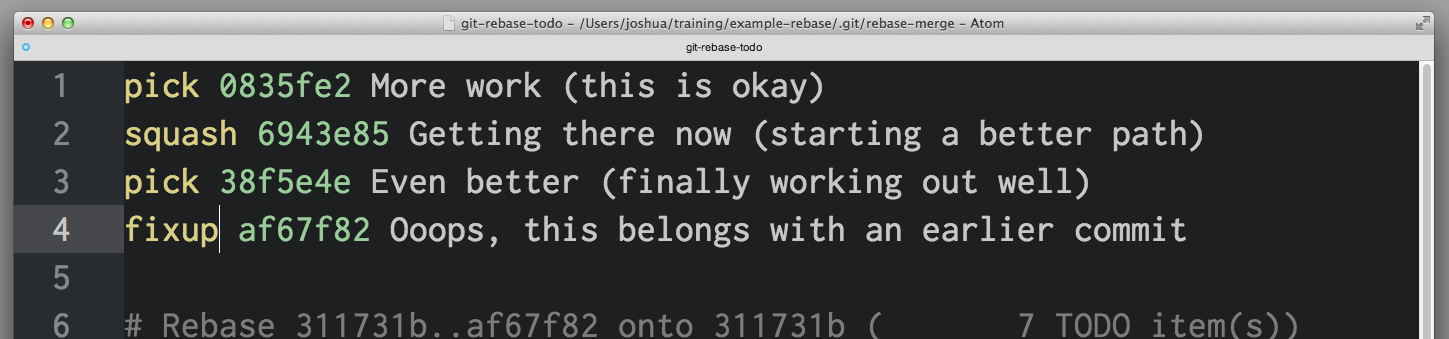
rebase -i will open in your default text editor, with a list of commits being applied, like this:
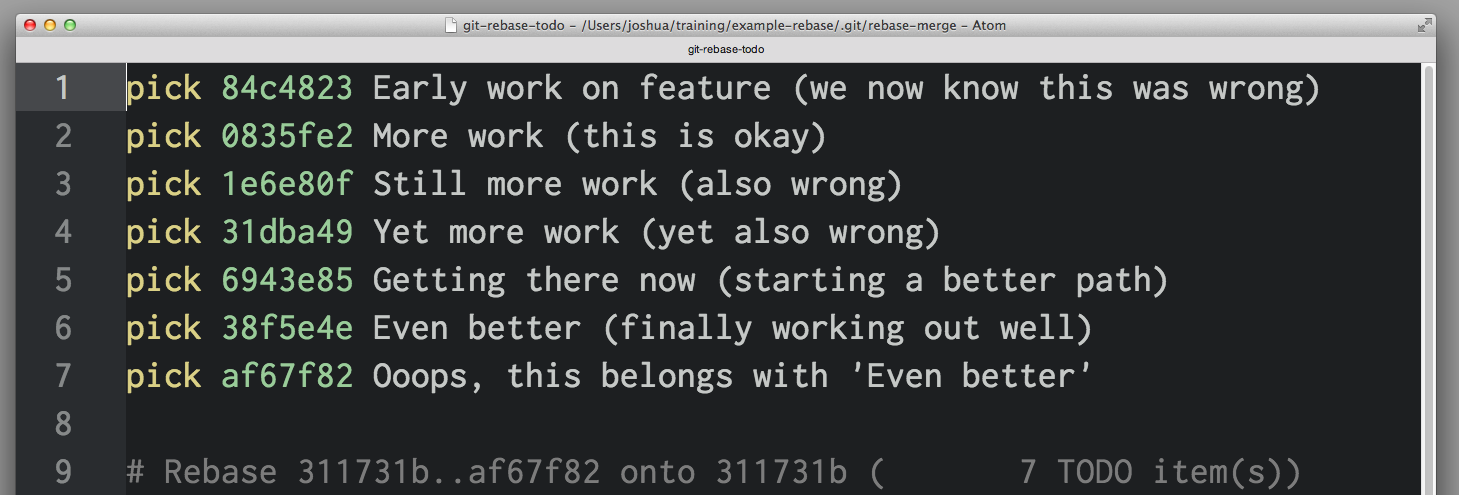
The first two columns are key: the first is the selected command for the commit identified by the SHA in the second column. By default, rebase -i assumes each commit is being applied, via the pick command.
To drop a commit, just delete that line in your editor. If you no longer want the bad commits in your project, you can delete lines 1 and 3-4 above.
If you want to preserve the contents of the commit but edit the commit message, you use the reword command. Just replace the word pick in the first column with the word reword (or just r). It can be tempting to rewrite the commit message right now, but that won't work—rebase -i ignores everything after the SHA column. The text after that is really just to help us remember what 0835fe2 is all about. When you've finished with rebase -i, you'll be prompted for any new commit messages you need to write.
If you want to combine two commits together, you can use the squash or fixup commands, like this:
squash and fixup combine "up"—the commit with the "combine" command will be merged into the commit immediately before it. In this scenario, 0835fe2 and 6943e85 will be combined into one commit, then 38f5e4e and af67f82 will be combined together into another.
When you select squash, Git will prompt us to give the new, combined commit a new commit message; fixup will give the new commit the message from the first commit in the list. Here, you know that af67f82 is an "ooops" commit, so you'll just use the commit message from 38f5e4e as is, but you'll write a new message for the new commit you get from combining 0835fe2 and 6943e85.
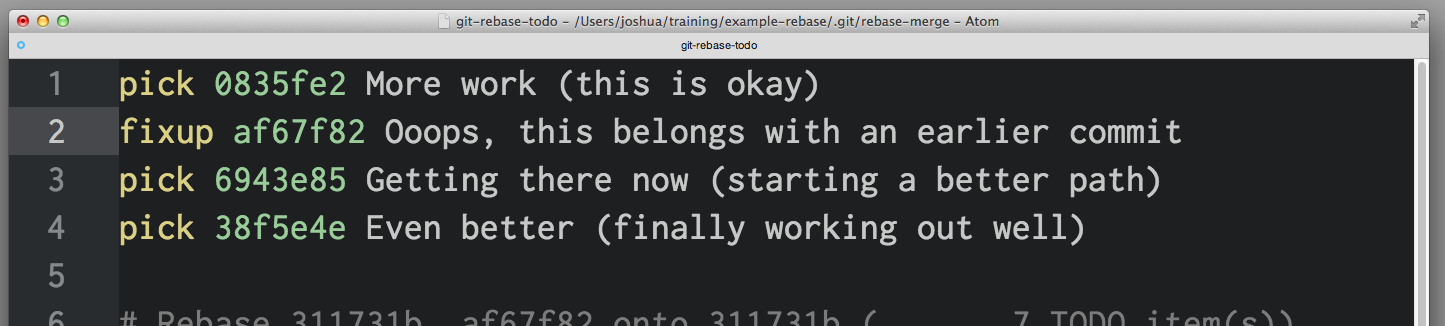
When you save and exit your editor, Git will apply your commits in order from top to bottom. You can alter the order commits apply by changing the order of commits before saving. If you'd wanted, you could have combined af67f82 with 0835fe2 by arranging things like this:
Fix an earlier commit
Scenario: You failed to include a file in an earlier commit, it'd be great if that earlier commit could somehow include the stuff you left out. You haven't pushed, yet, but it wasn't the most recent commit, so you can't use commit --amend.
Undo with: git commit --squash <SHA of the earlier commit> and git rebase --autosquash -i <even earlier SHA>
What's happening: git commit --squash will create a new commit with a commit message like squash! Earlier commit. (You could manually create a commit with a message like that, but commit --squash saves you some typing.)
You can also use git commit --fixup if you don't want to be prompted to write a new commit message for the combined commit. In this scenario, you'd probably use commit --fixup, since you just want to use the earlier commit's commit message during rebase.
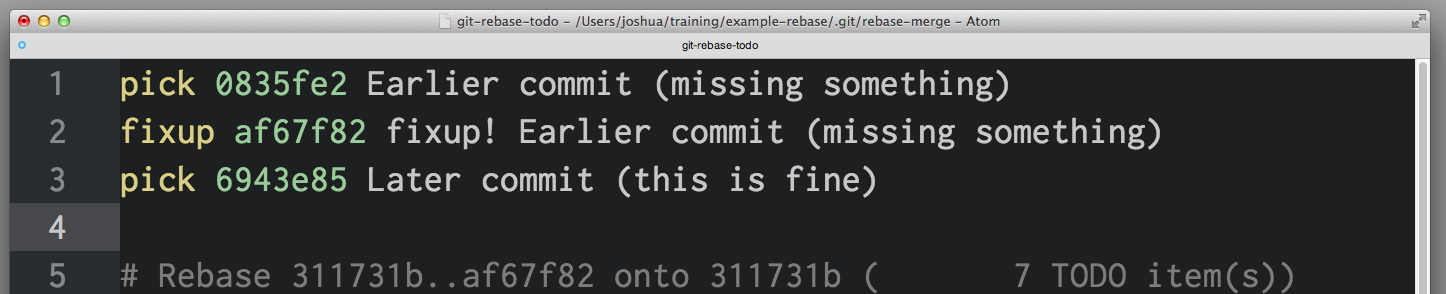
rebase --autosquash -i will launch an interactive rebase editor, but the editor will open with any squash! and fixup! commits already paired to the commit target in the list of commits, like so:
When using --squash and --fixup, you might not remember the SHA of the commit you want to fix—only that it was one or five commits ago. You might find using Git's ^ and ~ operators especially handy. HEAD^ is one commit before HEAD. HEAD~4 is four commits before HEAD - or, altogether, five commits back.
Stop tracking a tracked file
Scenario: You accidentally added application.log to the repository, now every time you run the application, Git reports there are unstaged changes in application.log. You put *.log in the .gitignore file, but it's still there—how do you tell git to to "undo" tracking changes in this file?
Undo with: git rm --cached application.log
What's happening: While .gitignore prevents Git from tracking changes to files or even noticing the existence of files it's never tracked before, once a file has been added and committed, Git will continue noticing changes in that file. Similarly, if you've used git add -f to "force", or override, .gitignore, Git will keep tracking changes. You won't have to use -f to add it in the future.
If you want to remove that should-be-ignored file from Git's tracking, git rm --cached will remove it from tracking but leave the file untouched on disk. Since it's now being ignored, you won't see that file in git status or accidentally commit changes from that file again.
That's how to undo anything with Git. To learn more about any of the Git commands used here, check out the relevant documentation: