Author Archives: Alan

About Alan

I've spent some time working in the games industry, and now I'm currently coming to the end of a PhD in Robotics at the Bristol Robotics Laboratory. Dawn Robotics is an attempt at supporting myself doing something I love, and also a platform that I can hopefully use to turn my various ideas for robots, and robotic parts, into useful products.

Using the Dagu Mini Driver to Build a Raspberry Pi Camera Robot

pi_magician_small_03__98633
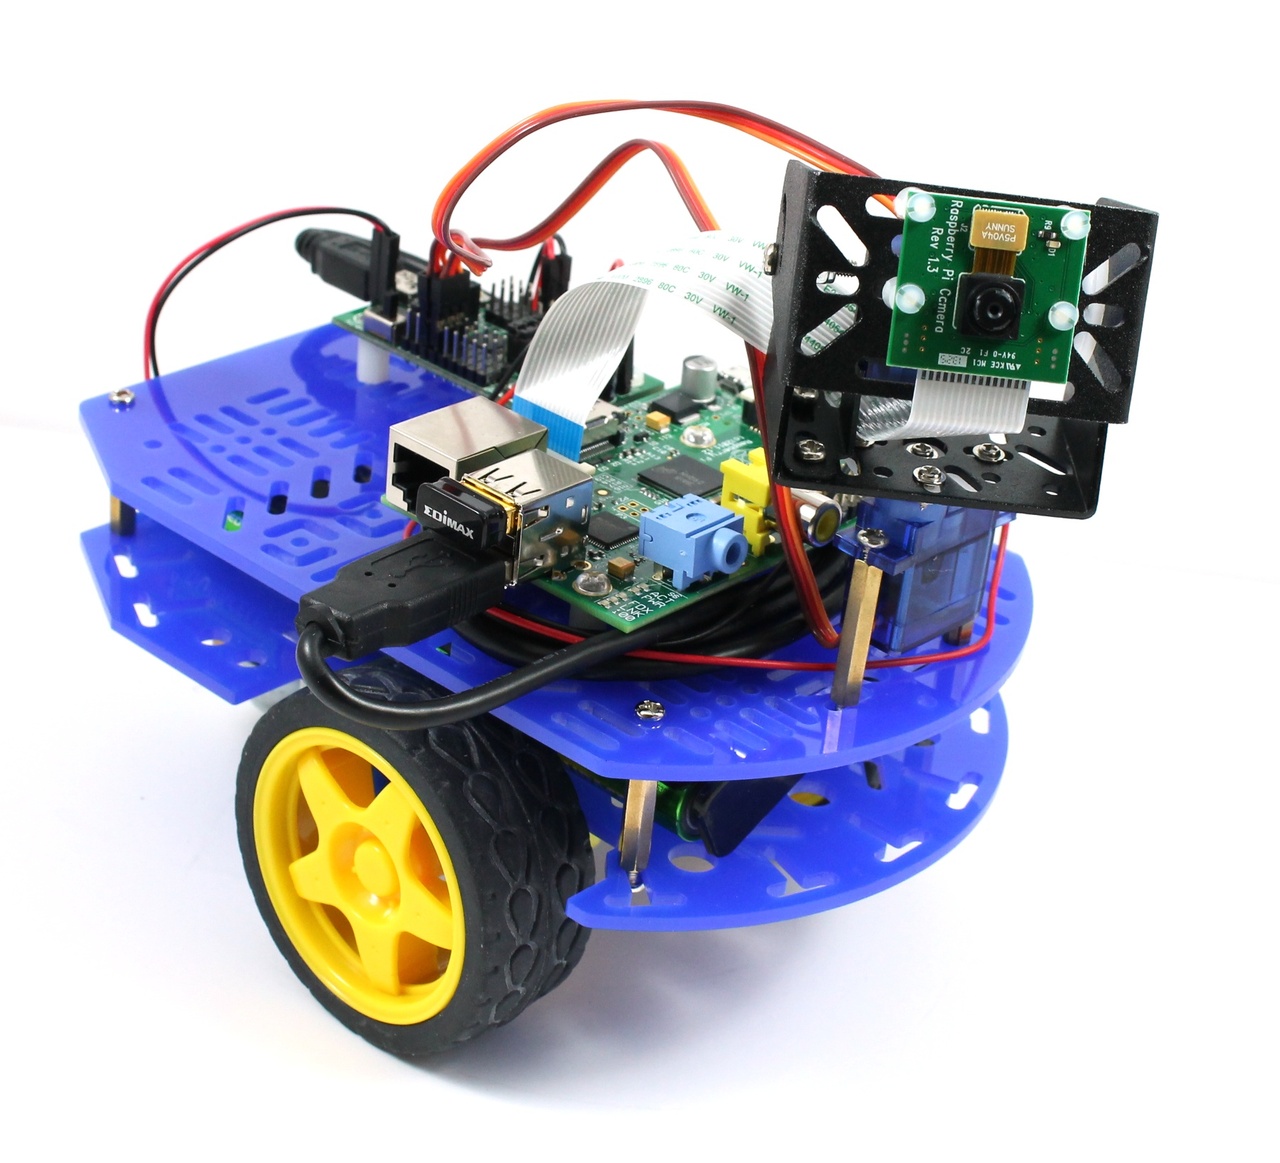
A Raspberry Pi with a camera, gives you a small, low cost, embedded vision system, but it’s not very mobile. In this tutorial we show you how to fix that by attaching it to a robot to give you a Raspberry Pi camera robot! The robot is WiFi enabled which means you can drive it around using a tablet, phone or computer, using the camera to explore remote areas.

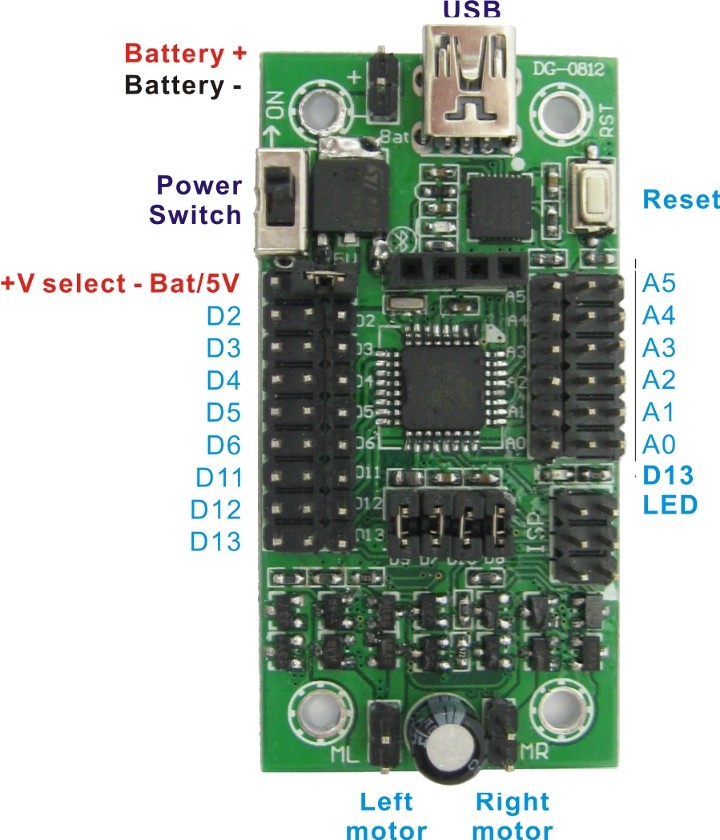
We’ve tried to keep the components for this tutorial as affordable as possible, and as such we’re using the Dagu Arduino Mini Driver to control the motors and servos of the robot. This board also contains a 1A voltage regulator which we can use to power the Pi. Now a limit of 1A is a bit tight for the Pi, but we’ve found that with the right WiFi dongle, the Mini Driver voltage regulator can happily power itself, the Pi, a camera, and WiFi. All the ingredients you need for a camera robot. :)

Update: This robot also works with the new Model B+ Pi. We’ve updated the instructions to reflect this below.

Update: We’ve now changed the robot slightly so that it uses a UBEC to power the Pi. This extends the battery life of the robot, and increases the current limit for the Pi to 3A.

Continue reading

Creating a Dawn Robotics SD Card

Update: This post is now out of date as we’ve released a new version of the software. You can find an updated version of the instructions here.

This post describes all the steps we go through to set up a Dawn Robotics SD Card. This SD card contains Raspbian with software installed on it to support a Raspberry Pi robot, and also to support the Pi Co-op Arduino add-on board we sell. If you want to get up and running quickly, then you can just download a complete version of the SD card image here, or alternatively buy a pre-installed SD card from us here. For people who want to build their SD card image from scratch however, or who want to customise it for their own Raspberry Pi robot, hopefully this set of notes will be a good guide to show you what we’ve done.

Continue reading

Building a Raspberry Pi Robot and Controlling it with Scratch – Part 3

Happy New Year everyone! Things have been a bit quiet on this blog due to the Christmas rush, and the fact that we’ve been spending time on product development (more on that in a future post). But here at last is the 3rd and final post in our series on the Raspberry Pi robot we used for a workshop at the now not so recent Digimakers event at @Bristol.

In part 1 we described the hardware of the robot, in part 2 we talked about the software that ran on the robot. In this post we’ll talk about about the the Scratch simulator which the workshop participants used to create their robot control programs, and our experience of running the workshop. Continue reading

New Products in Stock

L293D Motor Driver

L293D Motor Driver

We’re now stocking some Integrated Circuits (ICs) in our store for your robotics projects.

MCP3008 Analog to Digital Converter

MCP3008 Analog to Digital Converter

The L293D is a stalwart of many robotic projects. The are lots of newer motor drivers on the market, but the L293D’s DIP packaging and rugged design make it a great option for quickly breadboarding up some motor control for your project.

The MCP3008 is an 8 channel, 10bit Analog to Digital Converter (ADC) that is a very popular option for projects that need to monitor analog signals. The MCP3008 is an especially good match for the Raspberry Pi which doesn’t have an ADC built in, but which can talk to the MCP3008 using its SPI interface.

Building a Raspberry Pi Robot and Controlling it with Scratch – Part 2

Welcome to the second part of our series of posts, describing the workshop we ran at the recent Digimakers event at @Bristol. In the last post we described the outline of the workshop and looked at the hardware of the Raspberry Pi robot that we built for the event. In this post we describe the software running on the robot, and how we set it up. Hopefully this post will give some useful ideas for those wanting to set up their own Raspberry Pi robot.

Continue reading

Talking to a Bluetooth Serial Module with a Raspberry Pi

Bluetooth is a very low cost and flexible way to add wireless communication to your projects. However, it can also be a bit tricky to set up. In this post we show you how to set up a Raspberry Pi with a USB Bluetooth dongle so that it can communicate with an Arduino using a Bluetooth serial module.

Once the set up is complete, we’ll have a new serial port on the Raspberry Pi that can be used to communicate with the serial Bluetooth module, either using a program such as Cutecom, or using one of the many serial programming libraries such as pySerial. Continue reading

Building a Raspberry Pi Robot and Controlling it with Scratch – Part 1

Last weekend we ran a workshop at the Digimakers event at @Bristol where we taught people how to program a Raspberry Pi robot with the Scratch programming language. It went really well, and it was amazing to see kids as young as 7 grasp the basics of robot control, and produce some really good control programs. Quite frankly, our careers are obviously in jeopardy once they reach the jobs market. :)

This is the first in a series of posts where we describe the basics of how we built the robot, programmed it and put on the workshop. All of the workshop code, and the workshop worksheet can be found here if people are interested in recreating our work.

Continue reading

Getting Started with the Dagu Arduino Mini Driver Board

If you want an affordable way to drive DC motors, to control servos, and to add an ADC to your project, then the Dagu Arduino Mini Driver Board could be well worth a look. It can be hooked up to a Raspberry Pi with a USB cable to provide the hardware interface for a Pi project. Or alternatively, it can be used alone as a much smaller, and cheaper alternative to an Arduino with a motor shield.

Documentation is a bit thin on the ground for this board however, so we thought we’d put together a simple getting started guide, and show you how you can use the Mini Driver to control some motors.

Dagu Arduino Mini Driver

Continue reading

Early Work on a Raspberry Pi Rover Kit

We’re going to be running a workshop at the forthcoming Digi Makers @ Bristol event showing people how they can control a robotic rover with Scratch. So we thought we’d share a picture of the Raspberry Pi robot we’ll be using for the event.

The Dagu Explorer PCB which we use to drive the motors on the Rover 5 chassis has a 5V voltage regulator which is rated at 1.5A so we can use that to provide power to the Pi. Not 100% sure yet how well it will cope with both WiFi and when the motors are running at 100%, but it seems very stable with the hardware we’re using for the workshop which is the Raspberry Pi camera and a bluetooth dongle.

Ideally we’d like to develop this into a full blown Raspberry Pi robot kit that we can sell alongside our Seeeduino/Arduino based robot kit, but we’re focussed on delivering a good workshop first. :)

Our expanding collection of Rover 5 robots

Our expanding collection of Rover 5 robots

New Digs

It’s been really hectic here over the last few days, as we’ve been busy moving into our new offices, but we’re finally in, and can now get back on with making robots. :)

incubator_sign

Incubator sign

We’ve been lucky enough to secure a place in the new Technology Incubator that recently opened at the Bristol Robotics Laboratory. The Bristol Robotics Laboratory is one of the biggest and best robotics laboratories in Europe, and this move gives us much more space, and a much better environment for developing our new products.

dawn_robotics

The new office space