Guide Online Contribution
Contributing to the Wiki directly from the browser
In an effort to make contributing to the wiki and to FreeCodeCamp in general, this tutorial will walk you through the process step by step.
Requirements
- Stable internet connection.
- A GitHub Account. If you don't have one then click here to create one.
- Learning to write on Github. A quick reference to GitHub Markdown
Instructions
Navigate to the Wiki. You will encounter something similar to the image in Figure 0a below. This will give you three options to add changes for your pull requests. They are by no means numbered in the way you should try them, I just went from left to right. Each one have their purpose.
Figure 0a
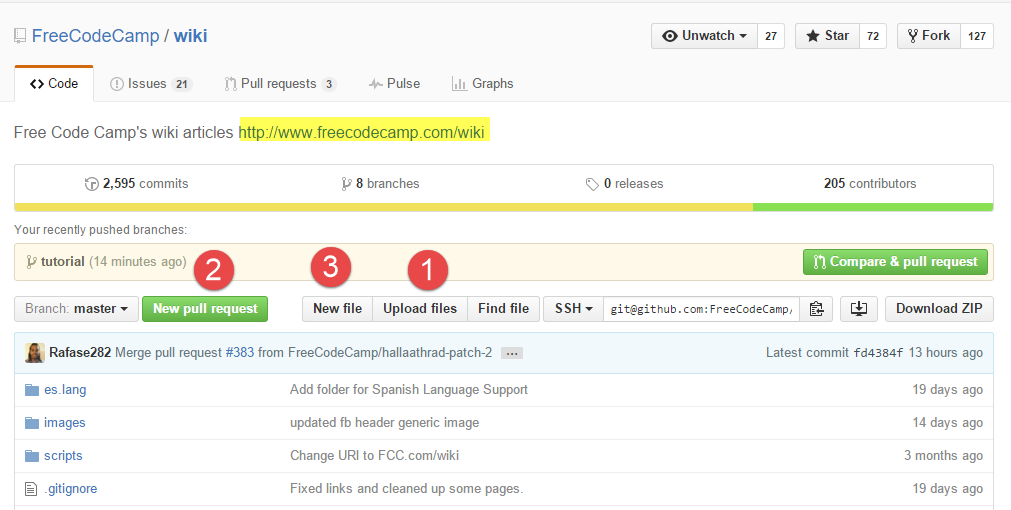
1. Upload Files Button
If you have already created the files, which should be .md files for Markdown or if you are contributing source code then feel free to use the adequate file extension.
After you select it, you will see something similar to Figure 3a bellow. You have the following options:
- Drag or select files to upload: This allows you to actually add the files, any files, so be careful with what you upload.
-
Remove Files: If you press the
xit will remove the unwanted files before you proceed. - Add Title: This will let you add a title for your pull request. Please try to use a self descriptive but short title. You will have a place to add as much detail as you like.
- Add Details: Below the title you can add extra information using Github markdown. This means you can add links, images, videos, checklists, and everything else that is supported. Please see the link in the Requirements section.
-
Select how to contribute: If you have write access like me then you can commit directly which is strongly advised not to do even for the core team. However, regular users will be unable to select this option anyway. The best way is to create a new branch for the pull request as seen on Figure 1b. This allows you to write a name for the branch. It is suggested to use a descriptive name that will give a glimpse of what the branch is about, for example
wiki-guidefor this guide, orPalindromesfor an article about palindromes. The name shown on the image is an example of a bad name!-
Figure 1a
-
Figure 1a

After you select your files, you will be presented with a screen like Figure 1b & Figure 1c where you have the options to:
- Change Base branch: Always select master unless you know what you are doing. The base should be the target branch.
- Compare to branch: This should be the branch you create for your pull request.
-
Details: As before, you will have a chance to change the title and details which will have the previous values.
-
Figure 1b
-
Figure 1b
Files Preview: You will have the chance to see what your files look like from Figure 1c. Note that here I changed the actual pull request for another one with a better branch name and a draft of this guide instead of just random images.
- You can select to view the code with differences between the previous version and the new one if you are modifying an existing file.
- The current view is the Rich difference that allows to view the changes on the same file, red for deletions, green for additions. Lastly you have the option to view the file as if it was live.
-
Figure 1c
-
Figure 1c


Next is to click on Create pull request. it is the green button and it will take you to view your pull request. it will look similar to Figure 1d bellow.
-
Figure 1d

The first thing you will notice is the title with the pull request number, in the example it is #393. Next, is the status of the pull request, it will either be Open, Closed or Merged.
You can click on the tabs to view the commits. Always try to have everything in one commit, or as few as possible if you have a good reason to have more than one commit. If you have multiple commits and need to squash them then follow these instructions.
That's it, you can reference people by adding @ before their name. You can reference other issues or pull requests by adding their id, which would be #393 from the example in Figure 1d.
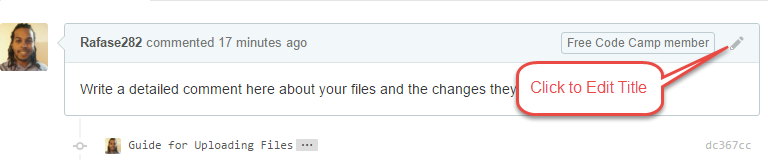
If your pull request closes an issue then you can add Closes # followed by the issue number. Once the pull request is merged then the issue will be automatically closed. You can edit the title or details if you are the one who created the pull request. Figure 1d shows how it will look for someone who did not create it.
The following is how it looks when you are able to edit your own pull request.
Figure 1e
Always delete the branch after the pull request has been merged or closed. There might be cases where this will be done automatically, but if for whatever reason you see something like in Figure 1f then press delete.
Figure 1f

2. New Pull Request Button
This is used to create pull requests from files that are already in existing branches, not really for adding new files. So if you are looking to add new files then check the other options. It will look like this:
-
Figure 2a

You will have to select the base branch which and then select the branch you want to submit a pull request against to. This means your changes are already on the branch and for some reason you did not submit the pull request before. Because of write access being required regular users should not be able to create new branches on the repository.
Once you select the branches you will get something similar to Figure 2b below.
-
Figure 2b

If you want to use a fork instead of a branch then you will click the link and get something that looks like the image from Figure 2c bellow.
-
Figure 2c

Going back to Figure 2b you will note that you get information like the base branch, the branch with your changes, and how many commits there are along with file changes. From there it's the same as the tutorial for uploading files, please see Figures 1b and onwards with the details that come along with it. But basically you just fill out the details and submit the pull request.
However, something new is the fact that you can Assign people, usually contributors with the Assignee Option on the far right side of Figure 2b. Above it, you will select the milestone for the pull request if any, and above that, select the labels that would fit your pull request. These are all optional though. If you want to learn more about labels then check this article.
3. New File Button
This is the option to choose if you want to directly create your files and submit a pull request from the browser. Unlike the New Pull Request button, this option allows you to create new files.
Figure 3a

As you can see from Figure 3a there are similar options when it comes to creating a new file for a pull request online. This is the way to directly contribute from the web, even from your smart phone!
-
File Name: This will be the file name with extension include to create it. it is required. Please do not use weird character or white space, use
-if you need space and Keep the first letter capitalize for better styling. - File Content: This is the area where you write the content of your file.
- Preview Tab: This allows you to preview your file.
- Title: This is where you must write a title for your pull request to let everyone know what the commit is about. The title should be descriptive but not too long .
- Extra Details: Here you can add more details if needed.
- This option is for committing directly instead of using a pull request. This will be grayed out for regular users, only admins can write directly to the repository.
- This is the way to go, it will let you create a new branch to create the pull request from. It will also give you the option to write a branch name, use a self descriptive one.
- Send the proposed pull request. The rest is like Figure 1b and onwards with confirmations and such.
Editing Existing Files
Besides creating new files, you might also need to edit existing ones for which you will need to locate the file on the repository. Clicking it will give the following view:
Figure 4a 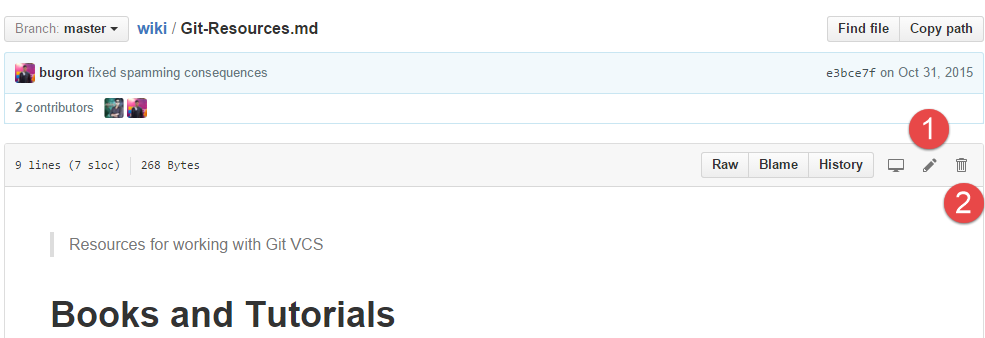
- The following is the view that a regular user would get as they do not have write access. Please note the message in blue. Everything else is pretty much standard now, if not see Figure 1b and onwards. However, this is the most accurate view as it is from a non admin account.
-
Figure 4b
-
Figure 4b

- Clicking the trash bin will create a pull request to delete the file.
- Deleting the file is very similar, just add the details for the pull request information.
-
Figure 4c
-
Figure 4c
- Deleting the file is very similar, just add the details for the pull request information.

If you have any further questions feel free to come over the Gitter chat and ask for help, see the list or if you need help with the wiki the visit the room.