- Download the controller by going to the polargraph download area and get the most recent bundle.
- Unzip it. You’ll find there is an application inside called polargraphcontroller. Run it!
- If it doesn’t run (sometimes it doesn’t), you’ll need to run it from source code. This article on the Polargraph wiki explains how.
- Machine width in mm – use the value you measured earlier
- Machine height in mm – use the value you measured earlier
- mm per rev – set it to 95 (why? This is the length of string dealt out by one revolution of the motor)
- Steps per rev – set it to 200 if you have a PolargraphSD v2 bought after July 2014, otherwise it should be 400 (why? This is the number of whole steps that the motor is capable of making)
- Step multiplier – set it to 8 (why? This is the default microstepping value for the polarshield – this sets the internal resolution that the machine uses while moving)
When you press save properties in the top left corner, it saves your changes to it’s own internal properties file, so they will be there when you close and restart.
Connect your PolargraphSD
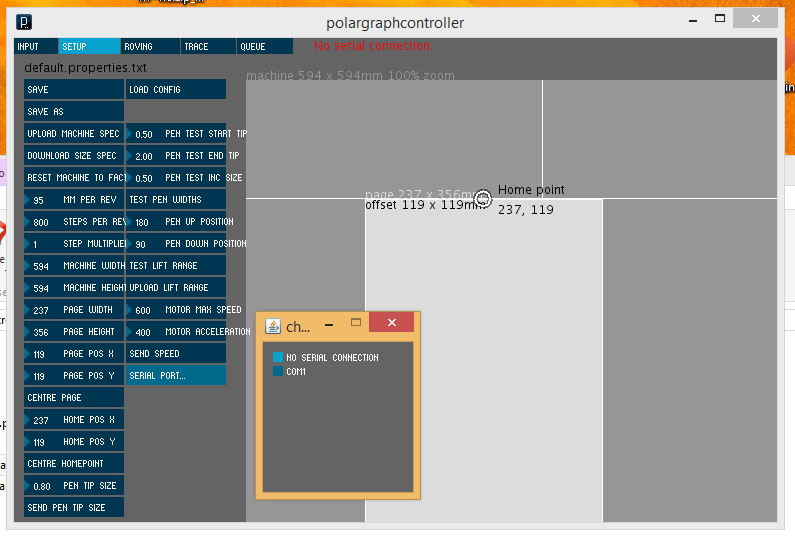
If you’ve plugged your machine in already, unplug it now. Restart the controller app and go to the setup tab, press the serial port button. It’s the last one in the control panel. A smaller window should pop up with the list of currently available communication ports. You might have one, you might have a few, you might have none!
Now close the controller entirely, plug in your PolargraphSD machine and wait a moment while any drivers are installed.
Start the controller again, and look again at the communication ports – you should see one extra has appeared. This is the virtual COM port that your PolargraphSD is connected on.
Select this new COM port, and keep an eye on the very top line of the main polargraph controller window – it should go green in a few seconds if you have selected the correct port.
(If no port appears, then the drivers might need to be installed manually – to all intents and purposes your machine is an Arduino Mega2560, with an FTDI driver chip. Have a look at the main Arduino installation pages for MAC OSX, Windows. If you are on Windows 8 and having problems with drivers not being found, or the Mega2560 showing up broken in device manager, it might be because by default, Windows 8 requires drivers to be digitally signed to install. This helpful illustrated page has a guide to changing that so you can install them.)
The Command Queue
The command queue is the list of commands waiting to be sent to the polargraph machine. It is shown to the right-hand-side of the machine preview in the controller. The header can be clicked on to make it run or to pause it. When you start up there are a couple of commands pre-loaded. These set the speed of the machine, and the pen size.
When you click the red header at the top, you will see the commands being to be sent to the machine until there are none left.
Send your machine specification to the machine
The machine doesn’t know how big it is yet. After you have entered your machine size into the controller, you can tell it by pressing the upload machine spec button. This sends a couple of commands to the machine, telling it how wide it is, what kind of motors it has, how big it’s sprockets are, that kind of thing.
The machine saves these settings internally for next time.
- Back to setup page
- In the box
- Build the machine
- Connections
- The gondola
- Touchscreen controls
- Controller application
- Troubleshooting!
- Updating firmware
@todo finish this.
Links to the instructable:
http://www.instructables.com/id/Polargraph-Drawing-Machine/step11/Controller-software-install/
http://www.instructables.com/id/Polargraph-Drawing-Machine/step12/Controller-software-Primer/
Does your software work with adafruit motor driver?
There is a version of firmware that runs on a MEGA or an UNO with the Adafruit Motorshield v1. It uses the AFMotor driver.
If you follow the links to the instructable (above), then you’ll find a whole guide about how to assemble one.
Pingback: 2D PLOTTING – BRENCHIE'S || LAB
so i am trying to experiement with your software for the polar graph.. Excellent work by the way
I got as far as uploading an image and getting the “standard” polargraph pixels
but how do i do things like trace image or more random scribbles…
how does the trace tab work…
there is not to much in the way of more advanced options on your software.
could you make a more in depth video perhaps on the software, so we know how to use the functions more thoroughly.
I wanted to trace images, rather than use pixels or i wanted to have random scribbles for photo images so its more like “art” ish style drawings.
Thanks Sandy
Did you see the last video on the most recent blog post, titled “PolargraphSD – Vector trace and draw from SD card”?
Here: https://www.youtube.com/watch?v=0xNSaxnORdg or of course on the very front page of polargraph.co.uk for the last month.