So this is the real star of v1.2: The norwegian pixel.

- Save your source image as a greyscale PBM or PGM file, and put it on the SD card. Note that GIMP saves PBM files as 2 colour dithered files, so you need to export as PGM to get it to work there. Photoshop just saves in whatever format the image happens to be in, so make sure you convert to grayscale (not RGB or indexed) before saving.
- Put the SD card in the PolargraphSD and turn it on.
- Open the controller and drag a selection box where you want to draw your picture. For one reason or another, you do need to have an image loaded before you’re allowed to drag a selection area. I just noticed that. But the image you load is nothing to do with what you’re drawing.
- On the roving tab, click set roving area. This tells the machine where you want it to start.
- Click draw norwegian… and enter the filename of your image file.
 Click trace outline and the machine will quickly draw an outline of where the image will be. The image will be scaled so that it is the width of the rove area, regardless of how tall that works as being. So really the height of the rove area is irrelevant.
 - Choose the amplitude (row width) and the wavelength, and hit submit to send the command off to the machine.
- Wait many hours.


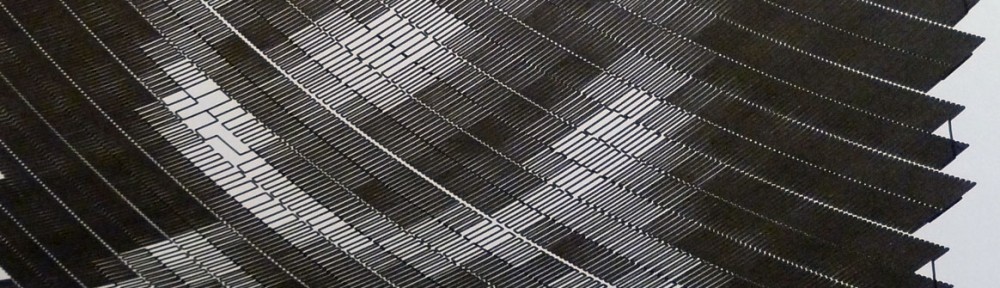
I haven’t done an awful lot of testing of this, but the initial results are beautiful.
HOWEVER, I have noticed one issue – there are regularly spaced breaks in each row, some more obvious than others. This is because of the way the beaded cord slips on the sprockets, and it’s a problem I actually expected to see before now. The issue is that the beaded cord is not manufactured to very close tolerances, so the sprockets are rarely a perfect size. It means that each beads-worth of rotation, there’s a little slip while the beads pull taut into the teeth.
There isn’t really a solution as far as I can see, as long as there’s even a mismatch between the circumference of the sprocket and the length of a piece of cord with the same number of beads, there’ll always be a little period where it falls forward.
Note that I think it’s only a problem for machines with beaded cords – if you use reels of thread and smooth bobbins, you’ll be fine.
–EDIT I goofed a bit with the various firmwares, and half the stuff didn’t work. I’m a bit puzzled how I didn’t notice, but there you go. Anyway, I’ve fixed a bunch of stuff, so if you had problems with the newest stuff, give it another shot.
Hi Sandy,
I know Iam a bit of a nag here, but is the Norwegian Pixel Style going to work with a tethered Polargraph? (If not i might just have to upgrade if the evolution of awesome SDonly functions goes on 😉 )
Stephan
There’ll only be maintenance updates for the regular polargraph Stephan, so all the good stuff comes with the SD I’m afraid 🙂
A few of those functions _could_ be squeezed into the tethered machine, if other bits are taken out. Actually all of the features _could_ be implemented as features in the controller, but something like the norwegian pixel would be so slow because each wave would need to be sent as a separate command. That could be a few thousand commands per row.
I just gave it a go, and it wouldn’t go. 🙁
When I send either a trace or render norwegian command, nothing happens (other than the command being displayed on the touchscreen and the controller’s “current command” line).
After trying many times, and catching myself making many mistakes (it seems I forget one step or another with every attempt), I decided to try an ol’ fashioned polargraph drawing just to make sure all was otherwise normal. Unfortunately, I got the problem mbcook has described in the forum (gondola tries to shoot higher than possible).
HA! You and mbcook discovered the hidden feature! It doesn’t work! Oops. Actually I found more than a few problems, have updated the code in the repo and rebuild the hex files. Sorry bout that guys.
Hi,
I have got one question for planning my works while exitedly waiting for my SD. Is is possible to get a plain black background like wirh the original norwegian drawbot? with your drawing all black spots are interrupted with white lines. so can you set the amplitude to a value that no paperwhite comes through?
cheers stephan
Don’t see why not Stephan, at the moment, amplitude and row-width are one and the same, but no reason why I can’t apply a multiplier (1.1) to the amplitude to increase it by 10% or so. A bit like the pixel size multiplier.
The gaps are caused because of the shape of the wave: It’s just a straight line up and down, with no “along” at either end, so the tip drags behind the gondola and doesn’t reach the extremes of the wave. The real norwegian machine only waves in one direction. It’s baseline is along one side of the row, whereas mine is down the middle. I might try a few experiments to see if moving the baseline will make any difference.
But adding a big weight to the gondola will probably make the biggest difference too, pull it more taut. Notice the norwegian machine has a big brass weight hanging from it. Multiplying the amplitude is a bit of “cheat” that I’d prefer to avoid, but it also might be the easiest way to get it solid.